


Mia Teal
Marketing Coordinator, Paid Media
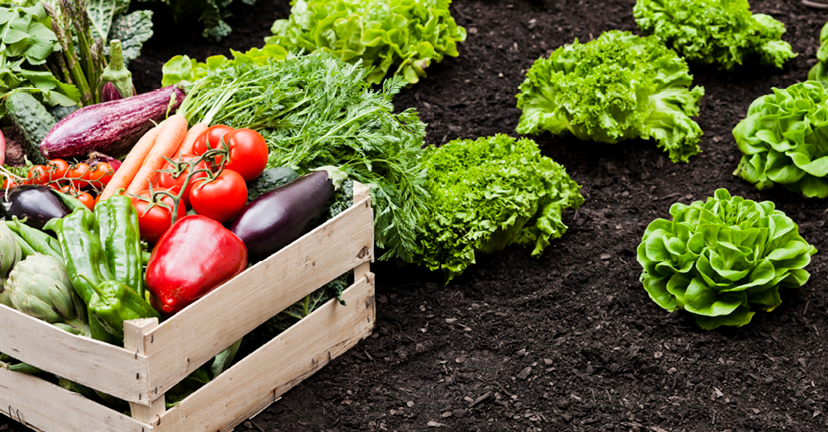
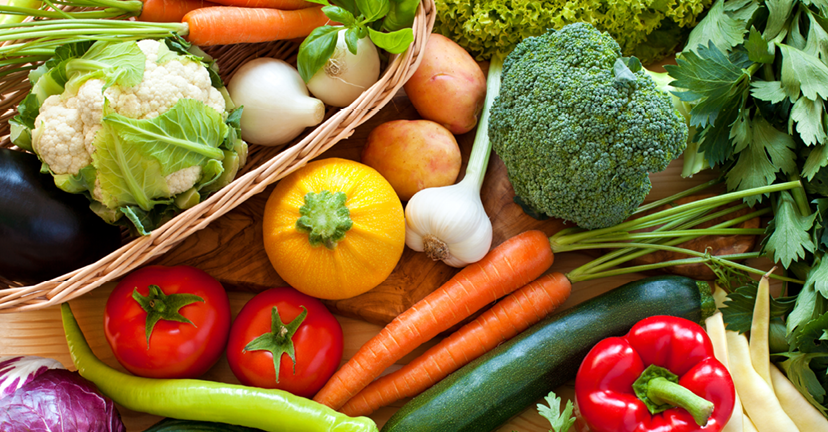
It is that time of year again where many people will start up gardening. Gardening is a great way to save money on your favorite vegetables and get a great deal of exercise in as well. Additionally, did you know that gardening actually helps the environment? Growing your own vegetables helps reduce carbon emissions. So what are we waiting for? Let’s get growing!
Tips & Tricks on Gardening Favorites
We picked out three commonly grown vegetables and provided some tips and tricks on how to succeed this gardening season. Find out how below!
Tomatoes:
- Tomatoes, like people, love the sunshine! Make sure that your tomatoes are in a position where they will get ample sunshine to grow strong.
- Tomato plants can be planted a lot deeper than other vegetables. A full two-thirds of the plant should be underground. Seeds should be planted one-eighth of an inch underground. By planting tomatoes deeper in the soil, you are allowing for stronger, more resilient roots.
- Tomato plants need 1-2 inches of water in total per week. Remember not to do this all at once.
Peppers:
- Unlike tomatoes, peppers must be in a shaded area, as they are very sensitive to heat.
- Peppers require 1-2 inches of water per week, but make sure to space out your waterings. Peppers need days in between for dryness. Slow dousings of water are beneficial for peppers.
- Plant peppers 18-24 inches apart.
Carrots:
- Carrots require a lot of sunshine – about 6-10 hours a day.
- Carrots are slow to germinate. They typically require 2-3 weeks to emerge, so don’t give up on these guys!
- Water carrots frequently, but do not douse them as you would with peppers. A shallow watering will do.
As you start harvesting your crops, you will want to make some homemade meals out of them. Check out some of our recipes below!
Grilled Veggie & Quinoa Bowl: This fresh blend of vegetables includes tomatoes, corn, green onions, and avocado, however, add in more of your garden vegetables for even more color!
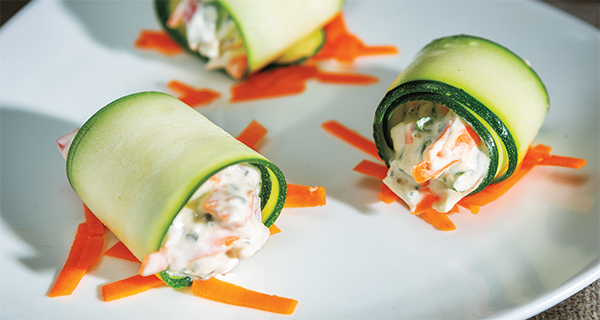
Zucchini-Vegetable Rolls: With only 5 ingredients, this is a great appetizer to put out for your Mother’s Day or Memorial Day celebration. The only ingredient you would have to purchase is the PICS cream cheese!
Shrimp and Grits Stuffed Peppers: Fresh peppers from the garden with delicious seafood and grits…Need I say more?
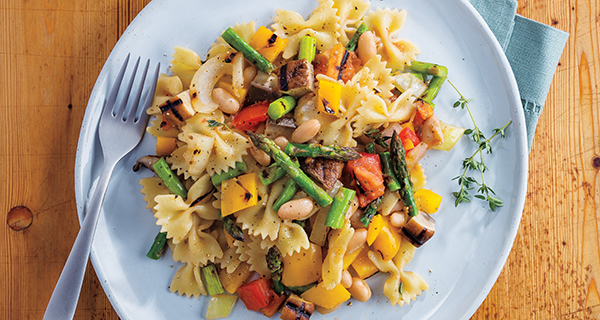
Grilled Vegetable Pasta Salad: What is an outdoor barbeque without the pasta salad? Better yet, you have our permission to brag about your freshly-grown garden vegetables in this salad!
Shop Our Seed Packets

Mia Teal
Marketing Coordinator, Paid Media
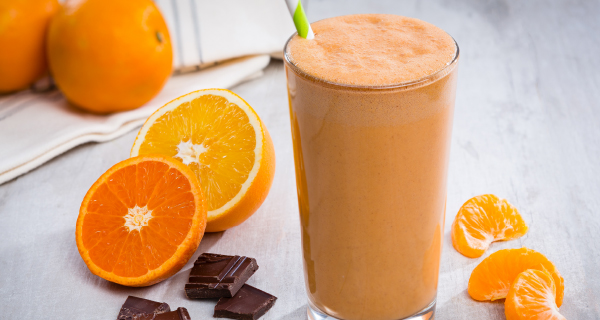
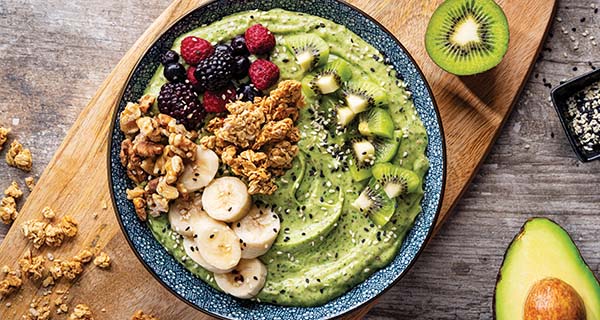
June 21st is National Smoothie Day, the perfect occasion to blend up some delicious and nutritious smoothies! Whether you’re a fan of fruity, creamy, or green smoothies, or even a hearty smoothie bowl, there’s a recipe out there for everyone. Let’s explore some delightful smoothie recipes & helpful tips that will make your celebration truly refreshing.
Tips for the Perfect Smoothie
- Balance Your Ingredients: Aim for a mix of fruits, vegetables, protein, to create a well-rounded smoothie.
- Freeze Your Fruits: Using frozen fruits can help create a thicker, creamier texture without the need for ice.
- Sweeten Naturally: Opt for natural sweeteners like honey, agave syrup, or dates.
- Experiment with Liquids: Try different liquids like coconut water, almond milk, or oat milk.
- Don’t Overdo It: Keep an eye on portion sizes and the amount of sweeteners to maintain a balance.

home.grown. Farm Feature: Reeves Farms
Jack Gelok
Marketing Intern
A Berry Sweet Legacy: The Story of Reeves Farms
It all started with a young 18-year-old coming from Draycott, England to Jacksonville, New York. His name was Arthur Thomas Reeves the founder of Reeves Farm. Arthur started out working on his aunt and uncle’s farm, but by 1898, he and his wife Mary had saved enough to buy their own patch of paradise on what is now known as Reeves Road. With eight kids running around, the Reeves family was starting a farming legacy.
The Fast-Paced World of Farming
In the mid-1920s, Arthur’s son Edward, along with his wife Flossie, took the reins and moved the farm a bit further down Reeves Road. They focused on crops and milking cows. Their son Cecil, after a stint in the Navy during WWII, decided he’d had enough of cows and set his sights on crop farming. Cecil and his wife Dorothy juggled raising nine kids and growing vegetables and grain, proving that farming really is a family affair.
60’s Expansion
By the 1960s, the farm was expanding faster than you can say “strawberry shortcake.” Cecil and Dorothy bought more land, growing fresh market vegetables and berries. Their hard work laid the groundwork for the farm’s next big leap.
The Reeves Farm Today
In 1990, Cecil and Dorothy handed the keys over to their sons Bruce, Mark, and Brian. After Bruce left the partnership in 1992, their brother Andy joined the team. Today, two of Mark’s children, Nolan and Karin, are also part of the farm’s management, making Reeves Farms a true multi-generational operation.

The Reeves Family Looking into the Future
What makes Reeves Farms extra special is their commitment to sustainability. They use Integrated Pest Management, reduced tillage, cover crops, crop rotation, and organic production to keep the soil and water healthy. It’s all about farming smart to ensure this land can keep producing mouthwatering berries and veggies for generations to come.
National Fruits and Vegetables Day
This week features #NationalFruitsandVegetablesDay and we’re celebrating with a variety of produce-centric recipes to try this season. Each with a unique variety of flavors and tastes for your summer fun. Whether it’s a main dish, side, or a treat to stay cool – we’ve got you covered with a summer’s worth of new dishes. Check them out below!
Grilled Vegetable Pasta Salad: Add a twist to your pasta salad with grilled veggies. They add a tasty crunch to a classic summer side.
Greek Stuffed Eggplant: Eggplant stuffed with delicious and refreshing ingredients.
Grilled Corn with Parmesan Spread and Basil: Corn is a summertime favorite, and ours is made locally. Throw it on the grill and add this flavorful parmesan.
Grilled Lemon Garlic Chicken Salad: A refreshing salad is perfect for the summer heat, and the lemony, garlicky aroma this recipe brings is a wonderful take.
Indian Spiced Cauliflower with Garbanzo Beans and Tomatoes: This recipe is packed with flavor, and it takes cauliflower, tomatoes, and garbanzo beans to a place you may not have tried before.
Grilled Veggie Quinoa Bowls: Quinoa bowls are super refreshing, and grilled veggies are a summer hit. Add them together for the perfect meal.
Hummus Stuffed Cherry Tomatoes: A delicious and light recipe. Perfect for an appetizer at your next cookout.
Watermelon Blueberry Pops: Cool down with these DIY Watermelon Blueberry Pops to complement your summer fun.
Campfire Skillet Strawberry-Peach Cobbler: Nights by the fire make for some of the best summer relaxation. This cobbler makes them even better.
Watermelon Bites: A tasty and refreshing appetizer or snack option.
Watermelon Pico De Gallo: Throw a summery twist into your dip by adding watermelon to your pico de gallo.
Crunchy Slaw with Creamy Lime Dressing: Coleslaw is another refreshing summer side dish. This tasty take might become a favorite.
Ellie Wilson
MS, RDN, CDN
History
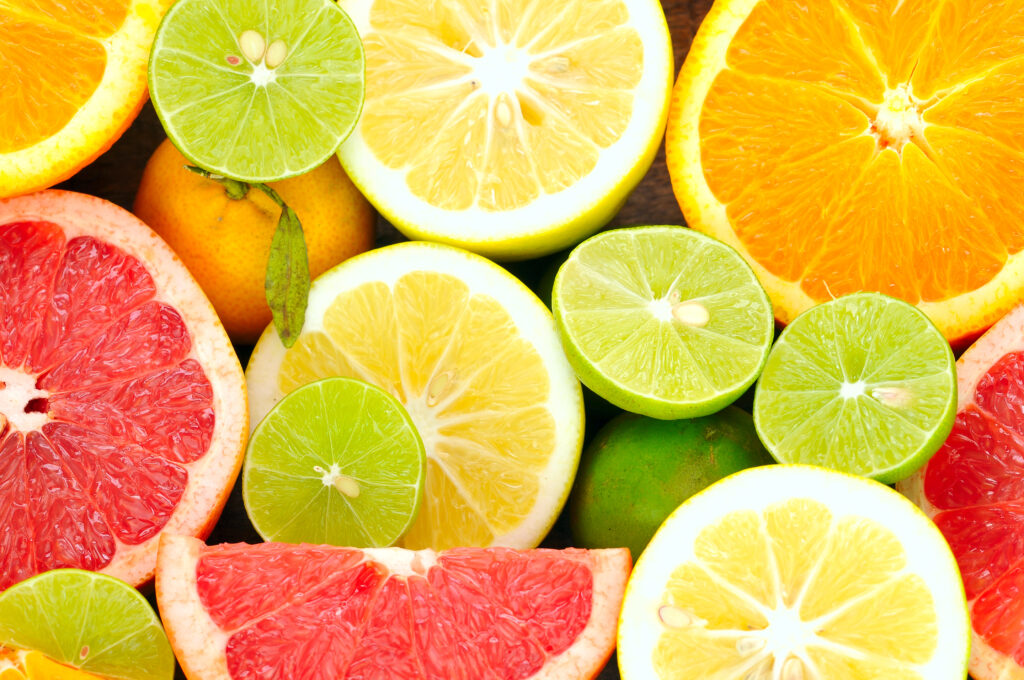
Vitamin C Day was started in 2019 by a skincare company (Skinceuticals ®), when their scientists showed that some Vitamin C can be absorbed by the skin. This is an important find, as Vitamin C is a key nutrient for skin health and production of collagen, a structural protein found in all connective tissues in our bodies. Vitamin C (ascorbic acid) is an essential nutrient – essential means it must be obtained by eating and drinking because humans cannot make it. Vitamin C is important to many body systems, and research is always reaching to better define roles and mechanisms, especially for preventive health efforts like reducing incidence of cancer or heart disease.
Natural Sources
Vitamin C is found in multiple foods, including all citrus fruits, bell peppers, tomatoes, potatoes, strawberries, and cruciferous vegetables including broccoli, cabbage, cauliflower, and Brussels sprouts. Many foods are fortified with Vitamin C, and it may also be a functional ingredient that maintains freshness. It is so commonly available in foods typically eaten by Americans; it is rare to find a deficiency. It was long recognized that citrus fruits contained a substance that prevented scurvy, a disease that killed sailors from the 1500-1800’s, but the nutrient was not actually identified until 1932.
Supplements
Many people increase their intake of Vitamin C via foods and supplements to ward off chronic health issues, or perhaps when a cold is coming on. In the 1970’s, Linus Pawling, a scientist, and proponent of mega dosing Vitamin C, recommended the equivalent of 12-24 oranges, to support overall health. Vitamin C is a water-soluble vitamin, which means our bodies do not store it well. Due largely to Dr. Pawling’s recommendations, it was not uncommon for people to take high potency supplements of 1000 mg or more, but that is rarely recommended now. In fact, though well-recognized as an antioxidant, at very high levels it can become damaging to cells.
Current Guidelines
The Recommended Daily Amount for adults 19 and older is 90 mg for men and 75 for women. Children’s needs are lower and defined by age and stage of growth. High intake over time results in lower absorption once the body’s limited stores are maxed out. Though it is not toxic, the Tolerable Upper Limit (the maximum amount generally recognized will not cause harm) is 2000 mg per day. Excessive Vitamin C can result in nausea and other GI issues. High, excessive intake of Vitamin C can backfire if it is suddenly stopped – a person that pivots from excess to none can develop rebound scurvy. Despite prevalent belief that Vitamin C can prevent colds, research has so far shown limited benefit, though it may be helpful to reduce virus duration.
Food First
Ensuring you get enough Vitamin C is a great motivator for eating more fruits and vegetables, preferably often over the course of the day. The benefits of eating more produce stack up as other nutrients come along for the ride, such as Vitamin A, fiber, bioactive substances (polyphenols) and water. Vitamin C enhances absorption of iron, which is important to children, pregnant women, and anyone with malabsorption due to intestinal issues or perhaps even a medication interaction. To get the best food benefit, pair higher iron foods, like cooked, unprocessed red meats, legumes, and iron-fortified foods with foods high in Vitamin C to enhance natural absorption of iron. Despite prevalent belief that Vitamin C can prevent colds, research has so far shown limited benefit, though it may be helpful to reduce virus duration.
Best Practices
Enjoy a wide variety of fruits and vegetables – the more you eat, the more likely you are to meet the RDA without a supplement. If you are concerned, ask your health care provider or registered dietitian-nutritionist to assess if you would benefit from a supplement and why, as well as ensuring there are no concerns about current medication/supplement interactions by sharing supplement information with your pharmacist. If supplements are needed, keep them lower dose and consider using every other day. The RDA is based on a weekly average – you are sure to get some Vitamin C most days and can fill in gaps with moderate supplementation.
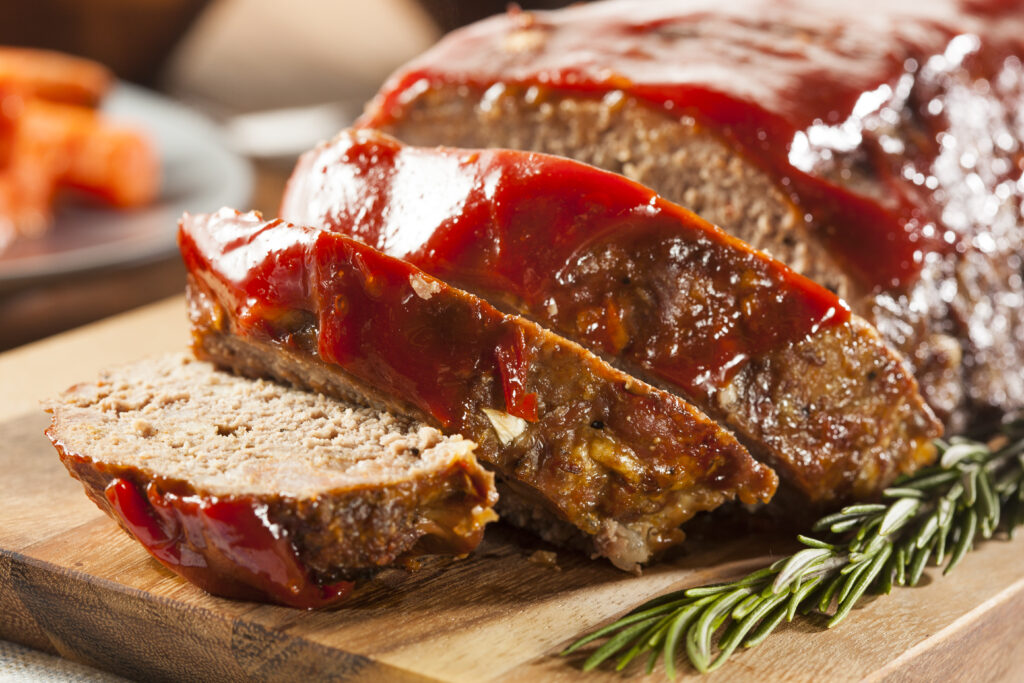
These meals are crowd-pleasers, timesavers, and budget buddies – we bet there won’t be any leftovers either! Market 32 Meatball/Meatloaf Mix is freshly seasoned so you have a delicious base to build with. Let’s check out this week’s ingredients, shall we?
Meatball Slider Bake
1 lb. Market 32 Meatball/Meatloaf Mix
1/2 lb. Market 32 Deli Sliced Provolone
1 jar (24oz.) PICS Marinara Sauce
1 Yellow Onion
1 Seedless Cucumber
1 package Bakery Brioche Buns
Shop for Meatball Slider Bake here!
Meatloaf
1 1/2 lbs. Market 32 Meatball/Meatloaf Mix
1 1/2 lbs. Sweet Potatoes
1 pouch PICS Beef Gravy
1 bag Pero Farms Green Beans
Shop for Meatloaf here!
Meal 1: Easy, Cheesy Meatball Slider Bake and Cucumber Salad
A crisp, bright side salad brings crunch and zest to complement the savory, cheesy sliders. YES!
Essentials: 2 cutting boards, large, serrated knife, sheet pan, Simply Done Aluminum Foil, 2 Simply Done gallon storage bags, large bowl for salad, paring knife, vegetable peeler (optional) liquid measuring cup, meat thermometer
From the Pantry – 3 TBSP PICS Unsalted butter, melted; PICS White Vinegar, PICS Sugar, Italian Spice Blend
Food Safety notes: Wash hands before and after handling raw and cooked meat. Wash cucumber before slicing. Use separate cutting boards and knives for each food group.
Directions:
– Preheat oven to 350 degrees.
-Place 2 sheet pans on the counter, and cover with aluminum foil. Spray aluminum foil with PICS Vegetable Oil. Count the number of rolls in the package of rolls you are using, and plan to make the same number of meatballs. For this recipe, we will use 12 as the number of rolls and servings.
-Place 1 cutting board on the counter, and transfer meat from the package to the board. Flatten the meat slightly, and lightly score with a butter knife in a cross-section pattern to get to the # of sliders/servings you need.
- For example, scoring 3 lines from left to right, and 4 from top to bottom should yield 12 even-ish portions that can be cut and rolled into meatballs. (Hack/optional – Use the 2 storage bags as “gloves” to make meatballs, (you can secure with a rubber band or chip clip) rolling them to your preferred size, and flattening slightly as you place them on one of the sheet pans. Put the meatballs in the oven to cook for about 20 minutes, or until an instant read thermometer says 145 degrees. Remove from the oven and place the pan on top of the stove, allowing it to cool for a few minutes.
-While the meatballs are cooking, remove the rolls from the package and cut in half, placing close together on the second sheet pan.
-Place a ½ slice of provolone on the rolls. They can touch or overlap slightly.
-Place the warm meatballs on top of the cheese. Spoon PICS Marinara onto each meatball, then sprinkle with Italian Seasoning.
-Place second piece of cheese on top of the sauce, and top with the rest of the sliced bun.
-Brush the tops of the sliders with melted butter, and sprinkle with additional Italian Seasoning.
-Cover with foil and bake for 15-20 minutes, or until cheese is melted and meatball internal temperature is 145 – 160 degrees.
-While the sliders are baking, using the clean paring knife and clean cutting board, make the cucumber salad. Depending on the number of people you are serving, plan ½ cup sliced onion for each cucumber, assuming they are average size. If you prefer, peel the cucumbers with the vegetable peeler, then slice. I like to peel stripes for a nice presentation and added texture. Place cucumber slices and onion in the bowl. In a liquid measuring cup, pour ½ cup of white vinegar, ½ cup water, 2 teaspoons of sugar, and 1 teaspoon table or Kosher salt. You can also use apple cider vinegar if you prefer a sweeter vinaigrette, and a pinch of dried dill or parsley. Toss and set aside to serve with the sliders.
Meal 2: MMMMMeatloaf Dinner – Sheet Pan Easy
Essentials: 2 Simply Done Gallon Storage Bags, 2 Sheet pans, Simply Done Aluminum Foil, 1 cutting board, 1 chef knife, small saucepan, wooden spoon, large tongs, meat thermometer
From the Pantry: PICS Olive Oil, Cayenne pepper or other favorite spice.
Food Safety Smart – Wash produce before preparing, leaving the skin on the sweet potatoes and leaving the green beans in the colander to dry. Wash hands before and after handling raw meatloaf, even if you are using the plastic bag hack.
Directions:
-Preheat oven to 375 degrees.
-Prepare 2 large sheet pans with Simply Done Aluminum foil. Spray both pans with PICS Vegetable Oil.
-Hack – (optional) – using plastic bags as “gloves”, remove the Meatloaf Mix from the package and place it on one of the sheet pans. (You can also use bare hands, and wash again before touching other food or utensils.) Shape the meatloaf to a low, rounded loaf shape. Remove and discard the plastic bags. Wash hands again, and place the meatloaf pan in the oven, lower rack. Set a timer for 10 minutes.
-On the cutting board with the chef knife, cut the sweet potatoes into 4 lengthwise wedges each. Place them the second sheet pan on one end of the pan, skin side down, slightly apart. Lightly spray with PICS Vegetable Oil, and sprinkle with a pinch of cayenne or Cajun seasoning. When the set timer rings, open the oven, and place the second sheet pan on the upper rack. Set the timer for 10 minutes.
-Place the colander in the sink, or on a paper towel. Pour 2 TBSP of PICS Olive Oil over the green beans in the colander, tossing with the tongs to coat in the oil. Season with a sprinkle of garlic powder, if you like.
-When the timer goes off the second time, remove the upper rack sheet pan, spray again with vegetable oil, and spread the green beans on the empty side of that pan. Return the pan to the oven and set the timer for 10 more minutes.
-Combine beef gravy mix with approx. 1 cup of cold or boiling water, stirring vigorously with a whisk for 1 minute. Heat and simmer for another minute, stirring occasionally.
-When the timer goes off the third time, test the meatloaf with the thermometer. It should be about 158-160 degrees. Continue cooking until temp reads 160, 5 – 8 more minutes if needed. Remove the pan to the stove top. You can also check the tenderness and color of the sweet potatoes and green beans, removing them to a heat safe surface when the wedges are lightly browned, and the green beans are roasted and tender. Allow the meatloaf to rest for about 5 minutes before slicing. Divide the vegetables on 4 plates, along with sliced meatloaf. Add gravy as desired, and serve it up! MMMMMM……….
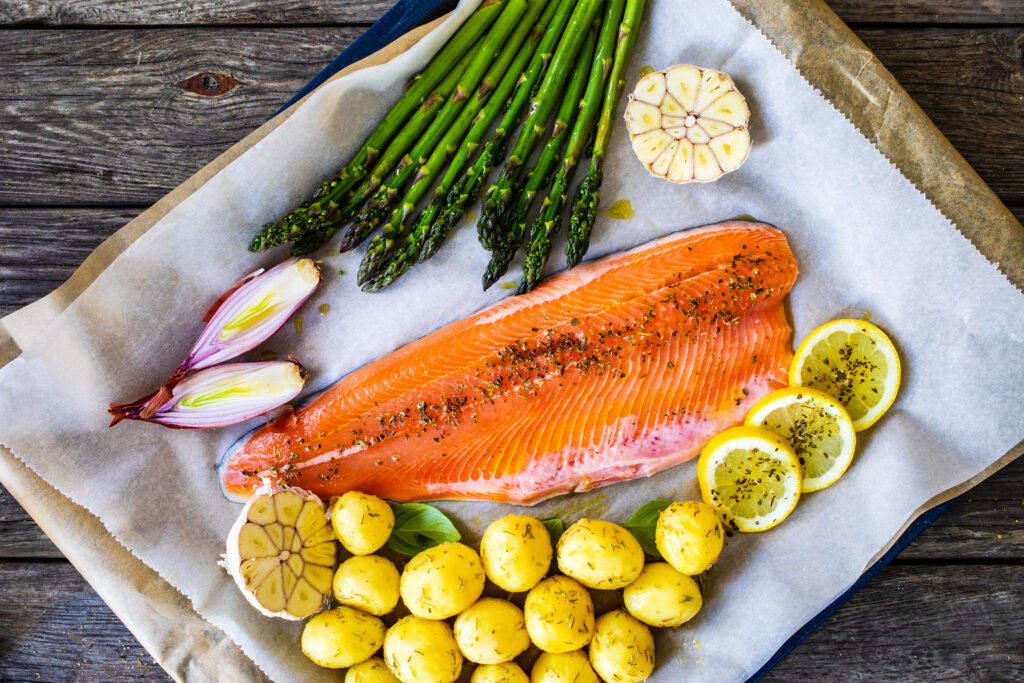
Seafood meals are smart moves for everyone, with a wonderful value story, too!
Seafood is a great, lean protein source, and recommended to be enjoyed at least twice per week by the Dietary Guidelines for Americans and the American Heart Association.
The Covelle items are frozen and individually cryo-vacced in their packages which makes it easy to plan and easy to keep on hand for busy days. Use 1, 2 or all 4 – great to have that level of quality and flexibility.
Quick-cooking – these frozen seafood filets can go from freezer to pan without defrosting – they cook up in a skillet or a sheet pan in 10 – 15 minutes, win-win for family meals!
Savory and satisfying – seafood is a culinary treasure, easy to season with your favorite spices, herbs and sauces. Stay traditional with lemon and garlic or explore the ocean’s treasures (and great variety of Cape Covelle items) and world flavors like chili-lime and barbeque rubs! Did you know, many seasoning blends are also lower or no sodium – you can get great flavor and manage sodium with blends by PICS, McCormick, Weber, Kinder and Badia.
Everyone can make these quick and savory favorites. Check out these ideas, tips, and hacks for delicious seafood meals! First, let’s take a closer look at our items needed for this week.
1 pack Cape Covelle Wild Caught Salmon (buy one get one FREE this week)
1 pack Cape Covelle Haddock (buy one get one FREE this week)
1 lb. Green Asparagus
1 bag Little Potato Company Gourmet Potatoes
1 pack Dole Chopped Salad Kit, Crunchy Taco
1 Avocado
1 pack PICS Tortillas
1 can (15 oz) PICS Black Bean Salsa
Planning ahead? Defrost filets in the bag in the refrigerator, up to 1 day ahead of when they will be cooked.
Sheet pan prep: Use Simply Done Aluminum Foil and a light spray of PICS Vegetable Oil to make cooking and clean up quick and easy. You can cook filets and fresh or on the same tray, with or without crimping the foil to create a barrier between different items on the same sheet pan.
Cooking from frozen? Tip – Some recipes call for rinsing the frozen filet, but that is not necessary. Use the 2-step directions below to keep your recipe and timeline on track. For seafood servings that are 6 Oz. or less.
Preheat oven to 425 degrees.
Sheet Pan Hack: Place frozen filets (if skin is on, skin side down) on the lightly oiled sheet pan. Cover filets loosely with foil for the first 10-12 minutes. This allows the filet to steam/defrost and maintain moisture. The same can be done with frozen vegetables. After 12 minutes, remove the foil covers. Season with herbs and spices, or a sauce, and return to the oven to finish for 10- 12 more minutes, or when an instant read thermometer reads 145 degrees.
Freezer to Skillet Hack: Set skillet and a cover that can be placed over frozen seafood on the stove. Spray skillet with PICS Vegetable Spray. Turn burner on low, and place filet(s) on the skillet. Place cover over seafood and allow to steam/sauté for 5 – 10 minutes. Remove cover and flip filets. Season or sauce and cook over low/medium heat until done, 10 – 12 minutes, until an instant read thermometer reads 145 degrees.
This Sheet Pan Salmon meal is a winner!
Reel in the simplicity with this delicious, easy meal.
Wash and trim the ends on the asparagus.
Hack: Place Gourmet Baby Potatoes on a microwave safe dinner plate, and microwave for 2-3 minutes. Move them around the plate to promote even cooking and microwave for 1 more minute. This will speed cooking so the salmon, asparagus, and potatoes all finish roasting at the same time.
Preheat oven. If seafood and veggies are not frozen, 375 degrees is fine.
Place salmon on one end of the pan, potatoes in the middle, and asparagus on the other end of the pan. Spread veggies and potatoes so they all have a spot on the pan, and none are stacked on top of each other. Spray seafood, veggies, and potatoes lightly with PICS Vegetable Oil if desired. Season with herbs and spices. Roast on the top rack in the oven, turning the veggies and potatoes at the 10-minute mark to promote even cooking. If using a sauce on the salmon, brush it on after turning the vegetables. Return to the oven for 10-12 minutes, until an instant-read thermometer reads 145 degrees and all vegetables are cooked. Serve it up!
Shop Sheet Pan Salmon!
Haddock Tacos
Change up Taco Tuesday with these mouth-watering haddock tacos!
Follow the directions above for cooking the haddock by your preferred method, sheep pan or skillet.
While the haddock is cooking, prepare the Dole salad according to directions, reserving the corn chips.
Wash and slice the avocado in half, then into chunks.
Open PICS Salsa.
Place Pics Tortillas, 2 per plate, up to 4 plates or servings.
When haddock is cooked, allow it to rest for a minute, then divide each filet into two pieces and place on the center of the tortillas. You may want to cut those pieces into smaller chunks to distribute the length of the tortilla. Sprinkle with chili-lime or taco spices. Using the Dole Crunchy Taco Salad kit for most of the filling is a great hack that delivers a delicious meal – maxing veggie variety and flavor while also saving time and stretching your budget! . Using a slotted spoon, place 1-2 spoonfuls of PICS salsa on the salad, and add a few of the avocado chunks. Sprinkle tortilla chips from the salad on top of the other ingredients, roll up and serve. Sassy, savory and simple.
Shop Haddock Tacos!
Final Tip: Many like the texture of seafood that has been cooked in the skillet for fish tacos, but you can prepare it either way. Cooking the haddock by the sheet pan method while preparing a different dinner a day or two before you plan to serve it can put you way ahead on a busy night – just warm the cooked haddock in the microwave and serve up with the rest of the fresh ingredients!
Mia Teal
Paid Media Marketing Coordinator
Crisp, colorful, and bursting with flavor, fresh veggies are the perfect addition to any summer meal. From tasty salads to zesty stir-fries, there are endless ways to enjoy these nutritious powerhouses. At Price Chopper and Market 32, not only do we have fresh veggies for you year round, but we also have a ton of recipes that you can make with them. What better time to try a new recipe than today, National Fresh Veggies Day!
I am sure we all remember the dreaded statement as kids: “Eat your veggies!” However, there are actually so many fun ways we can eat them, from dipping your carrots in ranch dressing to making a delicious stir fry meal. Oh, what about in a smoothie? The possibilities are endless when it comes to making veggies more appealing. Don’t believe us? Well, let’s take a look below…
Heirloom Tomato, Mozzarella, & Beet Stack: Nothing says summer like mozzarella, tomato, and basil. I can just smell this combo! This recipe combines the most delicious summertime ingredients for your next appetizer or light meal.
Mexican Street Corn: Have you ever tried Mexican Street Corn? Well now you can! These are so delicious, you will be coming back for seconds!

Carrot-Zucchini Chocolate Muffins: This sneaky way to get vegetables in your food is not only delicious, but easy too! Your child will love these.
Kicked-Up Green Smoothie: Enjoy this refreshing smoothie on a hot summer day to feel energized and rejuvenated!

Looking for more inspiration? We have an abundance of on our Recipes Page, Price Chopper Ready Website, and YouTube Channel. We hope you enjoy fresh veggies not only on National Fresh Veggies Day, but all year long.
Ellie Wilson
MS, RDN Manager, Lifestyles and Wellness
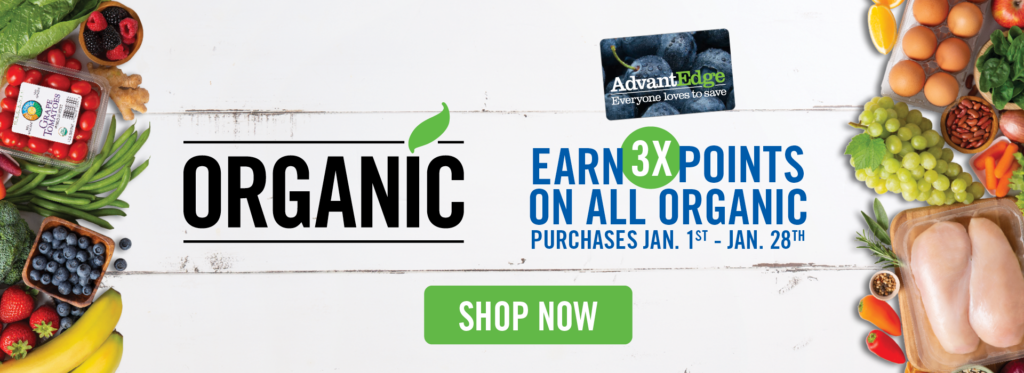
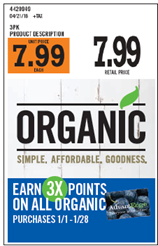
January rings in the New Year and inspires us to evaluate targets and goals that will bring positive results to our lives. There is one change that would bring more wellbeing benefit to more people than almost any other – eating more fruits and vegetables! Only one in ten Americans eats enough to meet daily guidelines for health. We also see shoppers are seeking more organic items for many reasons, particularly because they know that since 2002, organic items meet strict USDA certification standards.
The USDA certification offers production insights and confidence to shoppers. As quoted in Food Insight’s “What is Organic” article, USDA notes that “organic products must be produced using agricultural production practices that foster resource cycling, promote ecological balance, maintain and improve soil and water quality, minimize the use of synthetic materials, and conserve biodiversity.” This is right in line with shopper aspirations to eat more mindfully, consider production impact and sustainability along with taste and health value.
You can always find high quality produce, proteins, and grocery items in our stores, including a huge selection of organic items. To help you enjoy more, now through January 28th, earn 3X AdvantEdge Rewards points on organic purchases that can help families bring more benefits to your table.
Organic product tags on our website can help you select organic items for pickup or delivery and explore products across our site that fuel your wellness routine. Check out our weekly flyer each week this month and look for our special organic shelf tags to find out which simple, seasonal organic items are ready for you to enjoy!
Happy New Year!
Source:
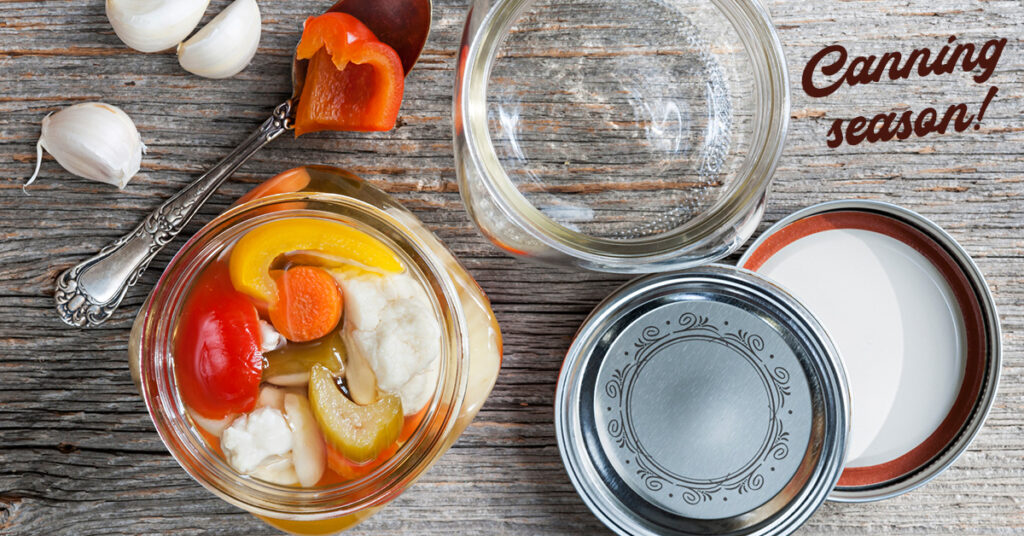
It’s Canning Season!
One of the best parts of summer is easy access to an abundance of fresh, homegrown fruits and vegetables. However, when the colder months roll around we are once again left deprived of these natural delights. Enter canning! Canning is a method of preservation, and the best way to enjoy summertime vegetables throughout the colder months.
Canning is an essential and safe, if done properly, method to food preservation. The canning process involves placing foods such as fruits, vegetables, jams, jellies, pickles, and other preserves, in jars and heating them to a temperature that eliminates micro-organisms that cause the food to spoil. During the heating process, air is driven out of the jar and as it cools a vacuum seal is formed. This seal prevents air from getting back into the jar, preventing these micro-organisms from contaminating the food and leading to successful preservation.
With fall fast approaching, we’d like to share some home canning tips to help you have as much success as possible this year. If your garden has been a success this year, you’ll probably have a good amount of vegetables to can! And if you’re canning from store-bought items, make sure to read your ingredient list closely and beforehand to see if ingredients need to be prepped before the canning process. For example, does your watermelon rind need to be soaked in brine overnight before you can begin the pickling process?
When it comes to filling, experts have said that sterilizing jars and lids is not necessary because all bacteria will be eliminated in the process. Therefore, you can reuse jars from previous years, as long as they are in good condition. You’ll just need new lids to ensure a tight seal. Jars should be washed and dried before they are filled. It’s important to soak your new lids in hot water for ten minutes to soften the rubber edge, and help the lids grip on the top of the jar when the rings are screwed on.
Once the jars have been successfully processed, let them sit, untouched for at least an hour. As the jar cools the lids will sink into the center and you may hear a “ping” sound, indicating the lids have sealed. Store your jars away from direct sunlight, in a cool, dry place. Processed foods typically are good for a year, although many items will not spoil for a longer period of time. If you see mold, discoloration, or smell something funny, discard the food immediately. If a jar’s seal has been compromised discard of the food immediately, and ultimately, when in doubt, throw it out.
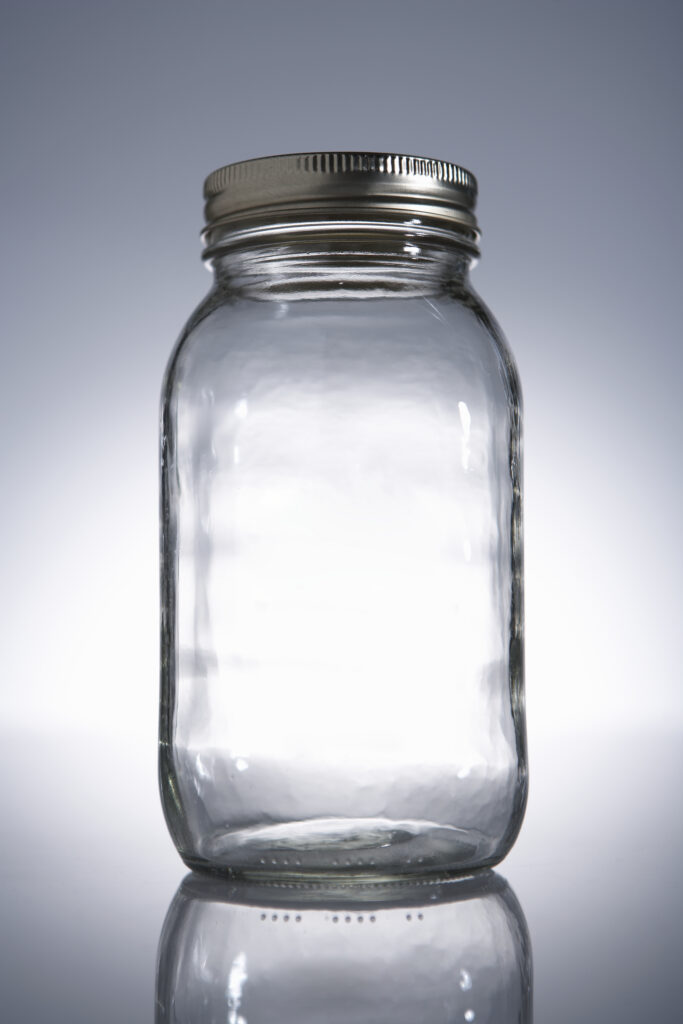
What’s basically the main ingredient in canning? Mason jars! We have them: Order yours from us here.
Happy canning!