


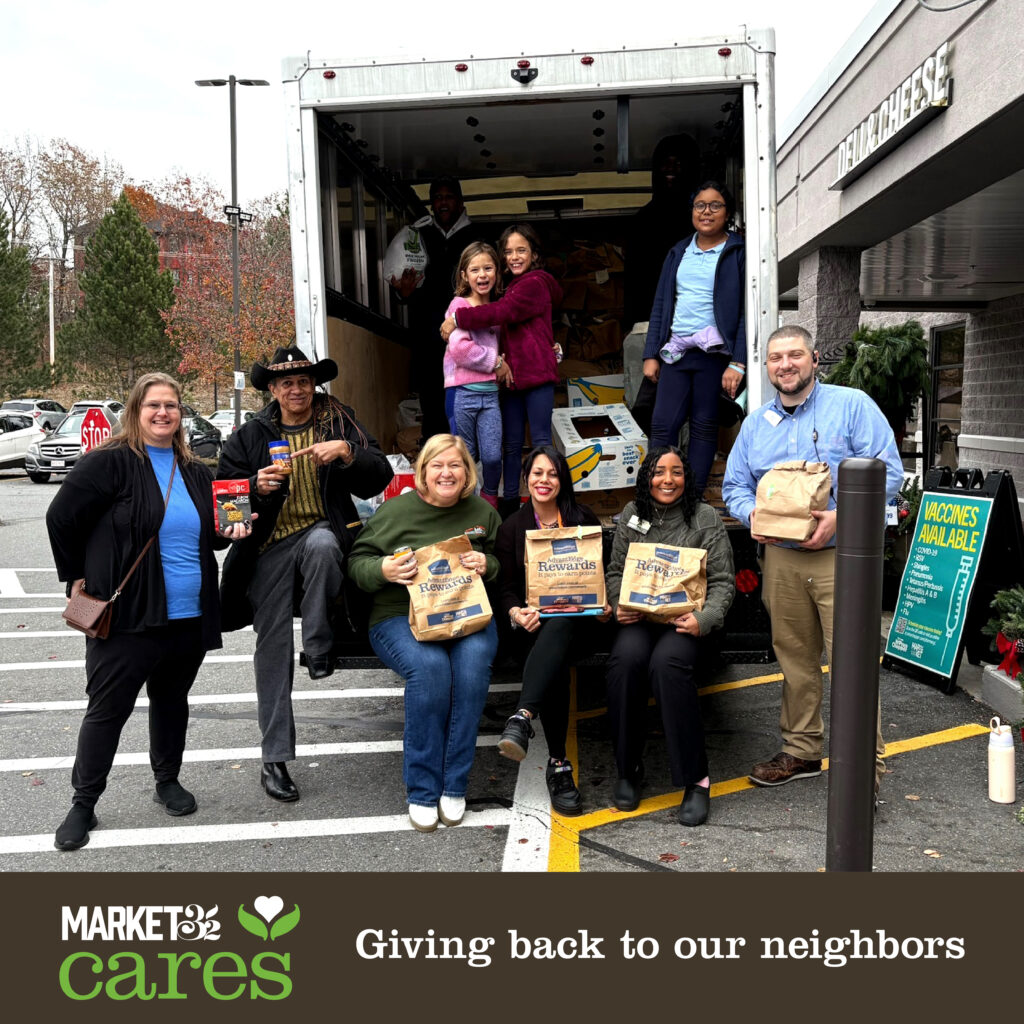
Market 32 and Price Chopper Launch Checkout Campaign to Support Local United Way Chapters
Market32 and Price Chopper are inviting customers to round up their purchase total to the nearest dollar at checkout to benefit local United Way chapters and the various nonprofit partners they help support across the chain’s six-state footprint. The campaign runs March 1 – 31.
Funds raised will help advance United Way’s work addressing critical community needs, including food insecurity, housing stability, access to education, childcare, and financial empowerment programs that support individuals and families.
“United Way works at the heart of communities to identify urgent needs and mobilize resources where they can make the greatest impact,” said Pam Cerrone, director of community relations for Market 32 and Price Chopper. “Every donation—often just a few cents—adds up quickly to help fund essential services. And because funds raised stay local, customers can feel confident their contributions are directly helping neighbors in the same communities where they live, work, and shop.”
United Way partners with a broad network of vetted nonprofit agencies to ensure resources are distributed effectively and strategically. In addition to funding direct services, United Way convenes community leaders, businesses, and nonprofit organizations to address root causes of challenges and build long-term solutions.

Over $623,000 Raised at Market 32 and Price Chopper During 2025 Salvation Army Red Kettle Campaign
SCHENECTADY, N.Y., February 16, 2025– Salvation Army bellringers at Market 32 and Price Chopper stores in New York, Vermont, Connecticut, Pennsylvania, Massachusetts, and New Hampshire raised over $623,000 during the 6-week “Red Kettle” holiday campaign in November and December 2025. The money raised will help fund essential services, including food assistance, shelter, and emergency relief.
For generations, the Red Kettle campaign has been a visible and meaningful symbol of holiday giving, offering customers a simple way to support neighbors in need while completing their everyday grocery shopping. Contributions collected at Market 32 and Price Chopper stores directly support local Salvation Army programs, ensuring that donations stay within the communities where they are given.
“Every donation made at our stores has a direct impact, allowing The Salvation Army to provide hope and assistance to those who need it most,” said Pam Cerrone, Market 32 and Price Chopper director of community relations. “We’re proud of our longstanding partnership and incredibly grateful to our customers for stepping up and supporting their important work and making a difference in the lives of so many.”
“It is only through the community’s generosity that The Salvation Army can respond to those in need 365 days a year,” said Major Michelle Dressler, divisional commander for The Empire State Division of The Salvation Army. “Our continued partnership with Market 32 and Price Chopper is vital to our mission and efforts to help those most in need, as all funds raised stay local to make a difference right here in our community.”
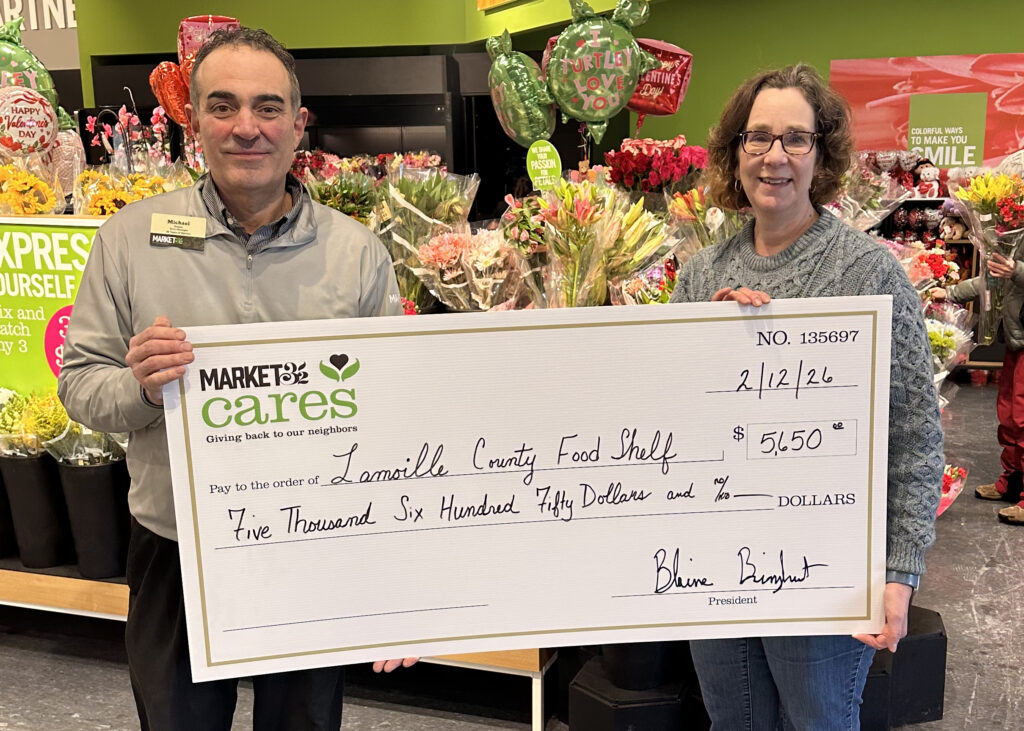
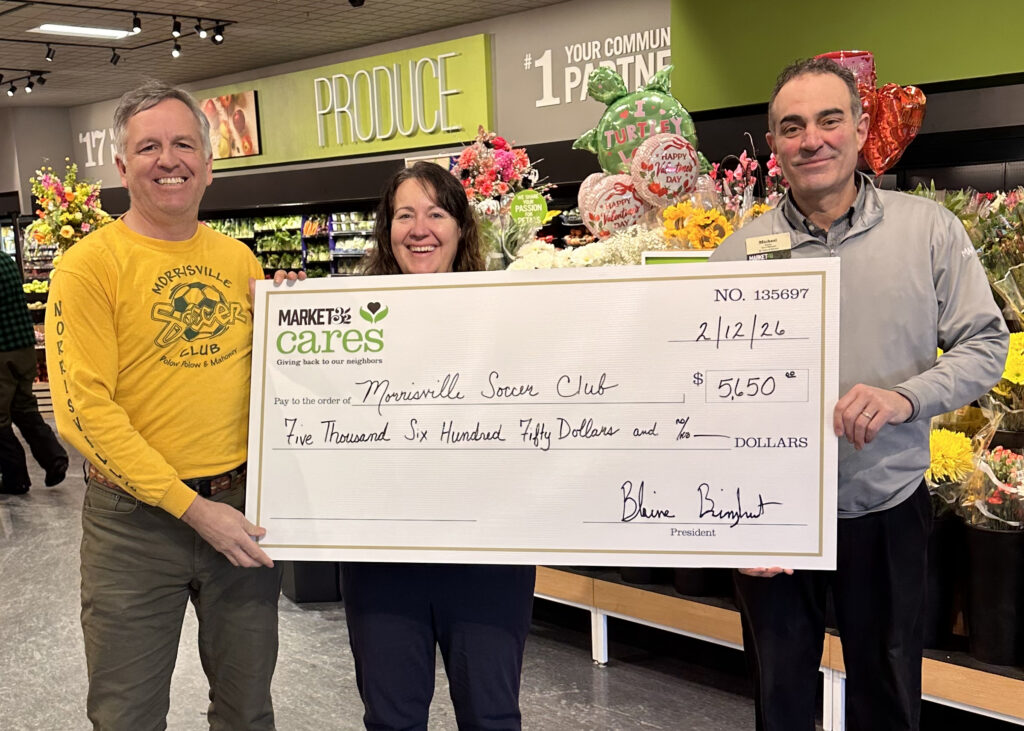
Market 32 Morrisville, VT Grand Reopening Generates More than $11,000 for Local Organizations
Schenectady, N.Y., February 16, 2026 — In celebration of the January 16 grand re-opening of the Market 32 located at Route 15 and 370 Munson Ave. in Morrisville, VT, Market 32 donated more than $11,000 to two local nonprofit organizations dedicated to strengthening the community.
As part of the re-opening festivities on Friday, January 16, and Saturday, January 17, customers received 5% off their grocery purchases. In turn, Market 32 donated an additional 5% of total store sales across the two days to Lamoille Community Foodshare and Morrisville Soccer Club. Each organization received $5,650.
“We’re proud to mark this re-opening by reinvesting directly in the Morrisville community,” said Pam Cerrone, Director of Community Relations for Market 32 and Price Chopper. “Beyond great food and value, we proudly lend our support to many organizations and events that make a real difference in our community, and we have a name for that support: Market 32 Cares. Providing access to nutritious food and creating opportunities for children and families are central to our mission of nourishing life. These donations reflect our ongoing commitment to helping people feed and care for their families in the communities we serve.”
Lamoille Community Foodshare works to address food insecurity throughout Lamoille County, while Morrisville Soccer Club provides youth with opportunities to learn teamwork, build confidence, and stay active through sport.
The Morrisville Market 32 grand re-opening, which was the culmination of a $3.4 million investment in the location, is part of Market 32 and Price Chopper’s continued commitment to elevating customer experience while remaining a strong community partner.
In 2021, the Food Industry Association (FMI) established National Supermarket Employee
Appreciation Day to recognize heroes across the grocery industry. At Market 32 and Price Chopper,
we’ve always believed in a simple but important principle: it’s not just our quality that makes us
special, but the exceptional teammates in our stores, Distribution Center, and corporate office
who help bring it to life. That’s why we’re proud to spotlight and celebrate our teammates for
the courage, compassion, dedication, and leadership you show in serving our customers
and supporting our communities each and every day.
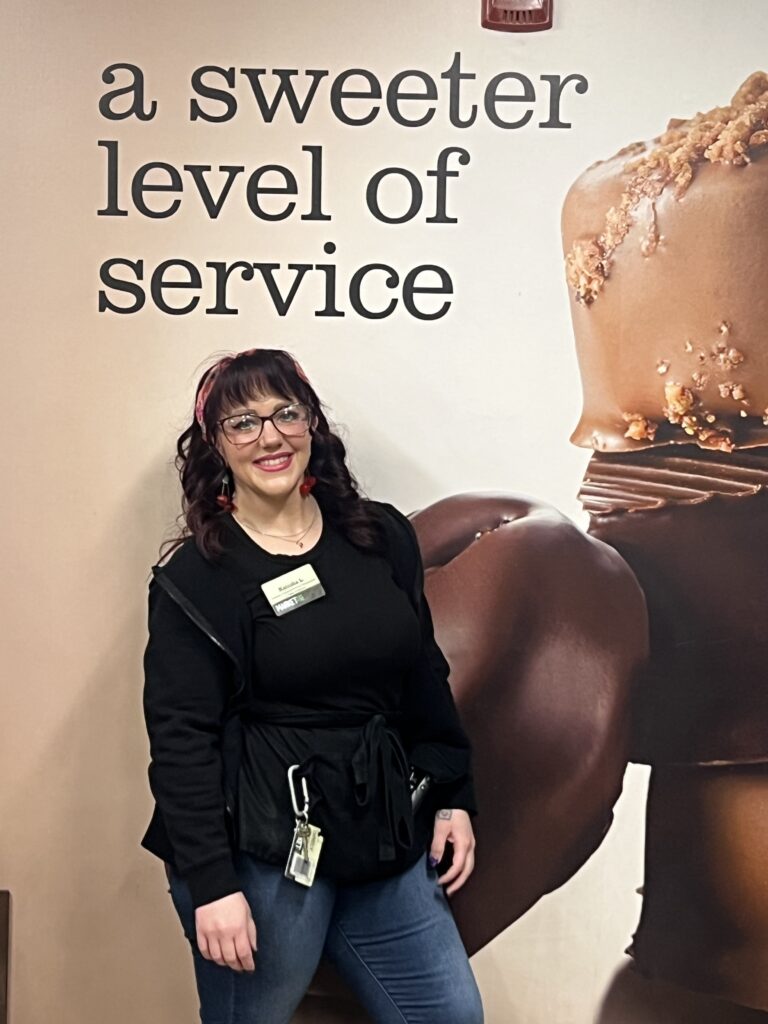
Karla Ortiz Fonseca / Pharmacy Teammate, Fulton #214
Karla started her Price Chopper journey right here in Fulton NY, store 214 in July of 2022. Originally as a Front End teammate, we quickly saw her talent with our guests. We cross trained her in the Pharmacy, where she excelled even more. She greets our guests with a huge smile and a positive attitude, knowing a lot of them by name before they even ask for their scripts! She is always ready to handle challenges filling in for call ins, stocking shelves during slow times, and taking on our recent sampling events. She loves to stay busy, and thrives during peak times.
Besides handling guests with exceptional customer service, Karla makes sure her fellow teammates are supported even leaving little words of encouragement for those coming in after her. Furthering her career, Karla is currently studying to take the CPhT exam and is excited to become an immunizer in the near future. Store 214’s guests and teammates are beyond lucky to have Karla as part of our team!
Carl White / Housekeeping Teammate, Shelbourne Rd. #165
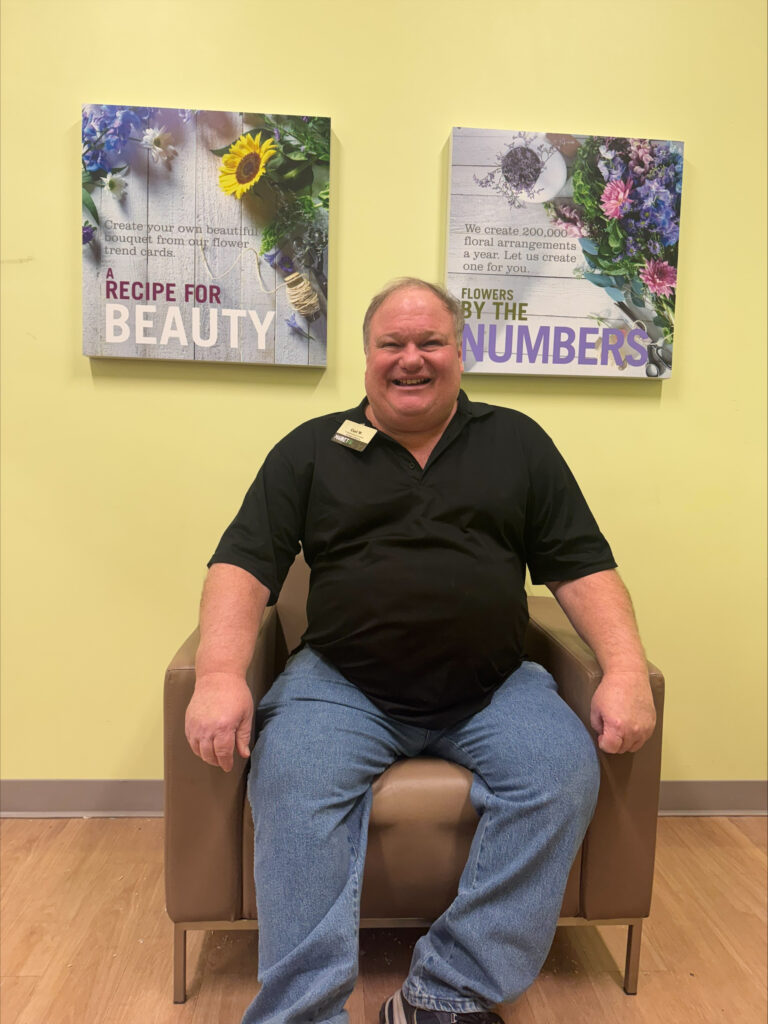
For the past 30 years, Carl has been an essential part of our Market 32 family, and his impact goes far beyond keeping our store running smoothly. As a dedicated housekeeping teammate, Carl goes above and beyond every day whether he’s keeping our common areas spotless, retrieving carts for our guests, or lending a helping hand to teammates and customers alike.
Carl’s contagious smile and unmistakable laughter are often the first things people notice, but it’s his genuine care for others that truly sets him apart. His favorite part of the job is helping coworkers and customers. Hearing how much he’s missed when he’s not at work speaks volumes about the connections he builds every day.
He especially looks forward to seeing the seniors in our community during their shopping trips and welcoming the fire department during their daily visits. They all know Carl by name, just as he knows each of them. Even outside of work, Carl is recognized in the community and is truly the most famous teammate at Shelburne Road Market 32.
Over the years, Carl has received countless customer compliments for turning tough days around and putting smiles on faces simply by being himself. We are incredibly grateful for his 30 years of service, kindness, and positivity. Carl truly represents the heart of Market 32, and we are proud to celebrate him.
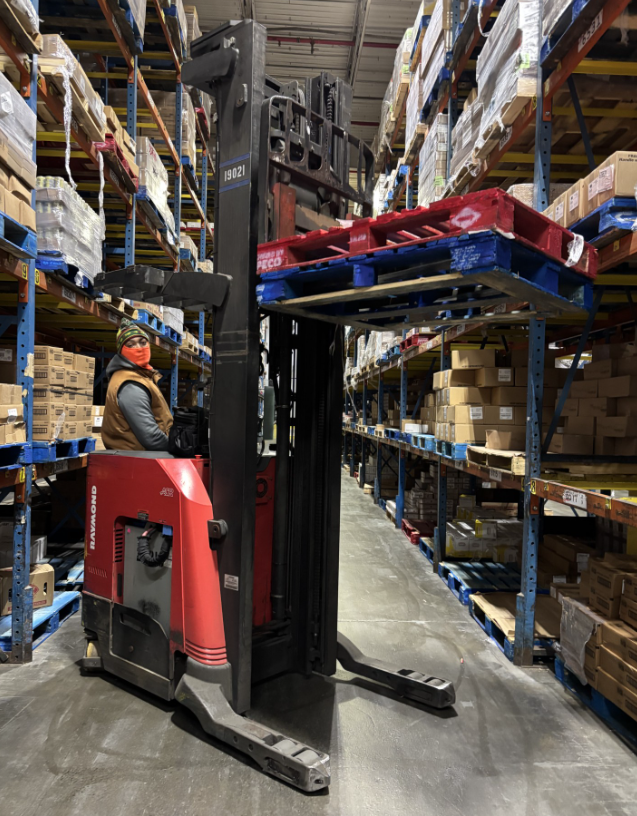
Kacheme Francis / Perishable Selector, Trainer, & Coach
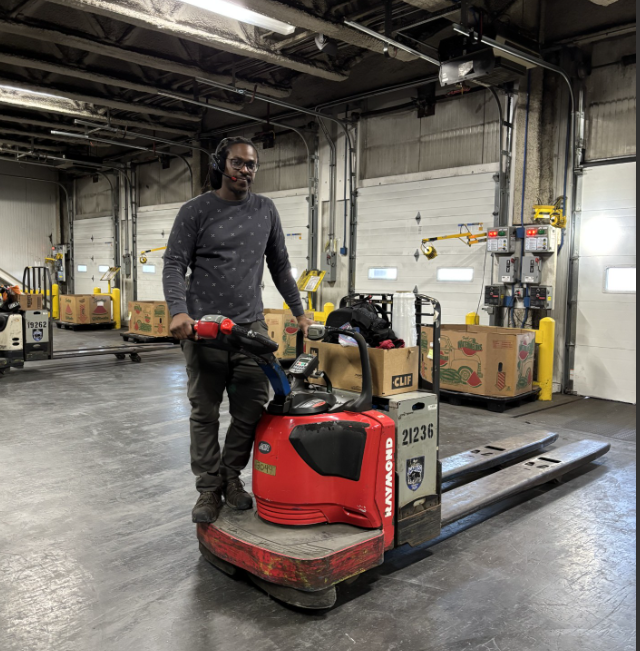
Kacheme joined the Perishable Warehouse team in 2024 and currently serves
as a Selector, Trainer, and Coach. He has quickly become an integral part of our team because of his willingness to learn and the determination to put what he has learned into action.
Kacheme enjoys training new hires and is able to offer them a positive perspective on what will work and what just won’t fly in the warehouse environment. This has proven to be a key factor in new hire success and succession.
We are very lucky to Kacheme on our team – he not only makes us stronger,
he makes us better!
Natasha Lapointe / Customer Service Team Leader, Glen St. #040
Natasha Lapointe has been an incredible member of our team since 2023, starting as a part‑time Office/Front End Supervisor. In 2025, she proudly graduated from the ADP program and has since stepped into her current role as an Assistant Customer Service Manager.
Natasha’s smile truly lights up any room she walks into. Her ability to uplift others with her energetic, positive, and outgoing personality is unlike anything I’ve ever seen. She leads with a natural can‑do attitude, and her dedication to both her team and our customers shines through in everything she does.
Natasha is an absolute pleasure to have as part of the leadership team in Zone #8, Store #040. We appreciate her commitment, her enthusiasm, and the warmth she brings to our workplace every single day.
Thank you, Natasha, for being a standout example of what great leadership looks like!
Chii Ju / General Merchandise (GM) Receiving Clerk
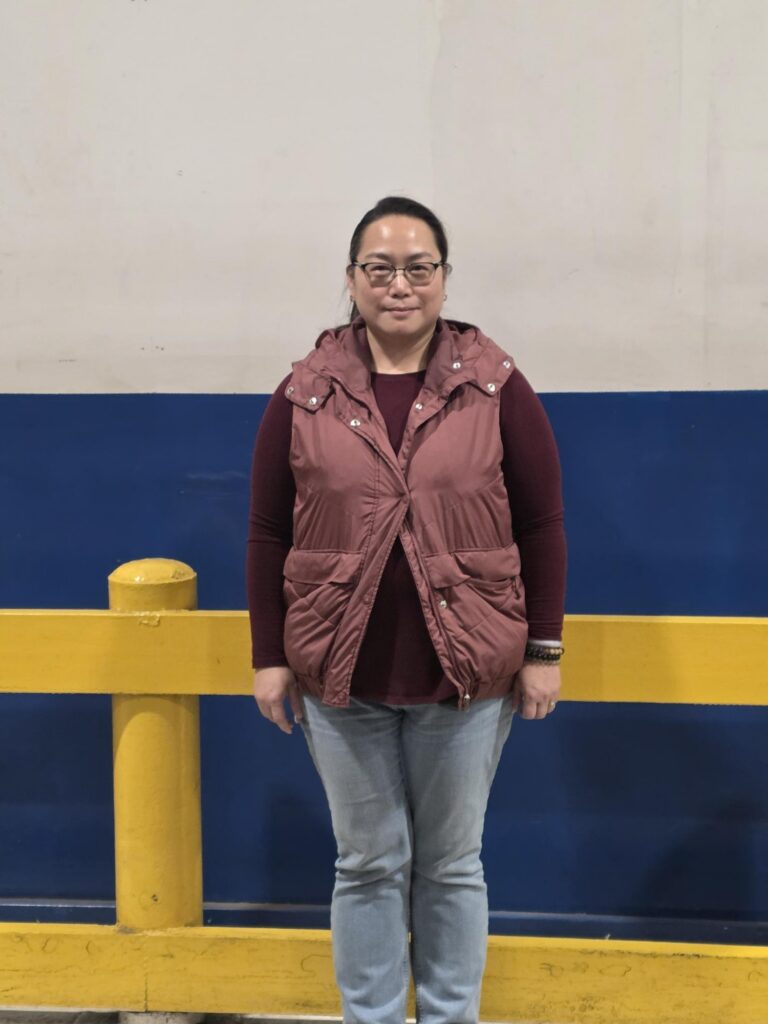
Chii Ju joined the Market 32/Price Chopper team in July 2021 and currently serves as the GM Receiving Clerk. She began her career as a clerk in the Perishable Warehouse and successfully transferred to the GM warehouse in October 2024. Since transitioning, she has taken initiative to learn all aspects of the Receiving process and continues to expand her knowledge so she can effectively support the team, especially during high-volume and high-pressure days.
Chii consistently demonstrates a strong willingness to assist not only her immediate team, but also other departments and facilities whenever help is needed. She works collaboratively across departments, steps in to support operations beyond her primary role, and is always open to performing additional job functions within her own warehouse to ensure overall efficiency and success. Her positive attitude, adaptability, and team-first mindset make her a reliable and valued resource throughout the operation.
Chii is a quick study who is eager to master new tasks and responsibilities. She pays close attention to detail, takes pride in her work, and remains committed to performing her role at a high level. The high standards she sets through her work ethic, accountability, and professionalism truly set her apart and serve as an example that others who work alongside her strive to achieve. Her dedication and flexibility do not go unnoticed, making Chii a true asset to the General Merchandise warehouse team.
Alison Shanley / Receiving Assistant Team Leader, Commercial Drive #207
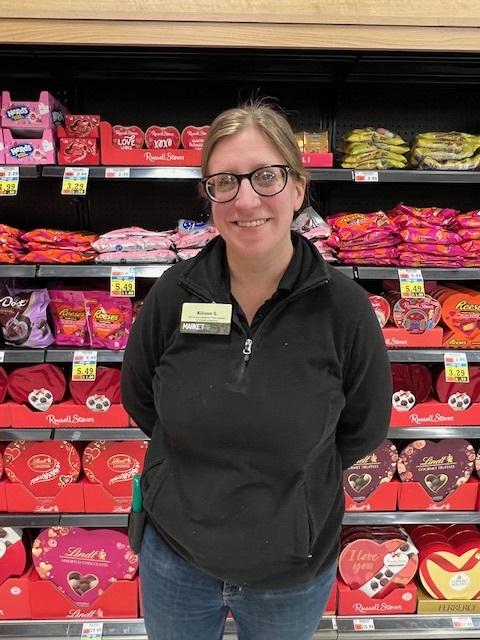
A 2010 graduate of Syracuse University, Allison holds a Bachelor’s degree in Political Science and History. She joined us in 2010 as a part-time General Merchandise (GM) teammate at our Genesee Street #026 location. She has worked at several stores in the Utica Market in a number of different departments including Grocery, GM and Front End and Price Accuracy Coordinator (PAC). Alison has been a full-time Assistant Team Lead (ATL) at #207 Commercial Drive Since 2020.
Alison is an extremely capable and knowledgeable teammate who is willing and able to step in and make a positive impact in all areas of Store Operations. She routinely goes above and beyond her own job responsibilities and aids the Store Management team in a variety of functions throughout the building. She is a leader amongst her peers and is often sought after by her teammates for guidance and support.
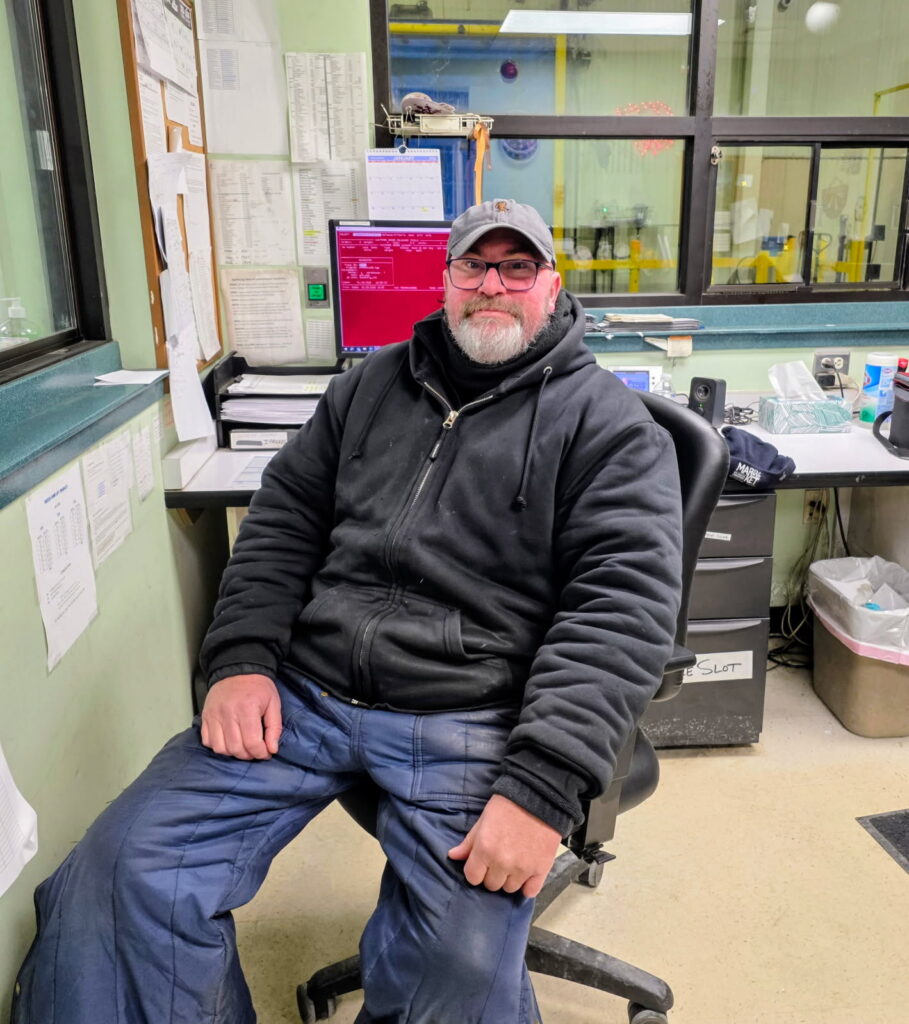
Peter Charbonneau / Frozen Distribution
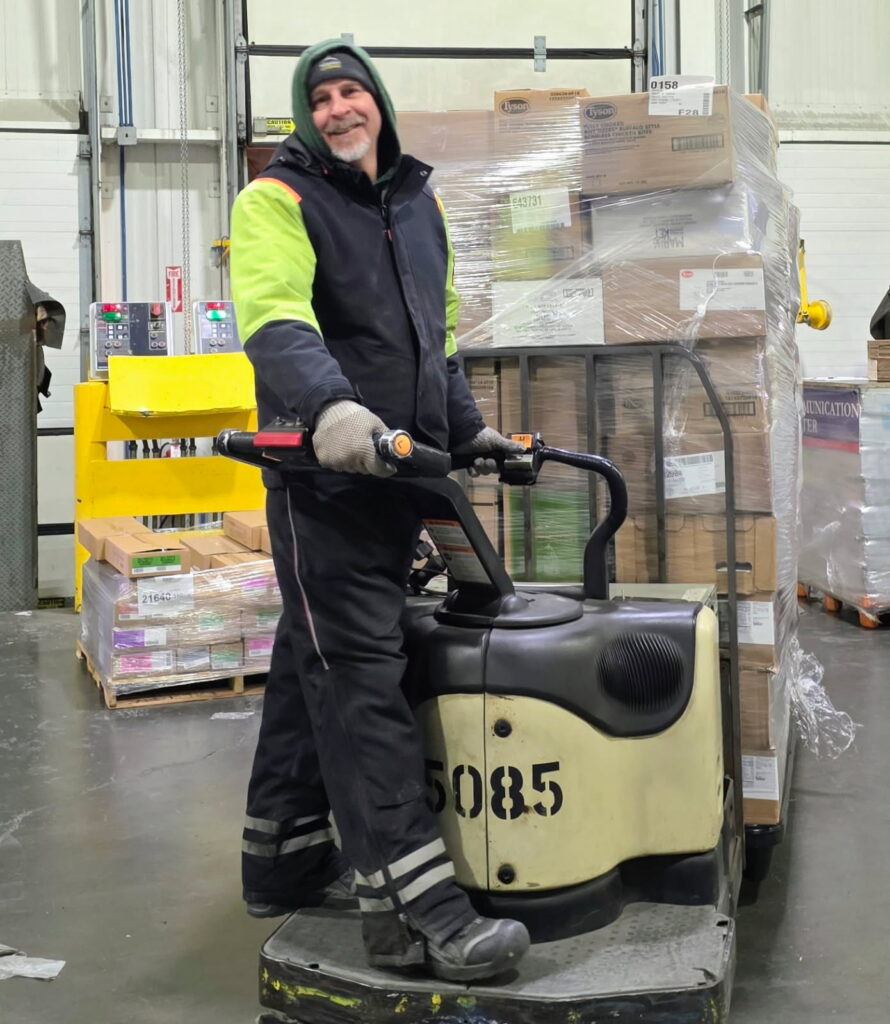
Peter Charbonneau has been a part of the Frozen Distribution Center since 2000 and currently works as an Outbound Freight Handler, loading frozen outbound orders that ship directly to our customers. Pete is a teammate the operation relies on every single day.
In addition to his primary role, Pete is highly cross-trained and serves as a coach, trained loader, selector, lift driver, inventory control backup, and backup lead. His versatility and deep knowledge of the Frozen Warehouse make him someone the team turns to when a task is complex or challenging.
When solutions are needed, Pete is the person the team looks to. His ability to complete difficult work correctly, safely, and efficiently has made him a trusted problem solver and a key contributor to the success of the Frozen Warehouse.
Dave Ellis / Warehouse Teammate
Dave Ellis has been a dedicated member of the warehouse team since 1994 and currently serves as our Inventory Control Specialist in the Frozen Warehouse. With decades of experience, Dave is the person the team relies on to keep inventory accurate and operations running smoothly.
Dave plays a critical role in the building by managing scheduled cycle counts throughout the Frozen Warehouse, researching and resolving product discrepancies, overseeing quality code dating, and ensuring new items are properly built into the system and slotted in the correct locations for selection. Known as a go-to problem solver, Dave’s attention to detail and deep operational knowledge help prevent issues before they impact stores or customers.
Russell Jennings / Produce Team Leader, Poughkeepsie #129

I hit my 27 year mark at Price Chopper/Market 32 this February. I started as a Bottle Clerk in Middletown #114, and worked my way into the Seafood Department, obtained full time as a meat wrapper.
I moved back into seafood as an Assistant Seafood Manager, shortly after I became a Seafood Team Lead for 16 years in Middletown #114. I took a step back but eventually became a Bench Deli/Food Service Team Lead for a couple of years.
After that, I became a Bench Produce Team Lead, then finally got the Produce Team Lead position in Poughkeepsie. I love working for this company and I never see my job as work, and I genuinely enjoy coming into work and challenging myself. I love talking to my guests that shop here and always give them any help they need. I have a very positive and optimistic outlook on life both at work and at home.
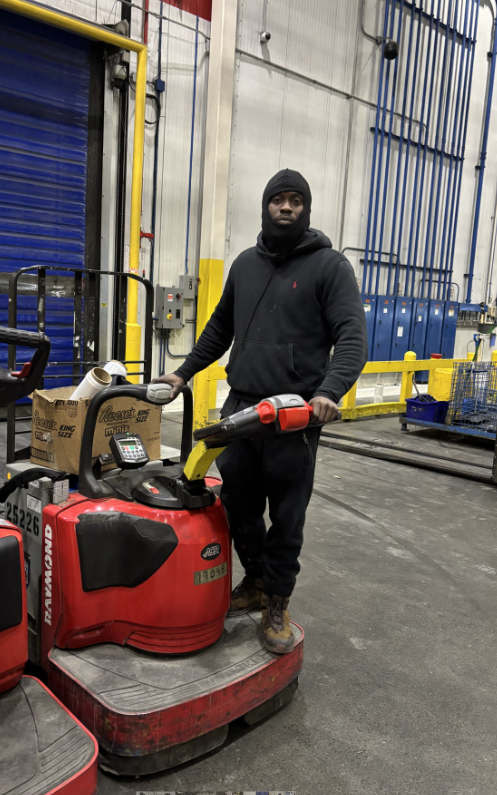
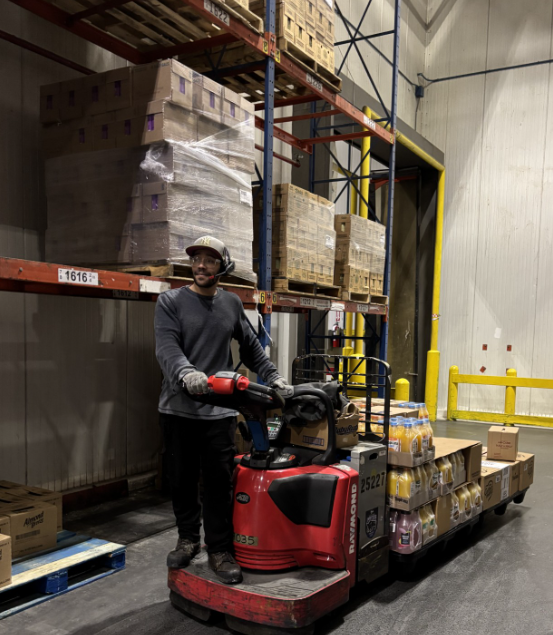
Robert Holmes / Frozen Warehouse Teammate
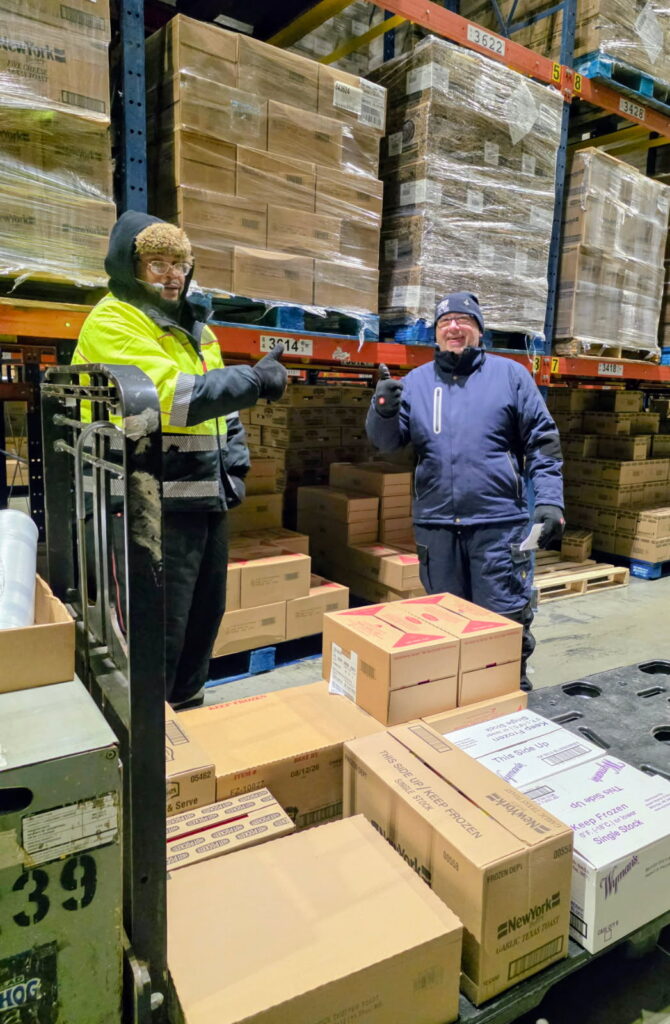
Robert Holmes has been a member of the Frozen Warehouse team since 2000 and is a key part of daily operations. As a Frozen Warehouse Selector, Robert is highly versatile and regularly supports the team as a trainer, loader, lift driver, and selector. His experience and reliability make him someone the team consistently depends on to get the job done safely and efficiently.
Pictured alongside Robert is Colin Rochelle, who joined the team on January 19, 2026 and is currently in his second week of training. In this action shot, Robert is working directly with Colin as part of his hands-on training in the Frozen Warehouse, highlighting the teamwork and knowledge-sharing that help set new teammates up for success.
Rebecca Spaulding / Assistant Team Lead (ATL) Grocery, Cicero #199
Rebecca started her career for Price Chopper in 2022 at the Clay NY location, as a part-time Cashier. In just a matter of a couple of weeks she became a part-time Front-End Supervisor. Her strong work ethic and customer service skills didn’t go unnoticed by her fellow coworkers as well as guests. Within a month she took on other roles as the store Staffing Clerk, Office Customer Service Clerk, trained to do Cash and Sales, and learned how to assist the Price Change Crew.
At the closing of the Clay store, Rebecca stayed past closing and helped pack up the entire store all while being a support system for her fellow coworkers and showing strong leadership when it was needed the most. Rebecca decided on transferring to the Cicero location where she ended up exceeding our expectations and expressed interest in learning as much as she could. In the short amount of time with Price Chopper, she decided she wanted to be an asset and help wherever she could.
In just two short years in the Cicero store she was the store Staffing Clerk, trained to be an ATL in Produce, ran the General Merchandise department as the ATL, and helped in Floral during major holidays.
In Center Store she became qualified to do Receiving, and run the Dairy Department. Rebecca has recently been promoted to the ATL position in Grocery. Rebecca doesn’t hesitate to stop what she is doing to help her fellow coworkers wherever needed all while performing multiple job duties. She plans on continuing her career at price chopper and eventually move up to become a Store Manager.
Thank you for all that you do!
Angel Cartagena / Distribution Center
Angel Cartagena has been a member of the Distribution Center team since 2006 and is someone the team consistently relies on across multiple areas of the operation. Known for his dependability, Angel can always be counted on to be at work and ready to support the team.
Angel is trained to step in as a backup lead, works as a selector, helps train other selectors, and is also qualified as a lift driver and freight handler. When additional coverage is needed, Angel has even stayed to support second shift operations, demonstrating his flexibility and commitment to the team.
Beyond his day-to-day responsibilities, Angel is a natural motivator who helps drive team buy-in and positive morale. His leadership, work ethic, and willingness to support others make him a valued teammate within the Distribution Center.
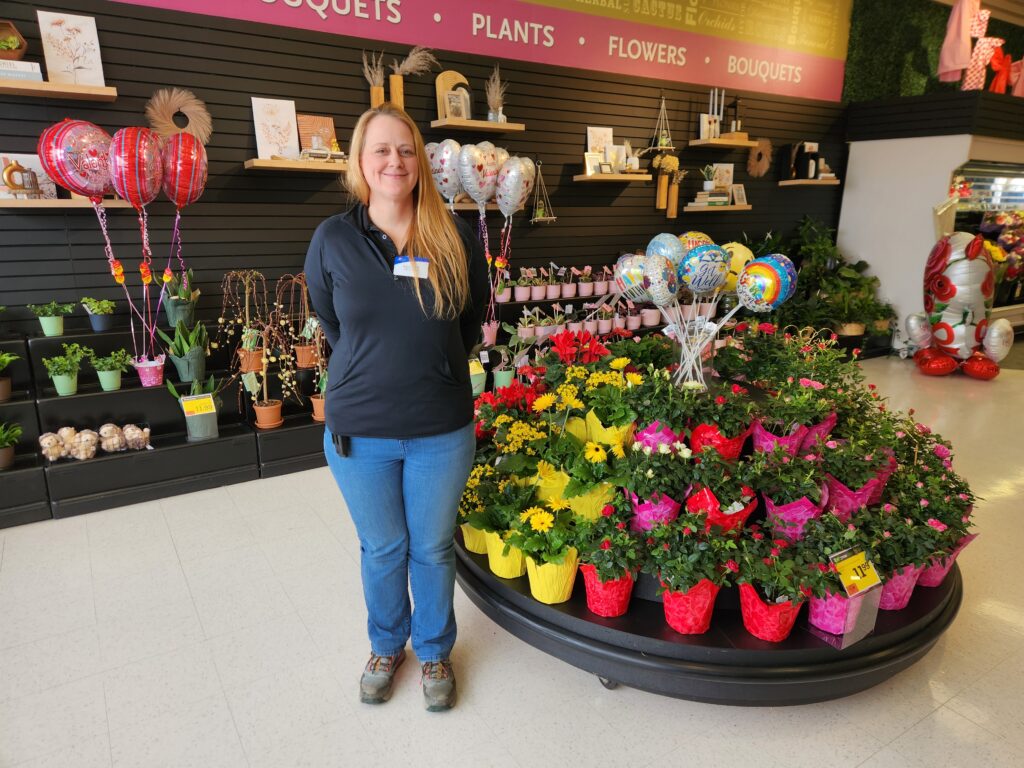
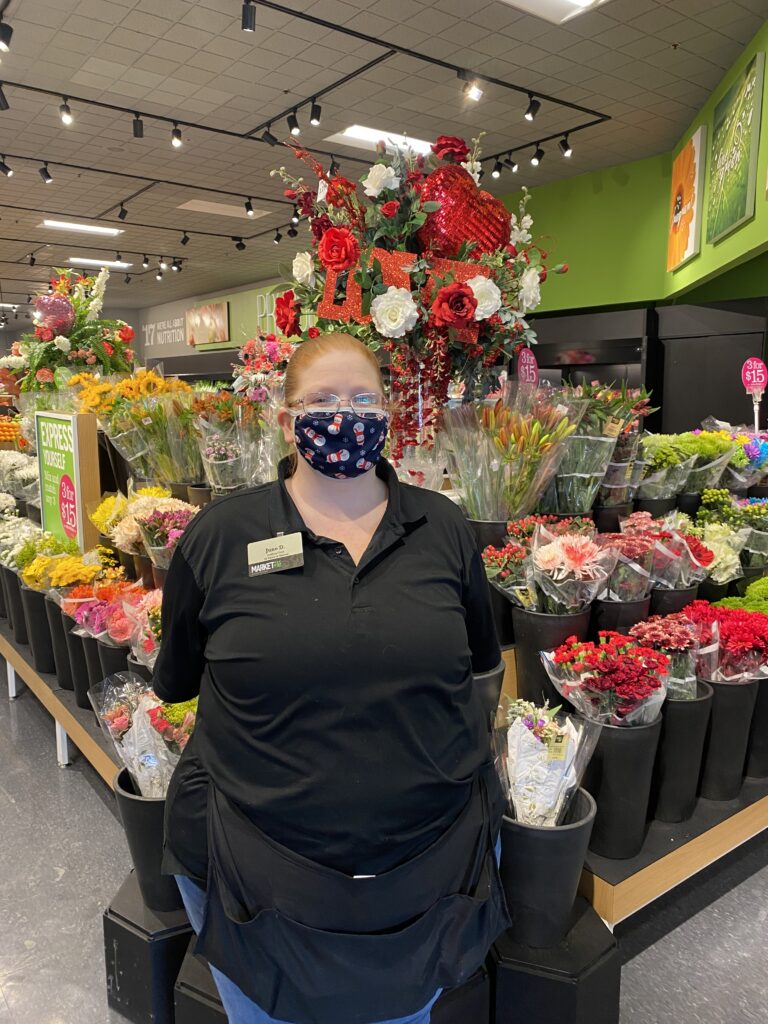
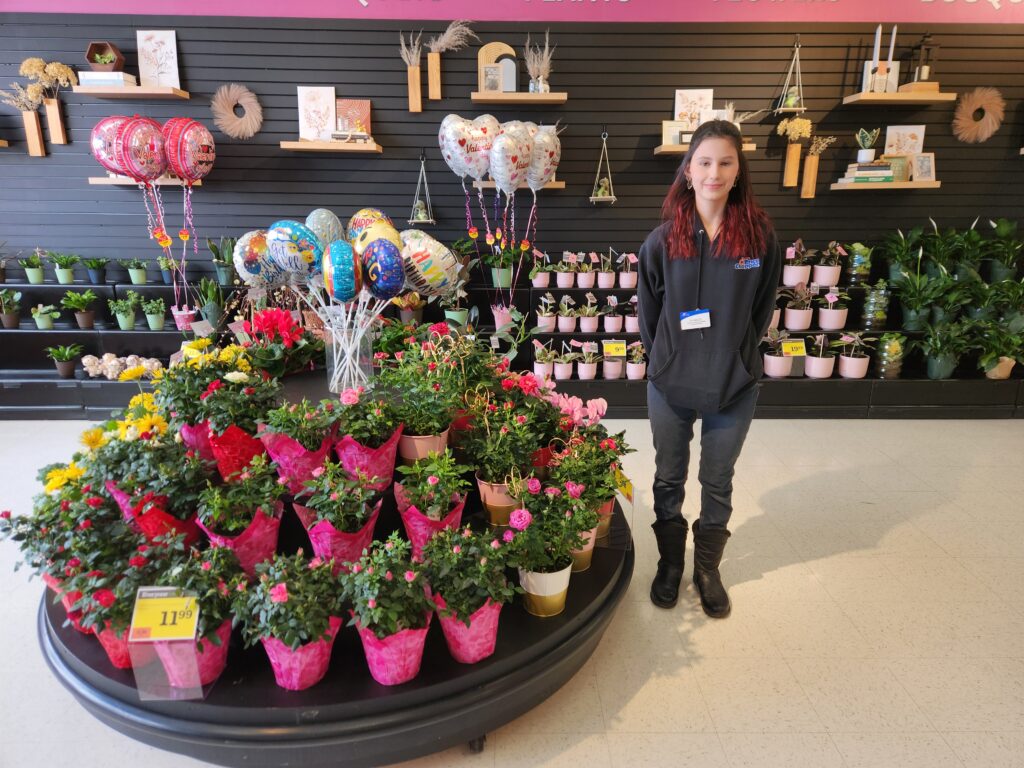
Carmalina Gullo / Floral Designer, Rome #206
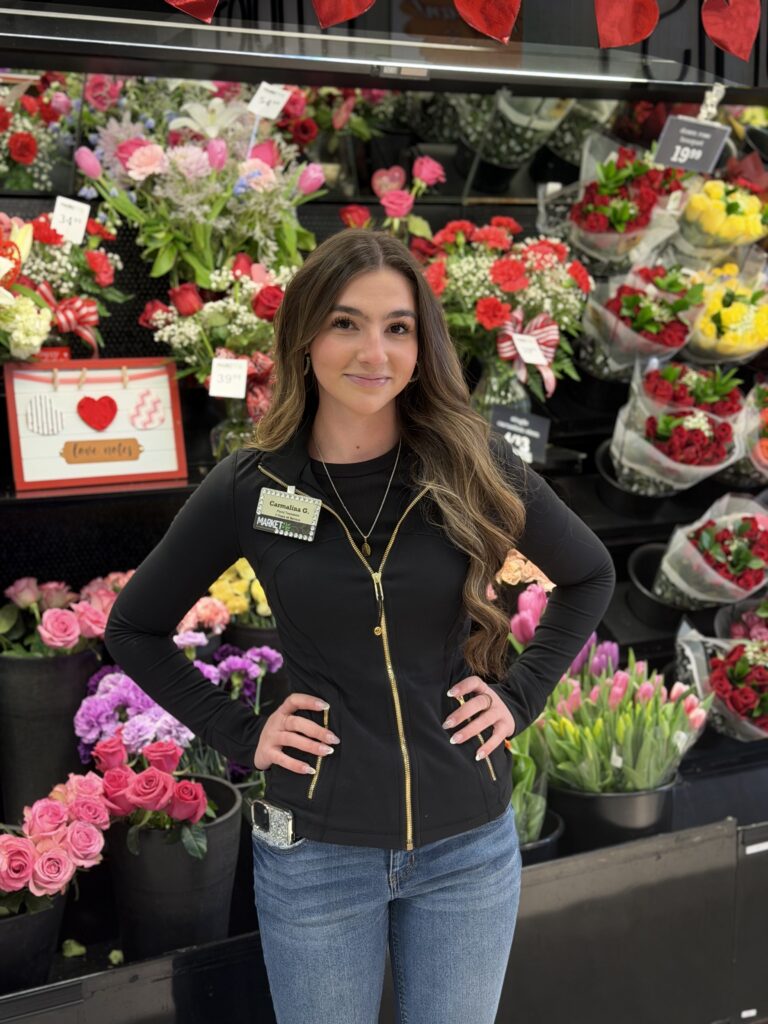
Carmalina joined us in 2022 as a part time cashier on the Front End. She was a very high performer on the Front End, and after meeting with Carm she expressed an interest in showcasing her artistic ability. We moved Carm from the Front End and began cross training her in Floral with Floral Team Lead Patty Damore. Carm immediately showed a tremendous acumen for design. Carmalina’s design work has received high praise from anyone that visits our store.
In addition to our store Carmalina has also assisted sister Price Chopper stores #213 Oneida and #172 Erie Blvd., filling in to design for special events and occasions. Her skills don’t stop with her designing ability, she has also stepped in to cover vacations and run the department.
Henry Bergmann / Distribution Center, Grocery Inbound Freight Handler & Backup Lead

Henry joined the distribution center in October of 2002. He began his career as a selector in our Perishable Warehouse and was quickly recognized as an outstanding performer. Within one year, Henry took on the role of a selector trainer where he used his knowledge and skill to help build our work force. Throughout his time in Distribution, he has held multiple positions in our Perishable, General Merchandise and Grocery warehouses.
Most recently, Henry joined the Grocery Inbound team as a freight handler. Henry’s positive attitude towards the operation combined with the skills and knowledge he had acquired through the years was acknowledged by the management team and his teammates. It wasn’t long until he was identified as a resource to the shift. When the need for a teammate to step up and take on additional responsibilities arises, he is always there. When faced with challenges beyond our control, Henry has been consistently willing to help and dive into sometimes complex situations. Performing in multiple job roles is not an easy task during a scheduled shift but Henry does it and at the same time, wants to assist others.
Over the past year, Henry has stepped into the back up lead person role. This role includes working with the management team to ensure the operation runs in a productive and safe manner.
Henry is truly an asset to the team and the distribution center. We all appreciate the dedication he puts in each day to help us be successful.
Jeff Delibac / Meat Team Leader, Essex Junction #192

Jeff Delibac joined our team in 2009 as a Meat Clerk right out of high school. Through dedication and hard work, he completed the Apprentice Program and passed his cutting test, earning his position as a part‑time meat cutter.
Jeff continued to grow within the department, becoming a Meat Assistant Team Leader (ATL) in 2012. His leadership and strong work ethic later led him to the role of Meat Team Lead in 2019, where he continues to excel. When reflecting on his journey from Meat ATL to Team Lead, Jeff estimated that the progression took about six to seven years—a testament to his perseverance and commitment.
Known for his strong work ethic, Jeff takes great pride in both his work and his team. His positive attitude and friendly nature make it easy to get a smile from him. We are all very fortunate to know Jeff and to work alongside him.
We deeply appreciate everything Jeff brings to our store each and every day.
Orlando Bass Brooks / Perishable Stocker, Lift Driver, & Loader
Orlando joined the Perishable Warehouse as a Selector in 2021 and has taken on the role with ease. He is a quick starter who has strived to learn the ins and outs of as many roles as possible, which makes him a very valuable member of
the warehouse team.
He is a model teammate in every way, which makes seasoned selectors respect
him and newer selectors want to learn from him. Many look to Orlando as not only a teammate, but a mentor.
Orlando currently serves as a Selector, Lift Driver, and Loader, excelling in all three positions.
Winnie Zhang / Customer Service Assistant Team Leader, Rome #206
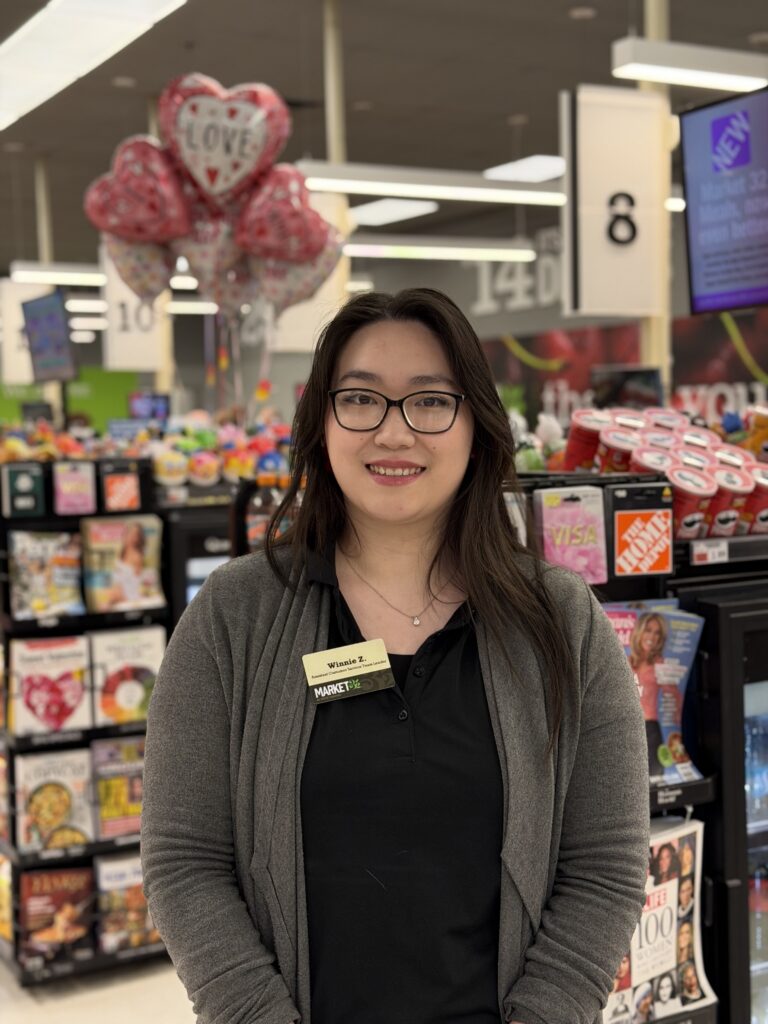
Winnie joined us in March of last year. Winnie started her career with us as a part-time Cashier with a bachelor’s degree from Ithaca college in Business Management with a focus on International Business and Marketing.
Winnie excelled at anything and everything on the Front End and was very soon cross training to be a part-time Shift Supervisor as well as learning all aspects of the Cash Office. In the Fall of last year, Winnie was accepted for the ADP program and trained at the #044 North Utica Price Chopper and #207 Commercial Drive Market 32.
Upon successfully completion of the ADP training program Winnie returned to #206 Rome Market 32 as an Assistant Customer Service Team Leader where she has made a tremendous impact driving retention results, raising customer experience scores and working to train teammates to be part of a further succession plan.
Since being placed into position Winnie has raised Front End CX (Customer Service Experience) scores by over 2,000 basis points since Period 7 in both Positive Checkout Experience and Positive Checkout Cleanliness.
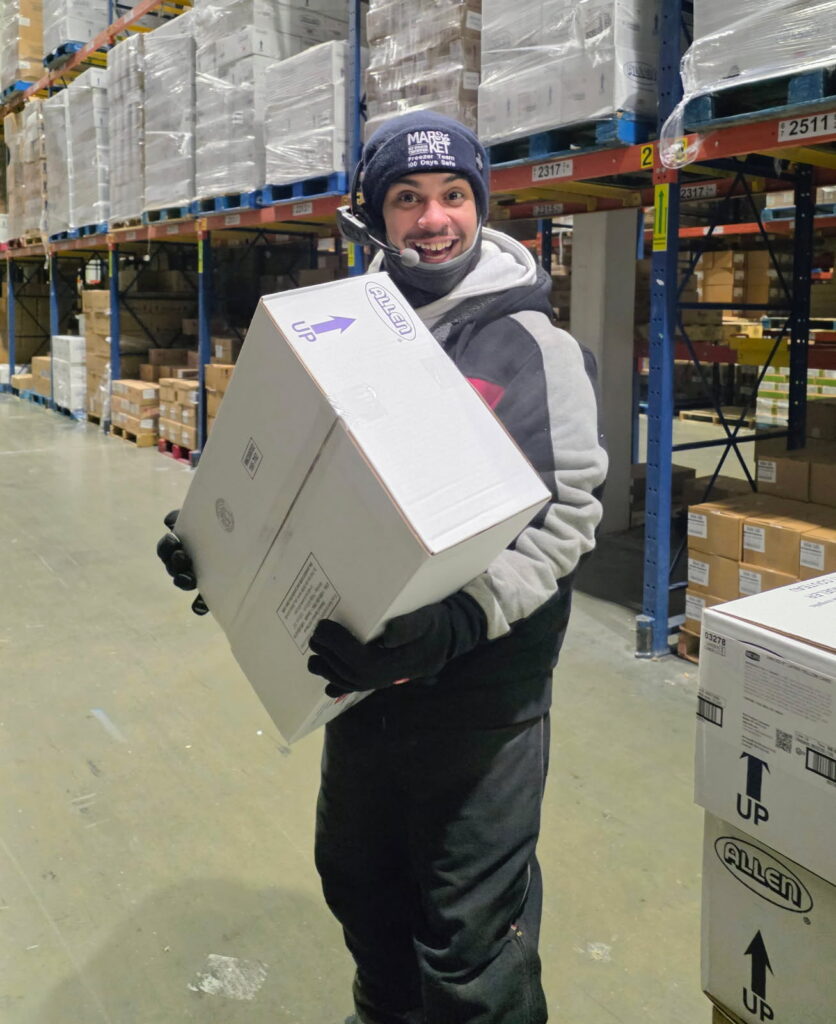
Bobby Fredericks / Distribution Center
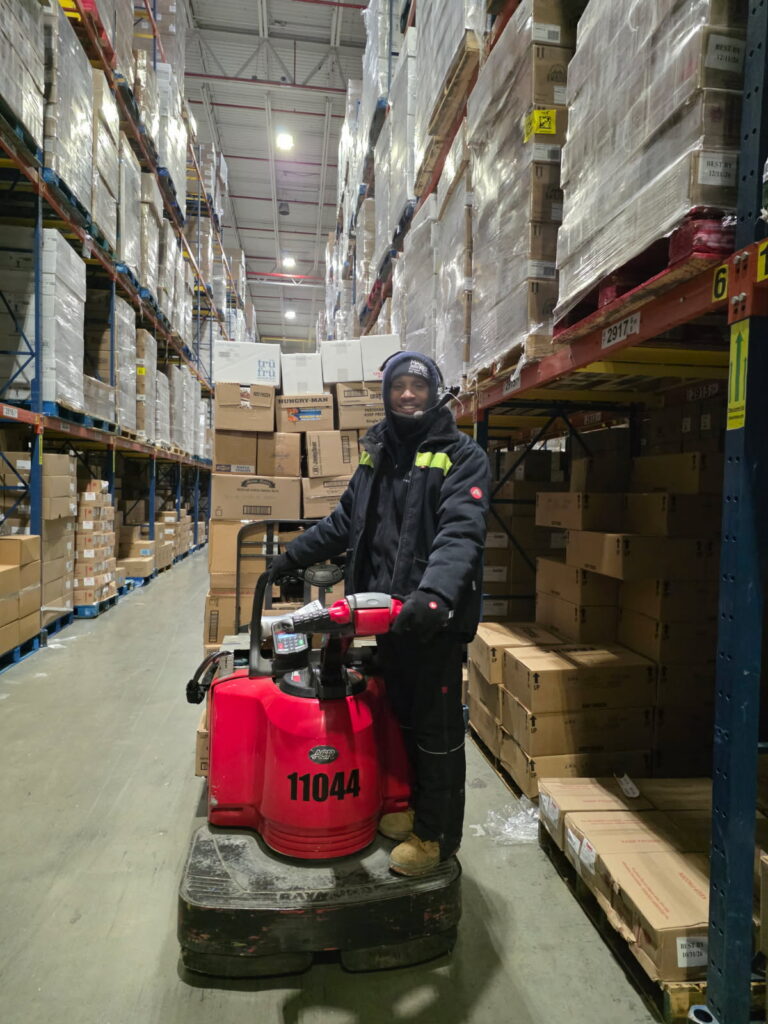
Bobby Fredericks joined the Distribution Center team in 2024 as a selector and has quickly established himself as a reliable and positive presence on the floor. Known as a true team player, Bobby consistently looks out for those around him and is always willing to step in to help.
Bobby regularly supports newer teammates by offering guidance on proper stacking techniques and pallet stability, helping ensure work is completed safely and efficiently. His willingness to assist others contributes to a stronger team and smoother operations overall.
Always upbeat and focused, Bobby makes the most of his time on shift and performs to a high standard as a selector. His positive attitude, strong work ethic, and commitment to teamwork make him a valued part of the Distribution Center.
Sheanna Jones / Pharmacy Technician, Webster #240

With 15 years dedicated service in Pharmacy service at store #240 in Webster, MA, I bring extensive experience, reliability, and professionalism to patient care. As an immunizer, I expand access to immunization services.
I pride myself on strong patient communication, attention to detail and consistent adherence to clinical and safety standards. Quality care is my focus!.
I’m consistently motivated by learning, gaining new knowledge and staying current in the Pharmacy environment.
From Left to Right: Jason Reesor (29 YOS), Perishable Freight Handler / Carleton Mckenzie (25 YOS), Perishable Freight Handler / Mike Gleichsner (27 YOS), Perishable Lift Driver
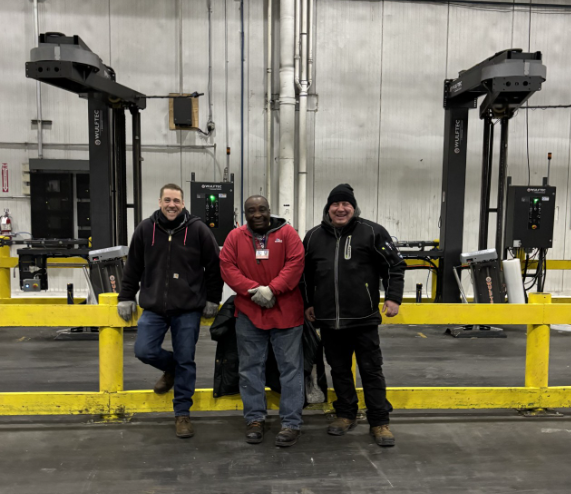
Jason, Carleton, & Mike have a combined 81 years of dedicated service. Each carry a wealth of knowledge and provide guidance and mentorship to what is mostly a younger workforce.
We are very lucky to have these three teammates!
June Davison / Part-Time Staffing Clerk, Morrisville #137
June joined our company in October 2002, and since then has contributed to our store in more ways than we can count. Over the years, she has taken on a wide variety of roles, including:
– Housekeeping
-Grocery Clerk
-Price Accuracy Coordinator
-Overnight Tags
-Front-End Supervisor
-Cashier
Today, June serves as our Part-Time Staffing Clerk, and when she isn’t focusing on staffing, she is always ready to jump in and assist with anything the team needs. She also plays an essential role on the Overnight Price Change Crew, helping ensure our store is well-prepared and accurate for our customers each day.
June is known for her incredible reliability — she never calls out, is always on time, and consistently arrives ready to take on whatever the day brings. Her positive spirit and willingness to help anyone, from customers to fellow teammates, make her a true cornerstone of Store #137.
June, thank you for your unwavering commitment, flexibility, and the pride you bring to your work every day. You are truly a staple of our team, and we appreciate everything you do.
Please join me in celebrating June for her outstanding dedication and continued contributions to our store and community.
Damian Desario / Maintenance & Dairy Departments, Poughkeepsie #129
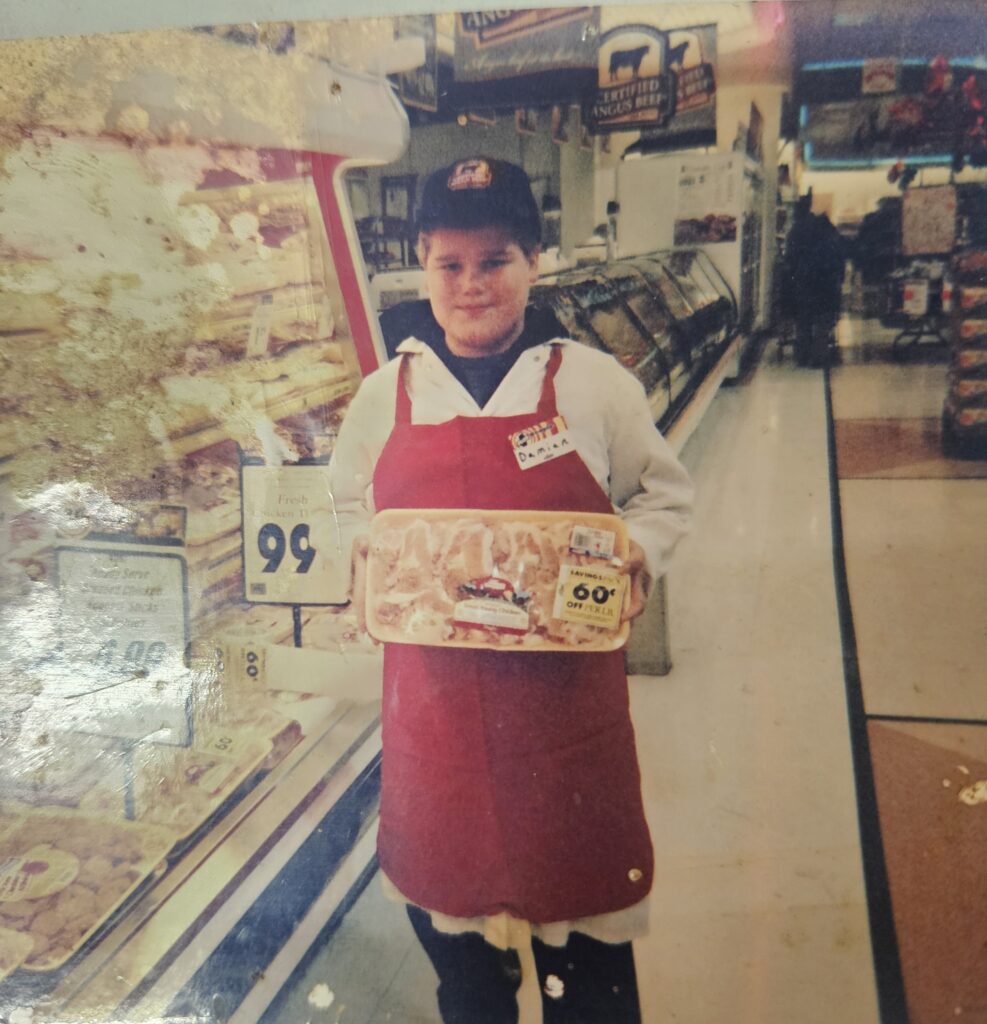
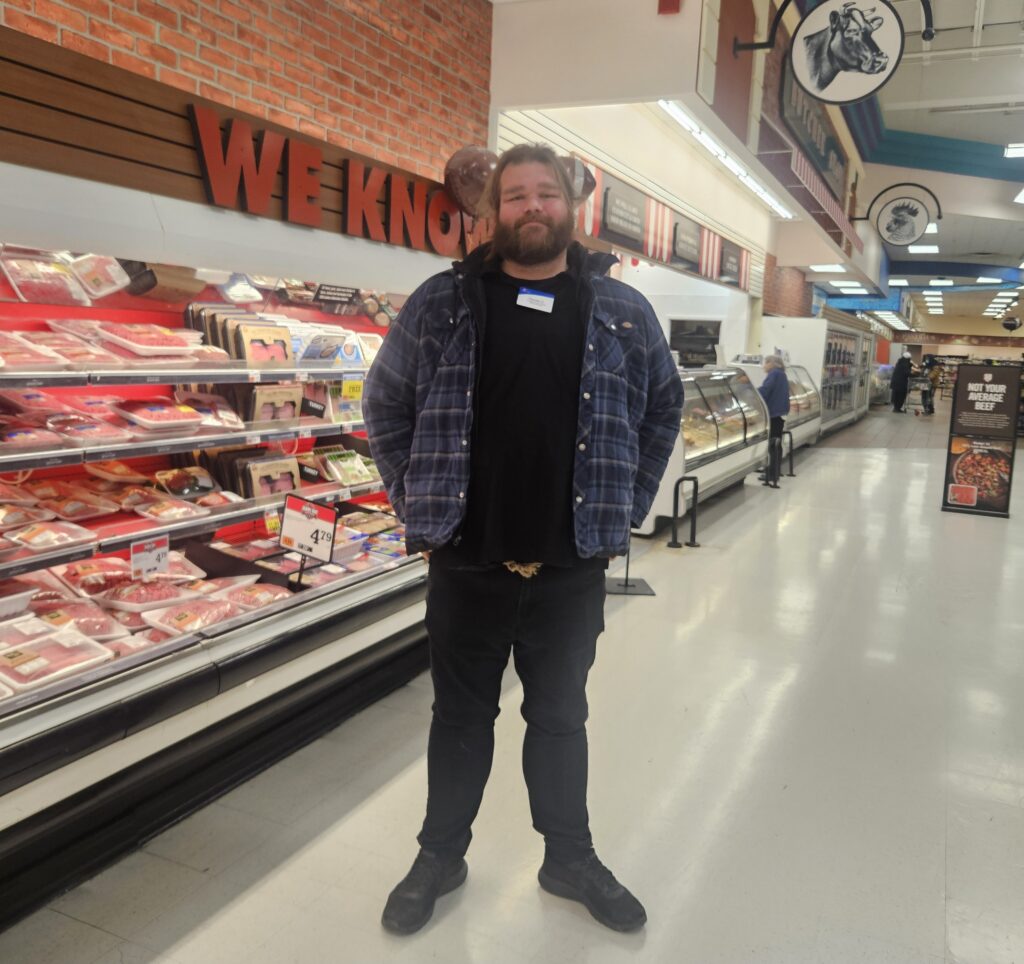
Damian started out in 2010 with a work program through the local school bagging on the Front-End. Once he turned 16, he was officially hired by Price Chopper, and has currently worked with the company for 15 years in various departments. Damian is currently doing Maintenance and Dairy in store #129.
Damian’s father worked as the Meat team lead here for 30 years. Damian remembers coming in with his father when he was a kid and always loved being part of the team. Damian likes to cook, listen to music and podcasts, and watch older movies.
Damian likes working with Price Chopper and says it’s calming. He enjoys working with all of the different people, customers and teammates. Damian is an asset to our store team and is always willing to help out wherever he is needed.
Devin Weller / Perishable Selector, Trainer & Coach
Devin joined the Perishable Warehouse as a Selector in 2017 and has proven himself to be a real asset to the Perishable team. His work ethic and commitment to getting the job done has earned the respect of his peers.
Once he mastered the skills of being a selector, Devin was offered the opportunity to become a warehouse trainer. In this role, he consistently shows leadership qualities and has become a key factor in the success of newly
hired teammates.
Devin is a natural coach, approaching teammates with a wealth of knowledge that, when shared, instills confidence in every individual he comes in contact with.
Amalia Griffith / Assistant Team Lead (ATL), Cicero #199
Amalia started her career at Price Chopper in 2023 when she was just fifteen years old at the Clay, NY location. As a part-time cashier, she exceeded our expectations, helping those around her. As the Clay store was in the process of closing, Amalia didn’t hesitate to stay after the store closed to help pack up and clean. She decided to continue her career at Price Chopper and transferred to the Cicero store where she again exceeded our expectations by improving the Instacart experience for our guests.
Amalia never hesitates to help her fellow coworkers and is always striving to do more. She recently finished school for cosmetology while continuing to work at Price Chopper. Amalia’s work ethic is unlike most – she never hesitates to help where needed and shows truly what it takes to make Price Chopper such a great store. She recently decided she wanted to move up and expand her knowledge throughout the store, and has been recently promoted to ATL of General Merchandise. To say we are so proud is an understatement. We can’t wait to see all the great things she’ll do. It’s truly employees like Amalia who make Price Chopper what it is.
Thank you for all that you do!
Amy Hildreth / Warehouse Teammate
Amy began her Price Chopper career over 27 years ago on 9/11/98, as a Clerical Teammate in the Distribution Center. Over her many years of service, she has had responsibilities for Billing, Receiving, Payroll, and Documentation. Amy’s work ethic and attention to detail is what separates her from the rest of the team. She is a communicator that doesn’t hesitate to ask a question when she’s unsure of an answer. Amy also elevates concerns to the proper level of management. Her work allows her access to sensitive teammate information, which is a task that she can be counted on to handle professionally.
Personally, Amy is an avid hiker who is known many times to climb the peaks of the Adirondack Mountains on her days off. No challenge is too much, whether it be inclement weather or freezing temperatures. Several weeks ago, she had spoken to me about a 20+ mile hike she had planned in temperatures below 0 degrees. It is these challenges that drive Amy’s successes, both professionally and personally.
Amy’s consistent results make her a great asset to our Team. She can be counted on for her reliability and remains a foundational building block to the operation. Amy makes it easy to nominate her for the National Supermarket Appreciation Day. She is the very definition of the valuable Teammates we need to be part of our organization.
Moraine “Moe” Edwards / Perishable Lift Driver

Moe joined the Perishable Warehouse in 1993 and currently serves as a Lift Driver. He is one of the hardest working individuals you will every know and his work ethic is a testament to that. If Moe was allowed to work 100 hours per week, he would still ask for more.
His hard work and the successful, long-term career he has built with the company are an inspiration to his teammates and supervisors. Having an individual like Moe is essential to building an exceptional team.
Moe has earned the respect of everyone who knows him, not by word, but by example.
Brianna Corbin / Part-Time Office/Staffing Clerk #234
Brianna started working for Price Chopper during her senior year of high school. She began as a Cashier and quickly moved up to Supervision and Service Desk. She also is the Staffing Clerk and helps support new teammates in their onboarding process.
Brianna is not only great with customers but is an asset to our team. She is dedicated and has a willingness to help and go above and beyond. We are lucky to have her!
Elizabeth Manning / Staffing Clerk, North Greenbush #054
My name is Elizabeth Manning but most know me as Liz. I have been with Market 32 for almost five years and am looking forward to many more. I began at the East Greenbush location as a cashier. When I was of age, I became a Front-End Supervisor, and it is a role that I filled for over a year.
Once I was out of high school, I spent the summers with Market 32 until I accepted a full-time Supervisor role in the newly converted North Greenbush location in 2024. Several months in, I was offered to become the Staffing Clerk for that location. It is a role I began several months ago and have enjoyed fulfilling. Earlier this year I was offered a full-time Staffing Clerk position that has now placed me in several different locations. Though I am fresh in the role, it has been exciting to meet the teams and see all the connections I have with people.
Market 32 has been a great place for me to grow and build connections and friendships that will last me a lifetime, and I can’t wait to see what this new chapter holds for me.
Rayton Raphael / Perishable Lift Driver & Safety Committee Member
Rayton joined the Perishable warehouse team in 2021 as a Lift Driver – and has become a standout in this role, not only for his work ethic, but for his true commitment to safety.
Rayton very purposefully puts safety at the forefront of everything he does and
sets an example for new and long-term teammates alike. He also serves on the warehouse Safety Committee where he frequently suggests new (and safer) ways of doing things.
Rayton is a teammate that his peers look up to, learn from and aspire to become, a true asset to our team.
Chareeda Lewis / Part-Time Staffing Clerk & Office Teammate, Wilkes Barre #222
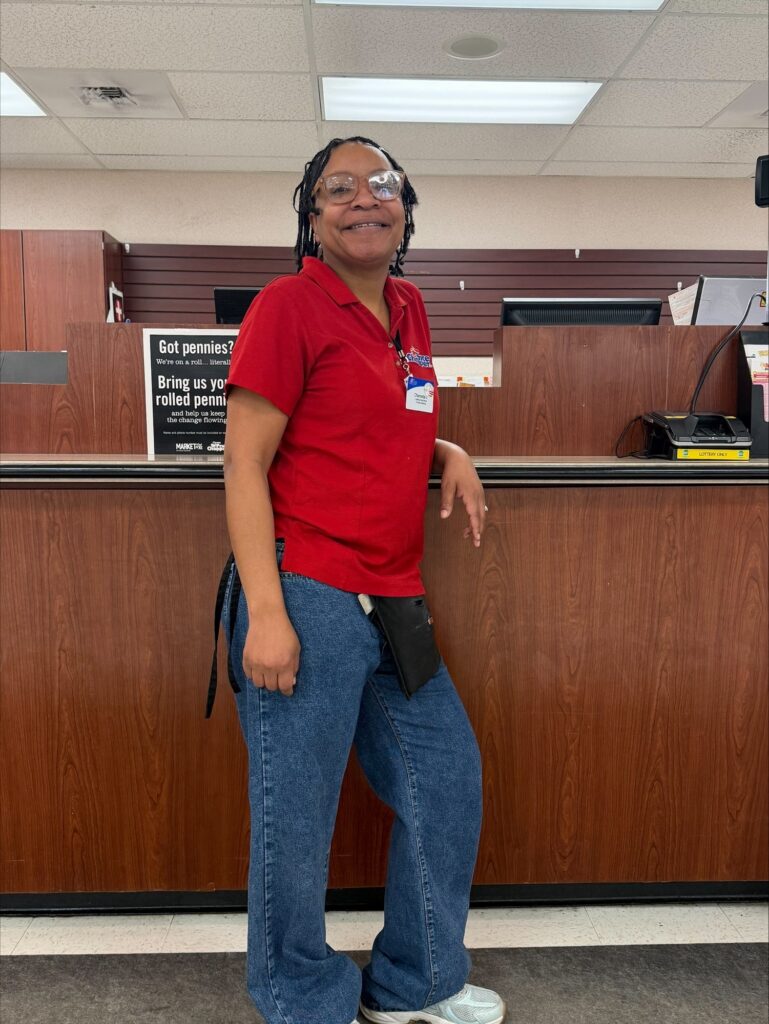
We are proud to shine a spotlight on Chareeda Lewis, a valued member of our Wilkes Barre #222 team since 2014. Over the years, Chareeda has worn many hats, serving as a part-time Cashier, Customer Service Associate, and Staffing Clerk. Chareeda brings the same dedication and care to each role she takes on.
Chareeda has a natural ability to connect with people. Whether she’s helping a guest locate an item, patiently working through an issue, or finding the right solution to a problem, she works with kindness, professionalism, and a genuine desire to help. Guests know they can count on her, and her outgoing presence makes a real difference.
Beyond her work with guests, Chareeda plays an important role in welcoming and onboarding new employees. She is often one of the first friendly and familiar faces they meet, helping them feel supported and confident as they begin their training. Her knowledge reflects her commitment to both our team and our values.
Thank you Chareeda for your years of service, your reliability, and the positive impact you continue to make every day. We are truly grateful to have you as a part of our team .
Billy Wertman / Yard Jockey & Transportation
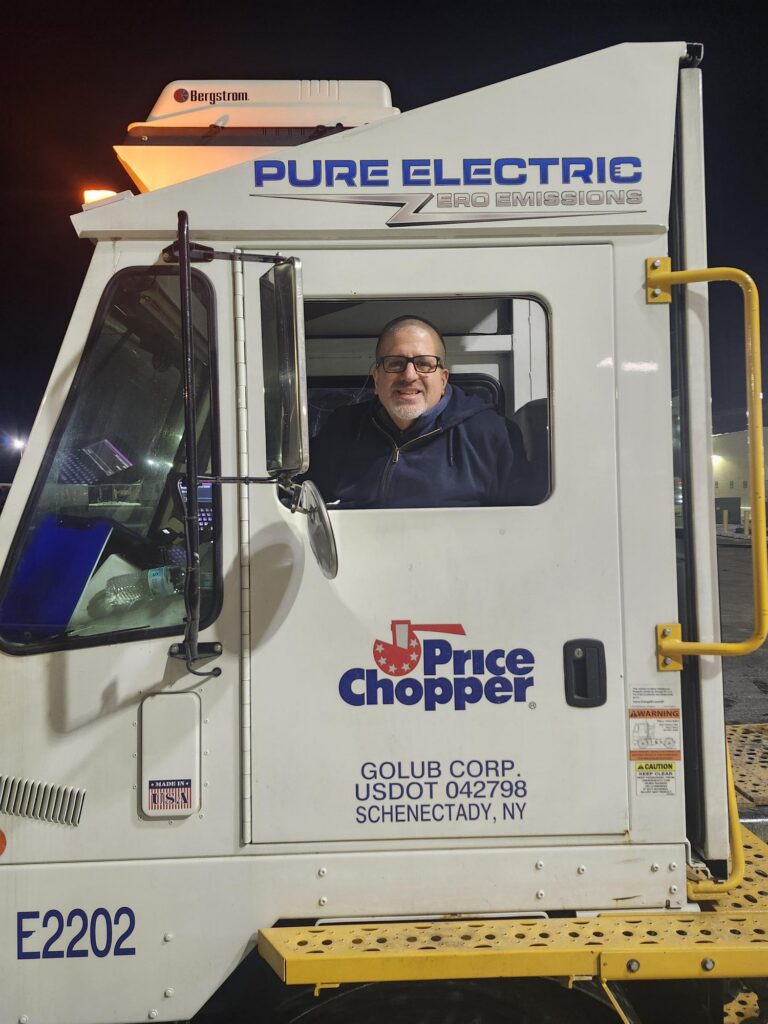
It is with great respect and appreciation that we recognize Billy Wertman for his outstanding dedication, professionalism, and unwavering commitment to Market 32/Price Chopper.
Billy has devoted 37 years to this company, beginning his journey in our stores bagging groceries and supporting locations wherever help was needed. Seeking a full‑time opportunity, Billy relocated to Middletown, NY, where his determination and strong work ethic quickly set him apart. He earned a promotion to Produce Manager, and after returning to the Capital Region, continued his success at the old Glens Falls location. Billy was also key in helping stores set up and get back on track. Billy spent additional time in the Worcester market as a veteran Produce Manager, helping them pull struggling produce departments back together. But Billy’s story doesn’t end there — it grows into a true family legacy.
Following in the footsteps of his father, a longtime Price Chopper driver who rose to the highest seniority before retiring and determined to continue that tradition, Billy earned his Class A CDL on his own and gained valuable experience outside the company before transitioning into transportation. Over the next 28 years, he represented Market 32/Price Chopper with skill, reliability, and integrity. What he enjoyed most about his driving career was the people — working with and for good people — and the ever‑changing “office views” the road provided. In true Billy fashion, his first official run out of the Distribution Center involved resolving an urgent trailer situation in Burlington, VT… setting the tone for a career marked by dependability.
Eventually, Billy made the decision to bring his experience back to the Distribution Center as a yard jockey, where he quickly became an indispensable part of the operation. He is the steady and trusted presence everyone counts on. He provides expert insight into new teammates and dispatchers, drawing on decades of firsthand experience. Additionally, Billy spots issues before they become problems, vigilantly monitors refrigerated loads, and approaches every challenge with unmatched calm and seasoned judgment.
When Billy is in the yard, dispatcher supervisors know the operation is in capable hands. His dependability is legendary, as precise and consistent as a Swiss watch. His work ethic, attention to detail, and deep understanding of our operation make him a cornerstone of daily operations.
We are proud to recognize Billy Wertman for his exceptional contributions and for embodying the very best of Market 32/Price Chopper. -Mike Brosnan, Dispatch Supervisor
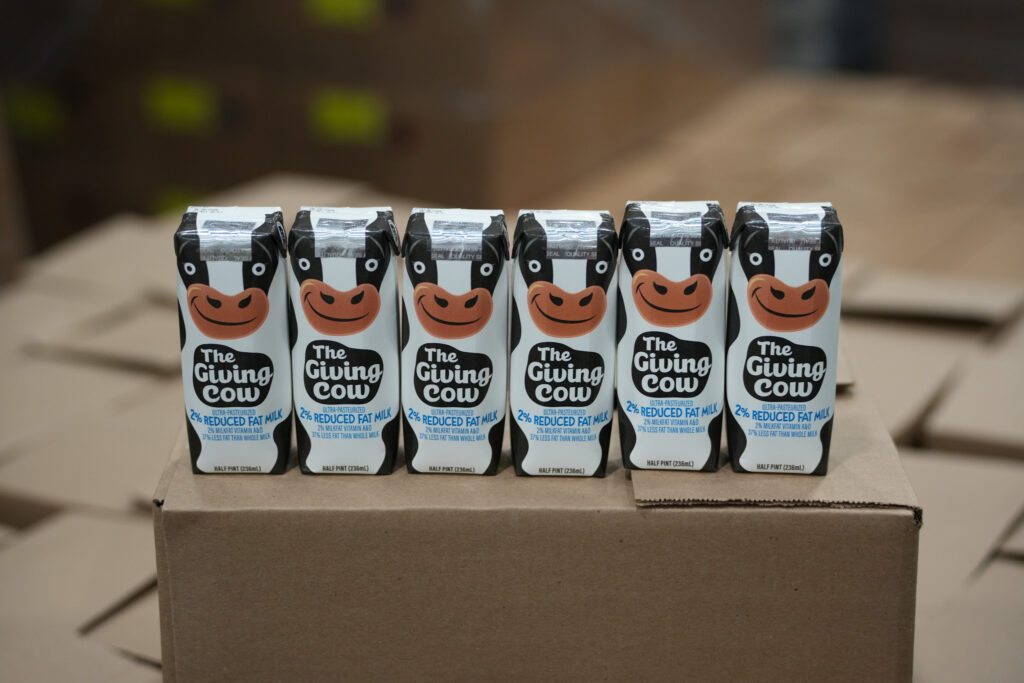
Northeast Grocery and Garelick Farms Donate over 7,000 Cartons of Milk to the Food Bank of Central NY through Giving Cow Program
Schenectady, N.Y., February 6, 2026– Northeast Grocery, the parent company of Market 32, Price Chopper, and Tops Markets, today announced the successful conclusion of its partnership with Garelick Farms’ Giving Cow program, resulting in the donation of 7,420 8 oz. cartons of shelf-stable milk to the Food Bank of Central NY.
During the Giving Cow promotion, one half-pint Giving Cow milk container was donated with every gallon of Garelick milk purchased at participating Market 32, Price Chopper, and Tops Markets stores. The initiative helps address a critical need, as milk is one of the most requested—yet hardest to source— food bank items.
“Nourishing families is at the heart of our mission,” said Pam Cerrone, Market 32 and Price Chopper’s director of community relations. “Through Market 32 and Price Chopper Cares, alongside the Giving Cow program, our customers helped turn everyday purchases into meaningful support for families facing food insecurity. Together with Garelick Farms, we’re proud to help ensure nutritious milk reaches those who need it most.”
“At Tops, our Neighbors Helping Neighbors philosophy means showing up in meaningful ways for the communities we serve,” said Courtney Mailhot, community relations manager for Tops Markets. “Milk is a staple for families, yet it’s one of the hardest items for food banks to keep in stock. Through this partnership with Garelick Farms and the generosity of our customers, we’re proud to help provide essential nutrition to our neighbors and take another important step toward our mission of eradicating hunger across our communities.”
“Childhood hunger is one of the most urgent issues we face, and access to nutritious staples like milk matters,” said Brian McManus, chief operations officer at Food Bank of Central New York. “This donation from Market 32, Price Chopper, and Tops Friendly Markets will be a welcome and popular addition to the food we distribute to families. We deeply appreciate their continued commitment as a long-time partner of the Food Bank.”
“Garelick supports families facing food insecurity through Giving Cow, a shelf-stable milk created for food bank distribution,” said Brooke Ryan, Garelick Farms NY general manager. “By eliminating the need for refrigeration until opened, Giving Cow makes milk easier for food banks to store and share. Working with Market 32, Price Chopper, and Tops Markets, Garelick is helping more families access a dependable source of nutrition. We are honored to support local communities by providing such a vital dietary staple.”
The Garelick Giving Cow program reflects the power of collaboration among retailers, suppliers, and customers, and is part of Northeast Grocery’s ongoing commitment to fighting hunger and supporting community health year-round. All donations generated through the program will help support children and families with an essential source of nutrition.


Recipes from Around the World
In spirit of the games starting up, we’re celebrating with recipes from around the world. Check out some of our favorite recipes below, learn about their origins, and try a dish you may not have had before, all while enjoying the games.
Grilled Thai Peanut Chicken Tenders with Pepper-Broccoli Slaw: Thai peanut chicken is a dish that originates from Thailand, where peanut sauces are commonly used in various recipes. The dish typically features chicken cooked in a rich, creamy peanut sauce made from ground peanuts, coconut milk, and a blend of spices. This sauce is often paired with vegetables and served over rice or noodles. The use of peanuts in Thai cuisine can be traced back to the influence of Chinese cooking, as peanuts were introduced to Thailand through trade. Over time, the dish has gained popularity worldwide, especially in Western countries, where it is often adapted to suit local tastes.
Middle Eastern Mushroom Burgers: Middle Eastern mushroom burgers are a modern culinary creation that draws inspiration from traditional Middle Eastern flavors and ingredients. This dish reflects the region’s rich culinary heritage, which often incorporates spices, herbs, and vegetables.
Mushrooms are commonly used in Middle Eastern cuisine, often featured in dishes like stuffed vegetables or as part of pilafs. The concept of a mushroom burger emerged as a response to the growing demand for plant-based alternatives, combining the savory umami flavor of mushrooms with spices typical of the region, such as cumin, coriander, and garlic.
Japanese-Style Crab Cakes: Japanese-style crab cakes, often referred to as “kani korokke,” are a fusion of traditional Japanese cooking and Western influences. The concept of crab cakes itself is believed to have originated in the United States, particularly in Maryland, where blue crab is a staple. However, the Japanese adaptation incorporates local ingredients and flavors.
Kani korokke typically features a mixture of crab meat, mashed potatoes, and seasonings, which are then breaded and deep-fried until golden brown. The use of panko breadcrumbs gives them a light and crispy texture, which is a hallmark of Japanese cuisine.
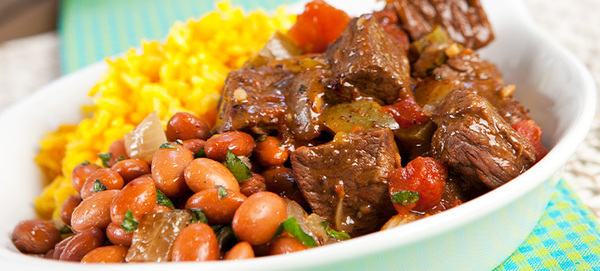
Carne Guisada Recipe | Price Chopper: Carne Guisada, which translates to “braised meat,” is a traditional dish with roots in both Mexican and Tex-Mex cuisine. Its origins can be traced back to the Spanish influence on Mexican cooking, where stews made with various meats and spices were common. The dish typically features beef that is slow-cooked with a variety of ingredients, including tomatoes, onions, peppers, and spices, resulting in a rich, flavorful gravy.
In Mexico, carne guisada is often served with rice, beans, or tortillas, and it varies by region, with different spices and cooking methods reflecting local tastes.
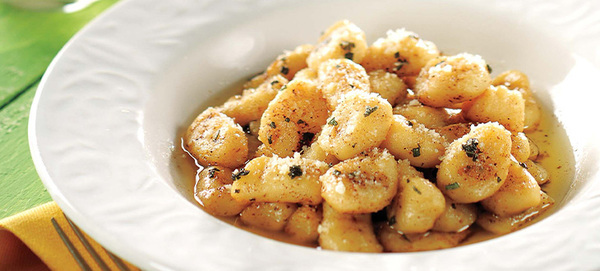
Gnocchi with Brown Butter & Sage: Gnocchi is a type of Italian dumpling that has its origins in ancient Roman times. The word “gnocchi” is believed to derive from the Italian word “nocca,” meaning “knuckle,” which may refer to the shape of the dumplings or the way they are formed. Traditionally, gnocchi were made from a mixture of flour and water, but over time, potatoes were introduced, particularly in the 18th century, leading to the soft, pillowy texture that is now characteristic of potato gnocchi.
The dish has evolved regionally across Italy, with variations that include different ingredients such as ricotta, semolina, or even spinach. Each region has its own unique take on gnocchi, often served with various sauces, from simple butter and sage to rich tomato or cream-based sauces.
Sheet-Pan Fish & Chips: Fish and chips is a classic British dish that originated in the United Kingdom during the 19th century. Its roots can be traced back to the introduction of fried fish by Jewish immigrants from Portugal and Spain, who brought the technique of frying fish in batter. The first recorded mention of fish and chips as a combined dish appeared in the 1860s, with the opening of the first fish and chip shop, believed to be in London.
The dish gained popularity during the Industrial Revolution, as it provided a cheap and filling meal for the working class. The combination of crispy fried fish, typically cod or haddock, served with thick-cut chips (fries) became a staple in British cuisine. It was often enjoyed with malt vinegar and mushy peas.
Sweet & Tangy Pulled BBQ Chicken and Slaw Sandwiches: BBQ sandwiches have their origins in the Southern United States, where barbecue culture is deeply rooted in regional traditions and cooking methods. The concept of barbecuing meat dates back to indigenous practices, but it evolved significantly with the arrival of European settlers, particularly in the 18th and 19th centuries.
The term “barbecue” itself is believed to come from the Taino word “barbacoa,” which referred to a method of cooking meat over an open flame. In the South, various meats, especially pork, were slow-cooked over wood or charcoal, resulting in tender, flavorful dishes. The practice of serving this smoked or grilled meat on bread, creating a sandwich, became popular as a convenient way to enjoy BBQ.

Cozy Up With Comfort Food
Cold, snowy weather is on the way! Shop your cold weather essentials and comfort food ingredients before it arrives. Check out some of our favorite cold weather recipes to cozy up with below.
Jalapeño Popper Slow Cooker Mac & Cheese: Deliciously creamy dish that combines the classic comfort of mac and cheese with a spicy kick from jalapenos. Perfect for busy weeknights, this recipe allows you to simply toss the ingredients into a slow cooker and enjoy a flavorful, cheesy meal with minimal effort.
French Onion Brisket: Savory dish that features tender, slow-cooked brisket infused with the rich flavors of caramelized onions and aromatic herbs. This hearty meal is perfect for gatherings, offering a deliciously comforting experience that pairs beautifully with mashed potatoes or crusty bread.
Asian Noodle Soup: A flavorful and comforting dish that combines tender noodles with a savory broth, fresh vegetables, and aromatic herbs. This versatile recipe can be customized with your choice of protein, making it a perfect meal for any occasion, whether you’re looking for a quick weeknight dinner or a cozy weekend treat.
Basil-Tomato Soup with Cheesy Matzo Balls: A delightful twist on a classic favorite, featuring a rich and tangy tomato base infused with fresh basil. The addition of fluffy, cheesy matzo balls adds a comforting texture, making this dish perfect for cozy meals or as a warming starter on chilly days.
Greek Grilled Cheese: Greek Grilled Cheese is a deliciously unique twist on the classic sandwich, featuring a blend of tangy feta cheese, creamy mozzarella, and fresh spinach, all grilled to golden perfection. This flavorful combination brings a taste of the Mediterranean to your lunch or snack, making it a satisfying option for cheese lovers looking for something different.
Italian Beef Sandwich: The Italian Beef Sandwich is a Chicago classic, featuring tender, thinly sliced beef simmered in savory au jus and served on a crusty roll, often topped with spicy giardiniera or sweet peppers. This hearty sandwich is perfect for a satisfying lunch or dinner, bringing a taste of Chicago’s rich culinary heritage to your table.
Smoked Bacon & Cheddar Twice-Baked Potatoes: A decadent side dish, featuring fluffy baked potatoes filled with a creamy mixture of cheddar cheese, crispy smoked bacon, and chives. Baked a second time to achieve a golden, crispy top, these potatoes are perfect for adding a savory twist to any meal or serving as a crowd-pleasing appetizer.
Savory Bacon, Spinach & Artichoke Breakfast Tarts: A delightful way to start your day, featuring flaky pastry filled with a rich mixture of crispy bacon, fresh spinach, and tender artichokes. Baked to golden perfection, these tarts offer a deliciously satisfying combination of flavors and textures, making them a perfect brunch option or a quick breakfast treat.
Monkey Bread Makeover: A fun twist on the classic pull-apart treat, featuring a delightful combination of flavors that can range from sweet cinnamon to savory garlic and cheese. This versatile dish is perfect for breakfast, brunch, or as a shareable snack, making it a crowd-pleaser for any occasion.
Use code “STORM2026” for free delivery on your order of $35 or more thru 1/26
Market 32 and Price Chopper Customers Drive Donation of More Than 85,000 Food Bags
Schenectady, N.Y., January 20, 2025– Thanks to the generosity of Market 32 and Price Chopper customers, 85,198 bags of food have been donated to local food banks and pantries. This donation is helping to provide essential nutrition to families and individuals experiencing food insecurity across the communities the company serves.
Between November 1, 2025 and January 3, 2026, shoppers at all Market 32 and Price Chopper stores were invited to purchase pre-packed $10 food donation bags filled with PICS-brand staples most requested by food assistance organizations including elbow macaroni, peanut butter, canned chicken and tuna, soup, and kidney beans—versatile, shelf-stable ingredients that provide the foundation for healthy meals.
Market 32 and Price Chopper also expanded the program by donating one food bag for every four bags purchased by customers during the federal government shutdown in November, contributing an additional 10,000 food bags to communities facing increased need during that time.
Each store selected a local hunger relief organization to receive the donations, ensuring that support remained close to home and directly served neighbors experiencing food insecurity.
“Through this program, we’re able to turn everyday shopping trips into meaningful support for local families,” said Pam Cerrone, Market 32 and Price Chopper director of community relations. “This initiative is a simple but powerful way to fight food insecurity and ensure nutritious food reaches those who need it most.”
The $10 food bag program is one of many Market 32 and Price Chopper initiatives focused on addressing food insecurity. In addition to customer-led fundraising programs, the company provides support for hunger relief organizations across its six-state footprint through food donations, teammate service, and sponsorships, reinforcing its ongoing commitment to nourishing life in the communities it serves.”
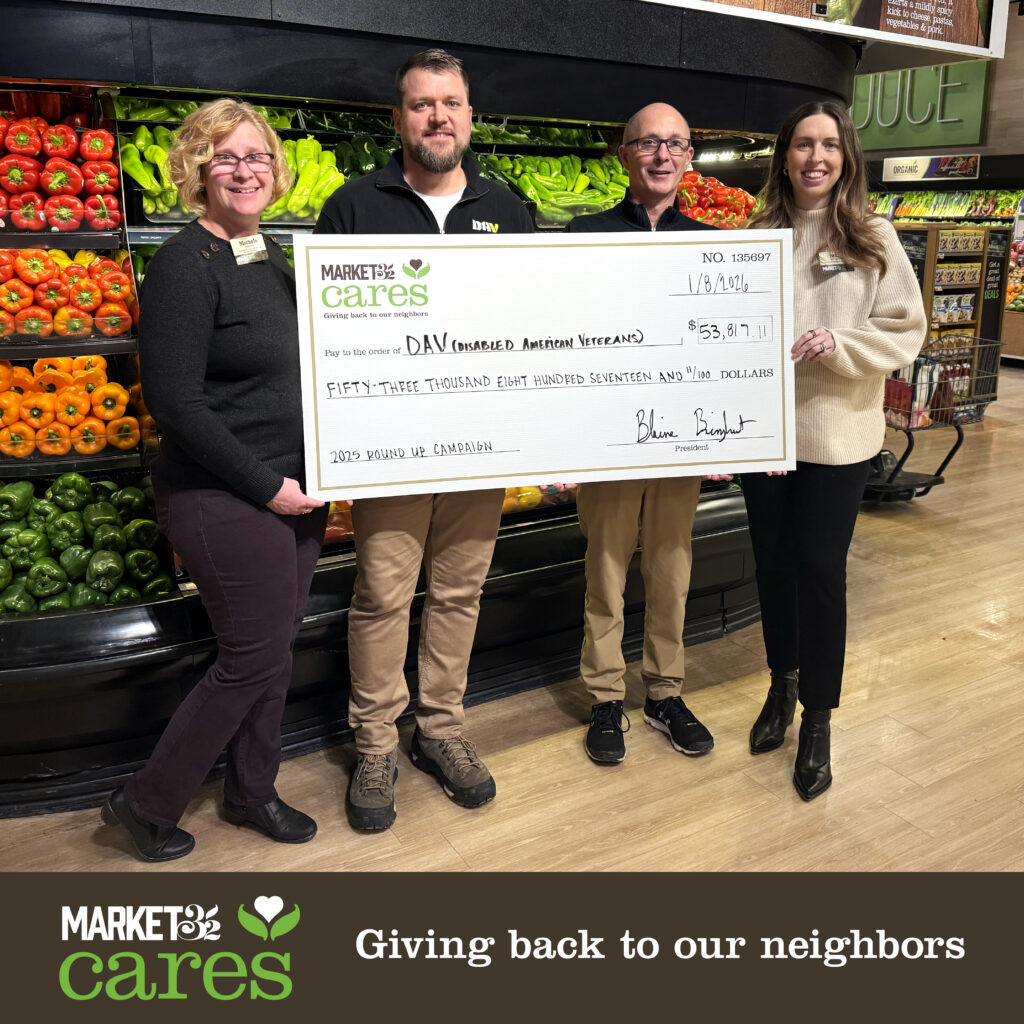
Market 32 and Price Chopper Donate $53,817 to DAV (Disabled American Veterans)
Schenectady, N.Y., January 9, 2026– Market 32 and Price Chopper today presented a $53,817 donation to DAV (Disabled American Veterans), reflecting the generosity of customers and teammates who supported the company’s November fundraising campaign. Shoppers across all 129 stores contributed $43,817 by rounding up their totals at checkout. Market 32 and Price Chopper added a $10,000 corporate match.
These funds will help DAV to provide no-cost, lifetime assistance to veterans, their families, caregivers, and survivors. DAV assists more than one million veterans each year through benefits assistance, employment opportunities, transportation to VA medical appointments, and more.
“At Market 32 and Price Chopper, our mission is to help people feed and care for their families, and our broader purpose is to support the well-being of the communities we serve,” said Blaine Bringhurst, the company’s president. “DAV’s commitment to helping veterans live healthy, dignified, and secure lives aligns with that purpose. We’re proud to stand with our customers in supporting an organization that offers life-changing assistance to those who have served our country.”
In 2024, DAV filed over 560,000 Department of Veterans Affairs benefits claims and provided more than 235,000 no-cost rides to VA medical appointments for veterans. In addition to providing direct services, DAV advocates on Capitol Hill, educates the public on veterans’ issues, and strengthens communities through its local chapters—ensuring America’s heroes receive the benefits they earned.
“Thanks to Market 32 and Price Chopper’s continued commitment to veterans, DAV can expand its reach and deliver critical support to ill and injured veterans nationwide,” said Barry Jesinoski, CEO and national adjutant of DAV. “Funds raised through this campaign directly advance our mission to help veterans access the benefits they have earned, including health care, employment, and education.”
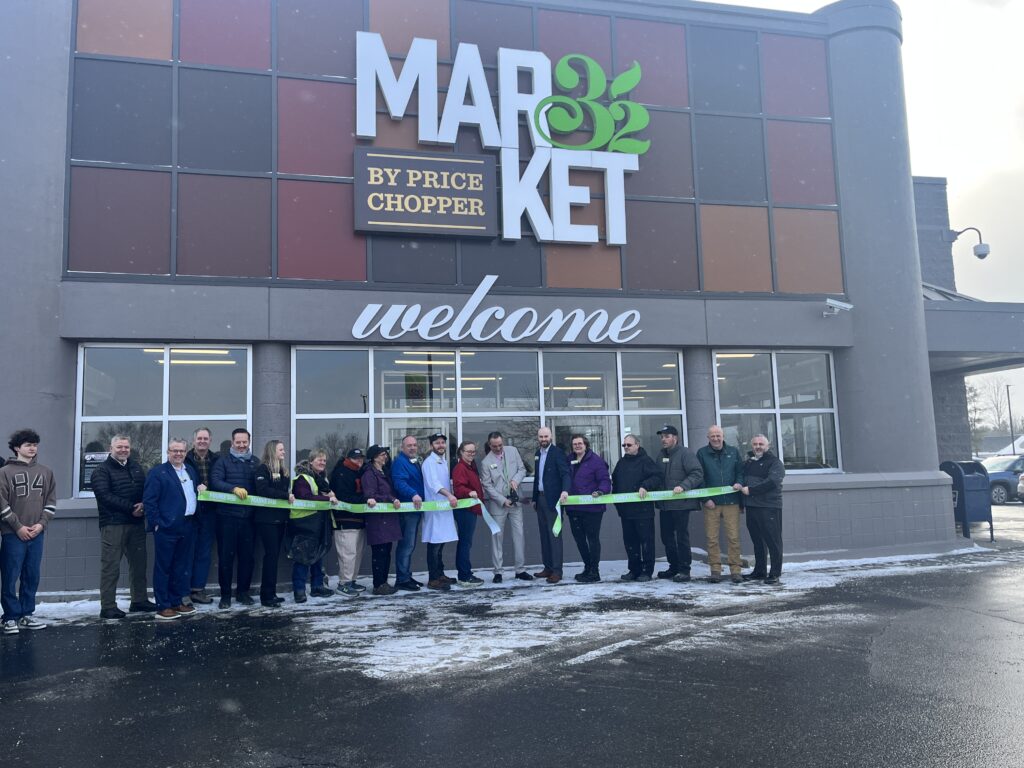
Market 32 and Price Chopper Unveil Vermont’s Newest Market 32
Schenectady, N.Y., January 16, 2026– Market 32 and Price Chopper have officially opened Vermont’s newest Market 32 location following the completion of a full conversion of the former Price Chopper supermarket at Route 15 and Munson Ave. in Morrisville. The store—which is more than 53,000-square-feet—becomes the 52nd Market 32-branded location across the regional grocer’s six-state footprint. Designed to meet evolving customer preferences, the location now features a distinctly modern look and feel, highlighted by open sightlines, soft earth-tone décor, enhanced lighting, and product-forward displays, all part of a $3.4 million investment in improvements.
“We’re proud to introduce the Market 32 brand to Morrisville and deliver an enhanced experience that reflects how our customers shop today,” said Blaine Bringhurst, president of Market 32 and Price Chopper. “This transformation provides a fresh, contemporary store while continuing to serve customers in the location they know and trust.”
Following months-long renovations, the location closed briefly on the evening of Thursday, January 15, to complete final renovations, and reopened at 6:00 a.m. on Friday, January 16, as a fully reimagined Market 32. To commemorate the occasion, company leaders were joined by local elected officials and dignitaries for a ceremonial ribbon cutting, the Peoples Academy choir performed the National Anthem, and customers enjoyed free product samplings.
In addition to the aforementioned upgrades to the store’s layout and amenities, the location also emphasizes convenient, ready-to-eat options alongside fresh, handcrafted, and locally sourced products. Intuitive product adjacencies enhance ease of shopping, while specialty offerings include Boar’s Head deli products, in-store freshly baked artisan bread, and a hot food buffet.
Led by Store Manager Mike Dennis, the new Market 32 also includes expanded floral, produce, specialty cheese, and wine offerings. In addition, it has a new seating area featuring ADA-accessible tables with built-in charging ports, where customers can enjoy the store’s wider assortment of prepared foods and convenient “to-go” meal offerings.
“This store directly incorporates the feedback and ideas we hear from our customers,” Bringhurst added. “We’re incredibly proud of the result and grateful to our teammates, whose passion and dedication continue to make a real difference for the communities we serve.”
Continuing the grand reopening celebrations, customers will receive 5% off their grocery purchase today and tomorrow, January 17. Market 32 will also donate 5% of sales from those two days to Lamoille Community Foodshare, a network partner of the Vermont Food Bank focused on alleviating hunger in Lamoille County, and Morrisville Soccer Club, a 100% volunteer-run youth soccer organization committed to teaching the principles of teamwork, sportsmanship, and citizenship.
“Market 32 and Price Chopper are dedicated to being a meaningful presence in the communities we serve,” said Bringhurst. “Our investment in this store reflects our long-term commitment to Morrisville—not only to provide quality products and value, but to continue supporting our neighbors through strong community partnerships for years to come.”