


Embrace strawberry season with some fresh, easy strawberry chia seed jam. This recipe is sweet, delicious and fruit packed. It takes 10 minutes to make and is a no-cook recipe. Not having to turn on the stovetop or the oven during the summer months is always a win-win, but it’s still fun to be in the kitchen creating and playing with food flavors.
This recipe is great to make with the kids in the morning. You can then enjoy it together at lunchtime, snack time or on summer picnics.
The chia seeds, also part of the super food group, serve as a natural thickening agent that happens to be “jam”–packed with goodness.
I love that I can make this for the week, control the amount of sugar and replace granulated sugar with honey.
Easy, No-Cook Strawberry Chia Seed Jam
by Jodie Fitz
1 pound fresh strawberries
3 tablespoons PICS honey or agave nectar
1 teaspoon PICS vanilla extract
3 tablespoons chia seeds
Wash and hull the strawberries. Pat them dry, or let them dry. Slice the strawberries.
Place the strawberries into a food processor or blender and blend until the strawberries are pureed.
Add the vanilla extract and honey. Mix the three ingredients together a little more in the food processor or blender.
Pour the mixture into a bowl. Fold the chia seeds into the pureed strawberry mixture.
Place the entire strawberry chia seed jam into a mason jar or other airtight container and place it in the refrigerator for at least two hours before using.
How long does it last in the refrigerator? You can keep your easy Strawberry Chia Seed Jam in the refrigerator for 3 to 5 days.
Can you freeze this jam? Yes you can!
Lessons for kids when making this recipe:
- Preparing fruit
- Hulling strawberries
- Measuring ingredients
- Folding
- Blender and/or food processor safety
- Following directions
- Natural thickening agents

Red, White and Blue Recipes for Fourth of July
One of the biggest days of the summer is upon us and we’re excited to celebrate! In the spirit of Independence Day we put together a list of some our go-to red, white and blue recipes. Not only are these ideas festive for the Fourth, they also make for fantastic summertime treats.
Red, White and Blue Trifle: Our recipe for Red, White and Blue Trifle has everything you need for a summer celebration. A cool, refreshing dessert with holiday spirit!
Cherry, Bacon & Blue Cheese Salad This tasty summer salad adds some red, white and blue to your greens. The flavors of cherry, bacon, and blue cheese mix perfectly in each bite.
Firecracker Popsicles: These popsicles may not be a full-blown recipe, but they are certainly a key factor in celebrating Fourth of July. They’re great for cooling down in the summer heat.
Stars & Stripes Cheese Board: What’s a celebration without cheese? This Stars & Stripes Cheese Board from our YouTube channel is an awesome game plan.
Pound Cake: This pound cake dish from our Pinterest page is another lovely Fourth of July treat. Made with Chobani® Whole Milk Plain Greek Yogurt, this pound cake makes for a fun addition to the menu! It’s just one of many awesome options on our Pinterest boards.
These are just a few creative ideas for the Fourth of July this year! After all, food can be fun and preparing festive dishes adds a certain pizazz to any holiday. Try any of these options or come up with your own creative meal. Either way visit your local Price Chopper/Market 32 or shop with us online for everything you need!
Happy Fourth!

Check Out Yasso's NEW Frozen Greek Yogurt Flavor
Yasso is the only better-for-you frozen dessert that delivers unsurpassed snacking satisfaction because we blends real, natural ingredients and flavors with the ridiculously creamy, wholesome goodness of Greek yogurt to create an truly crave-able frozen snacking experience. We don’t think you should have to sacrifice taste for cleaner ingredients. We’ve reimagined ice cream and the results are ridiculous, nostalgic, scoop shop flavors that don’t skimp on any of the cookie dough, chocolate chips or decadent swirls you love.
We use rich and creamy Greek yogurt as the base for our products to deliver an indulgent dessert that’s lower in calories (80-150 per serving) and packed with protein (5-7 grams per serving), made without high intensity sweeteners. You can enjoy Yasso anytime of day whether it be breakfast in the morning, an afternoon pick-me-up, or late-night snack.
Price Chopper now carries three NEW flavors to join our Black Raspberry and Chocolate Fudge on shelf. First, Triple Peanut Butter A.K.A three times the peanut butter goodness – and what’s better than that? We mixed peanut butter flavored frozen Greek yogurt with the smoothest peanut butter swirl and the most delicious peanut butter chips around. Next, our Mint Chocolate Chip and Peanut butter Crunch flavors won’t disappoint. Enrobed in an indulgent chocolate quinoa crunch, our new chocolate dipped products are sure to hit that 2PM sweet tooth. And 3 PM, and 5 PM, but you get the point.
Find all ridiculously creamy and delicious Yasso products in the freezer aisle

Celebrate Cheese During National Dairy Month
Maureen Rowan Murphy
People around the world have a love affair with cheese, and it’s easy to see why! Cheese is a flavorful and
healthful addition to many dishes. Most cheeses are a good or excellent source of calcium, a nutrient that many
people are lacking in their diet, and cheese also provides other essential nutrients like phosphorus and high-quality
protein. These three nutrients are particularly important to help build and maintain healthy bones.
With so many varieties to choose from, there is something to please everyone’s palate, and cheese can fit into most healthy eating plans. Those watching sodium in their diet, can choose softer, less-aged cheeses as they generally require less salt than harder, aged varieties. There are also cheeses available that are lower in sodium and fat available. Even people with lactose intolerance can enjoy cheese by choosing natural, harder cheeses like Cheddar, Colby, Swiss and Monterey Jack.
Cheese is a complex food made with just a few simple ingredients.
Did you know?
It takes 10 pounds of milk to make just 1 pound of cheese
There are more than 300 different cheeses in the U.S. and 2000 varieties in the world
Cheddar cheese is the most popular cheese in America while Mozzarella is the most popular globally
Cheese is the 2nd largest source of dietary calcium for Americans
The most popular cheese recipe in the United States is “macaroni and cheese”
Some varieties of cheese like mozzarella, cheddar, Swiss and American, may help prevent tooth as it promotes saliva flow which leads to the elimination of sugar and acids form the mouth
1 ½ oz. natural cheese or 2 oz. processed cheese is considered a serving about 4 dice-size cubes
Tips for Serving and Storing Cheese
Take cheese out of the refrigerator approximately 30 minutes before serving for best flavor and aroma
Create a delicious cheese platter by choosing up to 5 cheeses that differ in texture, flavor, size and shape
Arrange the cheeses from mild to strong and soft to hard and provide separate knives for each cheese to keep the flavors distinct
Choose a simple cracker without excess salt or flavors to enhance the flavor of the cheese(s)
Choose crusty breads for mild cheeses or a heavy fruit or nut bread with an aged or more complex selection when serving bread
Serve cheese with your favorite fresh fruit
Grapes can be served with almost any cheese
Pears go great with blue cheese, gorgonzola or aged Gouda
Fresh berries go nicely with a soft ripened cheese such as brie or camembert
Fresh or dried figs pair deliciously with Spanish Manchego or Reggiano Parmesan
Store cut cheese, tightly wrapped, in the refrigerator, away from other aromatic foods as it absorbs other flavors, and also loses both flavor and moisture when exposed to air
Cooking with Cheese
It is easier to shred or grate natural cheese when cold
Four ounces of ungrated cheese yields one cup when grated
When preparing sauces and soups, cook over low to medium heat and add toward the end of preparation as cooking over high heat, or for long periods of time, will cause the cheese to separate
For casseroles and baked dishes, sprinkle the grated/shredded cheese over the dish the last ten minutes of baking
Cheese can be enjoyed as an appetizer/snack or at any meal, and here’s a few recipe ideas.
Grab the kids, the paints and get ready to finger-paint in a whole new way!
What do you need?
• 1 white apron per child
• Purple paint
• Blue paint
• Green paint
• Yellow paint
• Orange paint
• Red paint
• White paint
• A paper plate or palette (preferably one per child)
• Water
• Paper towel or rag

- I recommend you put down a covering on the table before you begin the project to protect your surface as the paint can seep through the apron.
- Dip your thumb or finger into the purple paint and begin to create a rainbow arch starting with the smallest arch of the rainbow.
- Wash or rinse and dry that thumb or finger before dipping into the next color of paint.
- Just like the video, add the rest of the colorful rainbow arches: blue, green, yellow, orange and red. Don’t forget to wash/rinse your fingers between each color.
- You can let your rainbow dry before adding your clouds or you can do what I do, which is add the clouds right away. I like pulling some of the colors of the rainbow down into the puffy clouds like the video demonstrates – the option is yours!
- Optional: Add your name or words to the project like ‘Hope’, ‘Joy’, etc.
- Let it dry completely before wearing.
Your DIY Rainbow Craft apron is great to use as a smock for crafts, a smock for gardening or an apron for recipe making!
Rainbow Arch: If you have an independent child that wants to do it all or a young child that needs help with the arches of a rainbow, simply use a medal compass with a pencil to create the arches of the rainbow for them to follow. You can even put one dot of each color at the start of an arch so follow the colors or let them go free spirit. It’s good either way!
The Paints: The best paint to use for this project is fabric paint. However, you can use other permanent paint options like an acrylic craft paint, which just makes the area on the apron of your finger printed rainbow a little stiffer. Your apron will still be colorful, wonderful and useful!
Don’t Forget: Don’t forget to put on a smock, an apron, an old t-shirt or play clothes before doing this project. The paint will not come off of your clothes if it gets on them in the rainbow making process!
Now What?
Grab your aprons and join me in making recipes at the Price Chopper/Market 32 Kids Cooking Club! We have all kinds of delicious recipes! Coming soon…I will be introducing a no-rise dough pizza making activity for kids that coordinates with both the Kids Cooking Club and my book Fidget Grows a Pizza Garden.
This rainbow apron is easy and fun to make, and you can view it here
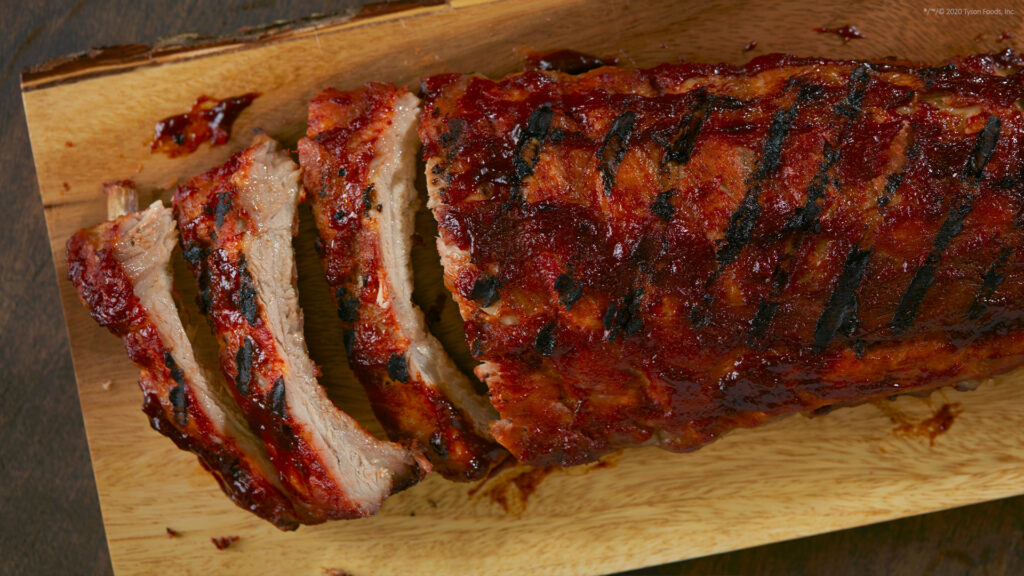
5 Ways to Make Your Ribs the Envy of the Neighborhood
The sun is out, grills are lit, Father’s Day is just around the corner and ribs are on the menu. This year up your ribs game with Chairman’s Reserve® Prime Pork ribs and these tips from our brand team.
Start with the basics. For fall-off-the-bone tender ribs, cook them slowly over low heat, around 225°F, ensuring the tougher parts melt away before the meat cooks through. To do that, set your grill up for indirect cooking. Here’s how:
- Charcoal: Add charcoal to only one side of your grill. Place your ribs on the other side, away from the active fire.
- Gas: Light burners on only one side of your grill. Place your ribs on the other side, away from the active fire.
To get the perfect texture, you’ll want to cook your ribs to the right internal temperature. There are two ways to tell when ribs are ready to come off the grill – using a meat thermometer or using the bend test.
- Thermometer: Using your meat thermometer, insert the probe directly between two ribs in the center of the rack. When the internal temperature reaches 207°F, your ribs are perfectly cooked.
- Bend test: Using tongs, pick up your slab of ribs, holding only one or two ribs between the tongs. Bounce the ribs gently. If the surface cracks when bent, your ribs are ready.
Part of what makes ribs spectacular is that perfectly caramelized coating of barbecue sauce. But getting sauce (and enough sauce) onto the ribs without burning it can be tricky.
Perfectly sauce your ribs: Wait until your ribs have reached the right internal temperature before adding sauce. Then, brush both sides with sauce and place back onto the grill. This time put the ribs on the side of the grill where your fire is lit and cook for about 12 minutes.
Get extra saucy ribs: Executive Chef and Culinary Consultant Chef Guy Meikle recommends cutting your ribs into individual pieces before saucing. This lets you toss your ribs with sauce in a large bowl, coating all the sides instead of just two. Then return the ribs to the grill for 12 minutes to caramelize.
Fun fact: Food trends start in restaurants before trickling to home chefs. Be the first of your friends to get rich, rewarding ribs by adding intriguing sauces or fun textures to your ribs. Check out Chef Guy’s tips:
Be a sauce savant: Use familiar concepts as base ideas – for example, transform a sweet Asian sauce into a Maple Gochujang Glaze.
Add appealing textures: Accentuate the smokiness of your ribs by introducing textures. Just a sprinkle of citrus zest, fried shallots or puffed rice can add a new element to your classic ribs.
The most important part of having tender, juicy, delicious ribs is starting with a great product.
How to get perfect ribs: Stop by Price Chopper and pick up Chairman’s Reserve Prime Pork Ribs, which are hand-selected and hand-trimmed to give you a perfect meal every time.
®/© 2020 Tyson Foods, Inc.
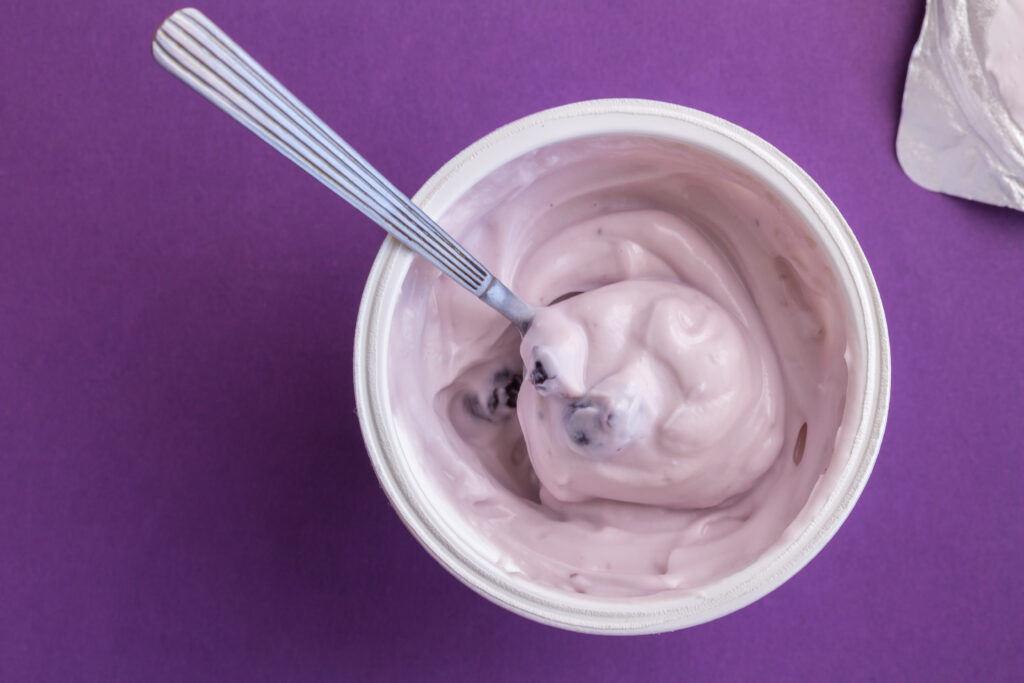
As National Dairy Month moooooves into its second week, we are celebrating all the sweet and savory ways yogurt can add benefit and bounty to your family meals. It is packed with protein, a good source of potassium, calcium, some B vitamins and more. Yogurt ranges in flavor and texture from delicate to decadent and everything in between – explore the many ways you can enjoy fresh, creamy yogurt!
Like milk, yogurt is a wonderfully versatile ingredient. Tangy, sweet, rich, full fat, low fat – there are a lot of ways to eat it on its own or as part of a recipe. Yogurt can complement and connect a diverse number of ingredients – spices and herbs, produce and proteins, whatever is in season can be married with yogurt. Plain Greek yogurt can substitute for mayonnaise or sour cream in recipes. Like easy and simple? Yogurt is your go-to for quick combos like parfaits with berries and granola, a whole food favorite of kids and adults. Love to entertain? Make it savory and wow your guests and family with recipes for appetizers, soups, entrees and desserts.
As we all embrace more local foods, it is great to know that for Price Chopper/Market 32 shoppers, yogurt is one of them. Dairy farming is part of the fabric of our communities. There are hundreds of dairy farms in the Northeast – over 90% of them are farmed by families that have been caring for their land and cows for generations. Dairy farmers have been navigating the same issues that have impacted us all over the last few months, and are working hard to ensure their delicious and nutritious products are available to near and far. Enjoying the yogurt and dairy items we carry in stores benefits local farms, local economies, your family and theirs – check out some of these amazing recipes, which highlight fresh items in the store right now – PICS Yogurt, sweet corn and sweet cherries! You will make delicious memories for your family and friends when you try one of these!

Local Produce Season: A Crop Roster
We’ve been partnering with local farms since 1932, and it’s because of their hard work that we’re able to offer fresh, regional produce in our stores each year. Some of these farms, like Black Horse Farms in Coxsackie, NY have been partnering with us for over 50 years! This time of year is one of our favorites because of all the local crops that become available. You probably know that some crops take longer to grow than others, but do you know which ones are the early crowd and which ones take longer here in the Northeast? We break it down below!
Season Starters
Introducing our growing season starting lineup: lettuce, summer squash and radishes.
Lettuce: Thriving in temperatures around 60ºF to 70ºF, lettuce is definitely a lead-off batter in the growing season lineup. Many varieties of lettuce reach maturity in as little as 30 days, and some can be harvested even before then as microgreens.
Squash: Squash shine their brightest when the air temperature reaches an average of 65ºF. They need 50 to 65 frost free days to properly mature, making them typically safe for planting in the final weeks of spring.
Radishes: We source radishes from local folks like A. Gurda Produce in Pine Island, NY. Requiring anywhere from 22 to 70 days to harvest in New York’s Black Dirt Region, radishes are a cool-weather crop, so farmers try to complete harvesting before the weather becomes too warm. If you’re a home grower, radishes are best sown in the garden two to three weeks before the average last frost in spring.
Peak-Season Heavy Hitters
When the growing gets hot, our heavy hitters get growing: corn, eggplant, peppers, and tomatoes.
Corn: Corn thrives when the soil temperature reaches 60ºF. Two to three weeks after the last frost of spring is a good estimate. Depending on the variety and amount of heat during growing season, corn takes between 60 to 100 days to harvest. It grows well in air temperatures from 60ºF up to as hot as 95ºF. We get corn from folks like Shaul Farms in Fultonham, NY and Kinderhook Creek Farm in Stephentown, NY: some of the best corn growers in the corn growing game.
Eggplant: Eggplant needs a long, warm growing season to reach their full potential. They’re sensitive to cool climates and will fail in any frost or light freezing. Ideally, eggplants need four months of 60ºF to 85ºF temperatures. If you’re a gardener and are located in a cooler spring climate, eggplant will ideally need to be started indoors.
Peppers: Speaking of starting indoors, peppers need similar treatment. Start your seeds indoors 8-10 weeks before the last spring frost date. They require a growing season of 60 to 90 days. Once we start getting in Northeast-grown peppers in our stores we know the season’s growing peak is in full effect!
Tomatoes: We’re proud to source tomatoes from a variety of local farms, like Paul Mazza’s in Essex, VT. Tomatoes enjoy having their fun in the sun, and do not tolerate frost. It takes tomatoes between 60 to 80 days to mature. When planting, our farmers have to make sure their crop is in an area where it can receive 6 hours of sunlight a day. Luckily, most farm fields in our region are wide open and get plenty of sun!
Late Season MVPs
At the end of the season, we call on the MVPs to close things out: hard squash and pumpkins.
Hard Squash: Hard squash grows best in air temperatures of 50ºF to 90ºF. It has a growing season of anywhere from 60 to as many as 110 days. If you’re growing them in your garden, they should be set to plant no later than three weeks after the last frost of spring, or once the soil has warmed to at least 60ºF. A lot of folks are on Team Butternut, but we’re fanatics of Team Acorn.
Pumpkins: A favorite crop of farms like Black Horse Farms in Coxsackie NY, pumpkins are a tender vegetable. In Northern locations, pumpkins for Halloween are usually planted in late May. We typically offer regionally-grown pie pumpkins until early-winter, which wraps up our local growing season roster until the following year.
There you have it! We hope you’ve enjoyed our home.grown. season breakdown. We’re lucky to partner with local growers in our region for locally grown produce each year. From apples to zucchini, when it’s made or grown here, we get it here!
Learn more about what home.grown. means to us!


Looking for a refreshing recipe to cool things down while having fun with the kids in the kitchen at the same time?
Check out my Homemade Strawberry Lemonade. It’s a great recipe to make with the kids without having to heat up an oven or turn on the stovetop.
Simply grab the blender, a few key ingredients and blend your way to recipe making yum. Even the simplest of recipes helps to strengthen and/or build kitchen skills while boosting recipe making confidence.
Here are a few key lessons to focus on when making the Strawberry Lemonade with children:
- Preparing fruit
- Hulling strawberries
- Slicing
- Extracting juice from lemons
- Measuring ingredients
- Following directions
- Blending
- Knife safety
- Blender safety
Homemade Strawberry Lemonade by Jodie Fitz
1 cup fresh sliced strawberries
2 whole lemons,
4 cups ice
2 cups water
½ cup PICS honey or organic agave nectar
2 teaspoons PICS vanilla extra
Prepare and measure the strawberries by washing them, hulling them and then slicing them before measuring.
Note: When making this recipe with younger children or children who have not sliced before, begin cutting soft fruits with a plastic knife until they become confident and understand safety procedures. Always remind them to be mindful of where their fingers are and to always make sure fingers are clear before cutting anything.
Cut the lemons in half to create four halves. Squeeze the lemon juice from the lemons.
Note: If you have a citrus squeezer simple squeeze it right into a blender pitcher, because it will catch the seeds. If you do the lemon squeezing by hand, simply squeeze the juice into a liquid measuring cup so that you can extract the seeds from the juice before pouring the freshly squeezed lemon juice into the blender.
Add the ice, water, strawberries, honey and vanilla extract together with the fresh lemon juice in a blender. Blend the mixture well; until the ice is crushed.
Serve and enjoy!

Milk Makes It Better
Ellie Wilson
MS, RDN Senior Nutritionist
World Milk Day is June 1st every year, kicking off National Dairy Month! Milk brings so much to the table – on its own, a refreshing, nutritious, local food that is sustainable and sustaining – milk’s 9- nutrient package improves the nutrition quality of every meal and snack it accompanies. I love the opportunity to pair milk, cheese or yogurt with all kinds of produce – flavor, texture and benefit all come together in many delicious ways! I am a dairy “agvocate” – science and practice as a nutrition professional has shown me the many benefits of including milk and milk products in meals and snacks, and we will showcase some delicious, nutritious meal and snack ideas, especially for family meals, all month long!
Milk is the definition of comfort food – one of those things everyone buys when the weather forecast is turning, one of the ingredients in almost every one of your grandmother’s recipes, and what so many of us reach for and enjoy when we are just browsing in our own refrigerators! Milk is also what so many families ask for when they are struggling with healthy food access – parents know milk is a smart way to ensure children have the energy and nutrients they need to grow and thrive. Consider sharing this bountiful beverage with your neighbors and food banks through the Fill A Glass with Hope milk donation campaign this month. Fun fact – chocolate milk is a great recover drink, for kids and adults working and playing hard!
Taste rules – milk is a culinary team player, incredibly versatile, and always seasonal. In fact, fresh Price Chopper milk is a true local product, and goes from cow to cup in 48 hours or less! Savory or sweet, milk does it all – sauces, desserts, smoothies, the latest coffee beverage, soups, stews, appetizers or casseroles! Adding milk to your family meals is affordable and just one extra glass per day can close some nutrient gaps for adults and children. Winner, winner, milk with dinner – Enjoy!
Spring Sausage Vegetable Strata