


Happy December! As the holidays are in full swing, we want to make your culinary life as easy as pie. This week, we have three incredibly delicious chicken recipes that can be made for lunch, dinner or both. The best part? These meals have six or less ingredients.
Let’s dive in to our menu!
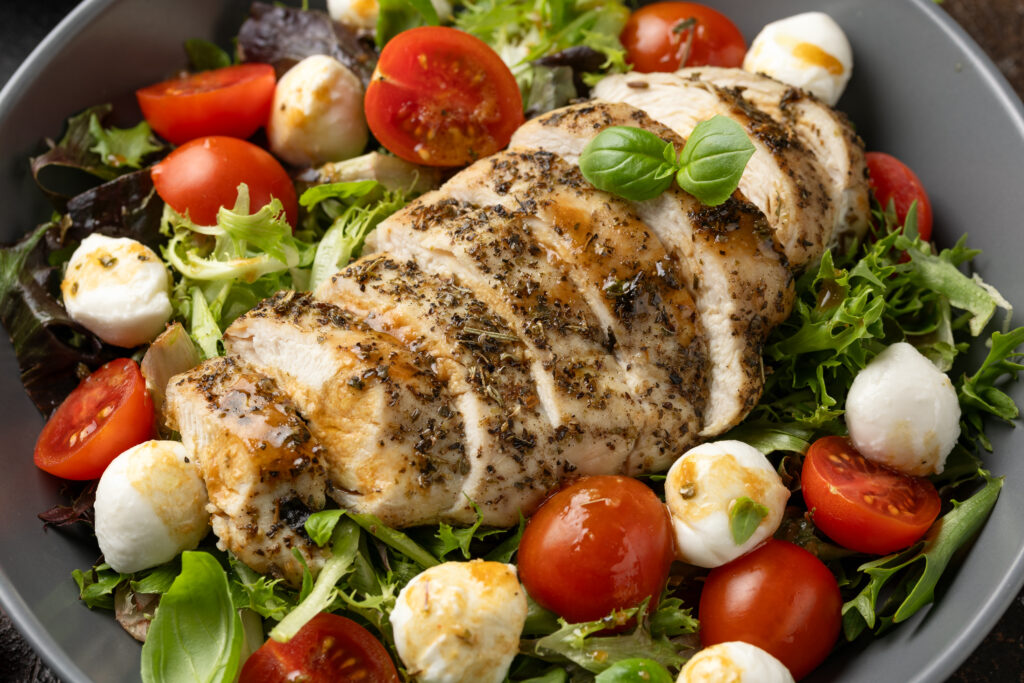
Chicken Caprese Salad
Market 32 Chicken Breast
1 bag Dole Salad Blend – buy one get one FREE with NatureSweet Cherrub tomatoes
1 package Market 32 Mozzarella (buy one get one FREE)
1 container Market 32 Basil
Chicken Parm
Market 32 Chicken Breast
1 package Market 32 Mozzarella (buy one get one FREE)
1 box Ronzoni Pasta
1 jar PICS Pasta Sauce
1 loaf Italian Bread
1 bag Green Giant Veggies
Chicken Tacos
Market 32 Chicken Breast
1 bag PICS Taco Tortillas
1 pouch PICS Taco Seasoning
1 jar PICS Salsa
1 container PICS Sour Cream
1 Avocado
Looking for More Inspiration?

Mia Teal
Marketing Coordinator, Paid Media
We get it—the holiday season can be hectic! Between gift shopping, wrapping, baking, and decorating for Santa, there’s a lot to juggle. That’s why at Price Chopper and Market 32, we’re here to help save you time and money with our meal solutions. Each week, we offer a Meal Plan to help you prepare for the busy week ahead.
Additionally, the next time you are shopping online or in store, check out our Meal Solutions. This wide variety of foods includes soups, salads, sandwiches, wraps, sushi, and rotisserie chicken. There is an option for everyone!
If you are passionate about cooking and would like to check out some of our previous simple, budget-friendly meal plans, take a look below!
Previous Meal Plans
- Buffalo Chicken Mac & Cheese ; Chicken, Asparagus, & Potatoes ; Chicken Spiedie Sandwiches
- Mushroom Swiss Burger ; Beef Tacos ; Beef Nachos
- Tomato Basil Shrimp Pasta ; Sheet Pan Salmon
- Traditional Lasagna ; Sloppy Joe Sandwiches ; Taco-Loaded Baked Sweet Potato
- Apple-Cinnamon Pancakes with Sausage ; Turkey Shepherd’s Pie
More Easy Meals
We are reeling in the shrimp recipes this week! Enjoy the tropical taste of shrimp, mango, and avocado with each bite! Let’s dive in and check out this week’s meal ideas, shall we?
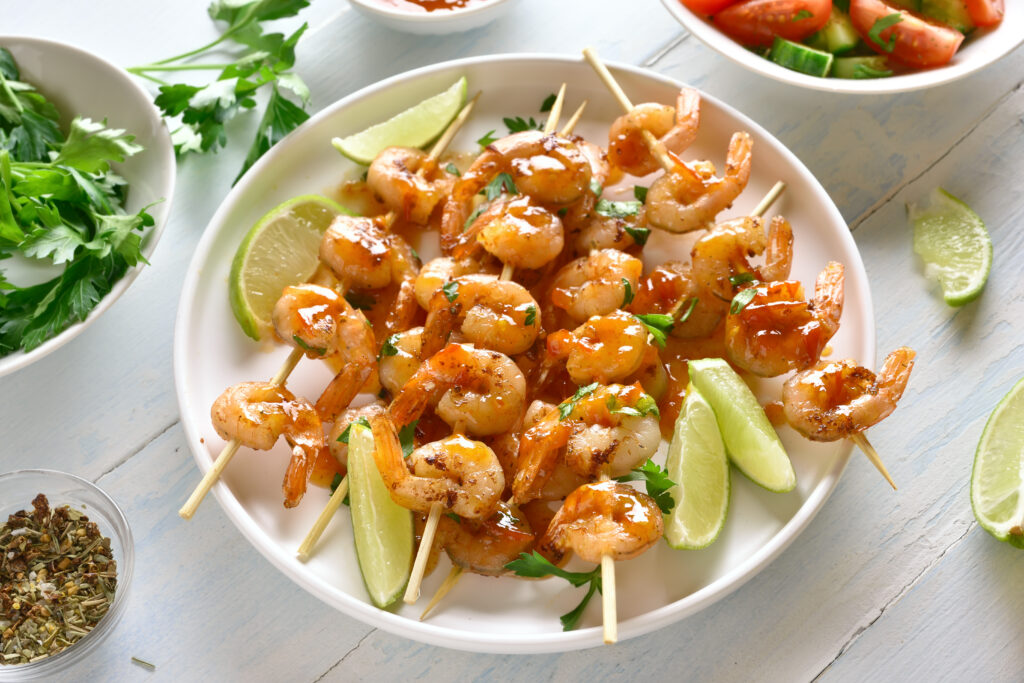
Shrimp & Mango Skewers
1lb. Market 32 Cooked Shrimp (Buy one get one FREE this week!)
2 Mangoes
2 Peppers
1 Vidalia Onion
1 bag PICS Rice
Shop for Shrimp & Mango Skewers here!
Shrimp Tacos
1lb. Market 32 Cooked Shrimp (Buy one get one FREE this week!)
1 bag PICS Tortillas
1 jar PICS Salsa
1 bag (8oz) PICS Shredded Cheese
1 Avocado (optional)
Shop for Shrimp Tacos here!

Hotter deals for warmer days! We have 3 meals for this week’s value plan adventure and hope to make your evenings easier and keep your kitchen cool. Let’s take a look at this week’s delicious trio!
3 lbs. (Buy 1.5 lb. get 1.5 lb. FREE) Market 32 Hand Trimmed Fat Free Chicken Breasts, Cutlets, or Tenders
1 pack Cappiello Mozzarella Cheese (Buy one get one FREE)
1 container Market 32 Vine Ripe Tomatoes
1 pack Market 32 Sub Rolls 6 pk
1 package Market 32 Basil
1 pack Market 32 Refrigerated Pizza Dough
1 bottle (Buy one get one FREE) Sweet Baby Ray’s BBQ Sauce (Mix & Match with Ken’s Dressing)
1 bottle (Buy one get one FREE) Ken’s Caesar Dressing (Mix & Match with Sweet Baby Ray’s)
1 bag Romaine Lettuce
1 pack PICS Flour Tortillas
Meal 1: Chicken Caprese Sandwiches
Nothing beats a delicious caprese sandwich on a warm summer day!
Essentials: Grill or slow cooker; bread knife, cutting boards, meat thermometer, two large or dinner forks for shredding.
Wash tomatoes and basil and allow to dry on a paper towel. Slice the tomatoes into thin rounds, and remove basil leaves from the stems. Set in place where you will assemble the sandwiches.
Slice 4 Market 32 Bakery Sub Rolls in half. (Tip – consider toasting, especially if you are grilling the chicken.)
Prep 1 – Oftentimes, restaurants will make this wonderful sandwich with a thin chicken cutlet, quick-grilled to juicy perfection and topped with the signature fresh mozzarella, tomato and basil that defines the Caprese combo. If you decide to grill the chicken, consider a quick brining, and cook all 3 pounds at the same time. Use the meat thermometer to keep an eye on the temperature, getting the chicken off the grill as soon as it hits about 160 degrees F, (measured in the center of the thickest part of the cutlet or tender) and wrap in clean foil/rest (off the grill) for about 5 more minutes, to finish cooking and reabsorb juices. Check the temperature again when you unwrap the foil, to be sure it is 165 degrees, recommended for food safety. Place the grilled cutlet on the sliced roll, and layer on the tomato, basil, and sliced mozzarella. The remaining chicken can be stored in a container in the refrigerator for up to 3 days, or in the freezer for up to 3 months.
Prep 2 – Another way to keep the kitchen cool is to cook all the chicken with a cup of water or low sodium chicken broth in the slow cooker (about 4 hours on low, or when it reaches 165 degrees), then shred and divide it for use in each of these recipes. Hack – use two large forks to shred the chicken in the slow cooker with the cooking juices, or in a flat-bottomed bowl. The shredded chicken can be used for the Caprese sandwich warm or cold. The tender shredded chicken will make it easier to enjoy the sandwich and keep it together for a flavor-full, easy clean up meal. It will also make the other two meals quick and easy!
1.5 lbs. Market 32 Hand Trimmed Fat Free Chicken Breasts, Cutlets, or Tenders
1 pack Cappiello Mozzarella Cheese (Buy one get one FREE)
1 container Market 32 Vine Ripe Tomatoes
1 pack Market 32 Sub Rolls 6 pk
1 package Market 32 Basil
Shop for Chicken Caprese Sandwiches here!
Meal 2: BBQ Chicken Pizza
Take your pizza to a whole other level with this BBQ Chicken Pizza recipe!
Preheat oven to 450 degrees.
Essentials: Pizza pan, stone or baking sheet, pizza slicer. Optional – cutting board, grater or chef knife, large spatula or pizza peel.
Pantry: PICS Olive Oil, optional apple and/or red or sweet onion.
Food safety tip – Use cooked/leftover chicken only – do not use raw chicken for the topping.
Defrost the pizza dough, if needed, in the refrigerator overnight, then allow it to come to room temperature. It may rise slightly. Use a lightly oiled metal pizza pan, sheet pan or pizza stone, and stretch the dough to fit to the rim of whatever you choose. First-time pizza makers, check this out for dough-licious skill building! Check out this article on Steps to Strecthing Pizza Dough.
Slather a generous amount of Sweet Baby Ray’s BBQ sauce on the dough (start with ¾ cup and add more as needed) and top with shredded chicken. Tip – up the flavor and nutrition of this meal with some grated red onion and/or thin-sliced fresh apples! Top with rounds of fresh Capiello Mozzarella slices. Hack – for thicker crust, pre-bake the dough for about 6 minutes before adding sauce and toppings. Food safety tip – do not use raw chicken for the topping. Cook for about 15 minutes, until dough edges are a rich brown and the mozzarella is melted and bubbling on top.
1.5 lbs. Market 32 Hand Trimmed Fat Free Chicken Breasts, Cutlets, or Tenders
1 pack Cappiello Mozzarella Cheese (Buy one get one FREE)
1 pack Market 32 Refrigerated Pizza Dough
1 bottle (Buy one get one FREE) Sweet Baby Ray’s BBQ Sauce (Mix & Match with Ken’s Dressing)
Shop for BBQ Chicken Pizzas here!
Meal 3: Chicken Caesar Wraps
If you like chicken caesar salads, then you are sure to LOVE this wrap!
Essentials: Salad spinner, medium-sized mixing bowl, cutting board, serrated knife, ¾ cup measure, large mixing spoon or spatula.
Pantry: Optional, fresh grated or shredded Market 32 Parmesan.
Wash romaine lettuce, at least 2 large leaves per wrap. Use a salad spinner to dry it so the flour tortilla wrap doesn’t get soggy. Chop the lettuce as you like – about 1-inch sized pieces makes it easy to enjoy.
Place shredded chicken in a bowl and add a generous amount of Ken’s Ceasar Dressing (3/4 cup to start, then add more to taste if needed.)
Add the lettuce to the chicken mixture and toss lightly. Place a flour tortilla on each plate and spoon out even servings down the middle of the wrap. Sprinkle fresh Parmesan on the mixture to taste. Roll the filling in the tortilla and fold in the ends to secure.
Enjoy!
1.5 lbs. Market 32 Hand Trimmed Fat Free Chicken Breasts, Cutlets, or Tenders
1 bottle (Buy one get one FREE) Ken’s Caesar Dressing (Mix & Match with Sweet Baby Ray’s)
1 bag Romaine Lettuce
1 pack PICS Flour Tortillas
Shop for Chicken Caesar Wraps here!
This week’s meal ideas are very exciting, and something much different than previous weeks. Today, we will dive into two delightful dishes that will transform your mealtime routine. Whether you’re seeking the comforting warmth of a classic dish with a twist or the vibrant zest of Mexican-inspired flavors, we’ve got you covered. Let’s check out this week’s meal ingredients, shall we?
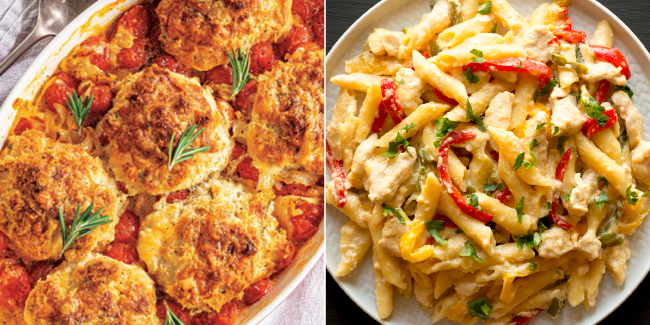
Mediterranean Tomato and Scallop Cobbler
Two Full Circle Organic Grape Tomatoes
1 bag Market 32 Bay Scallops
1 Onion
1 Container PICS Biscuits (found in the dairy & eggs section)
1 can (24oz) PICS Diced Tomatoes
Shop for Mediterranean Tomato and Scallop Cobbler here!
Chicken Fajita Pasta
1 box PICS Pasta
1 lb. Market 32 Marinated Chicken Breasts
1 package Fajita Seasoning
1 bag PICS Frozen Fajita Peppers and Onions
1 bag PICS Shredded Cheese
Shop for Chicken Fajita Pasta here!
Meal 1: Mediterranean Tomato and Scallop Cobbler
This veggie-forward skillet bake brings the flavors of the Mediterranean together in one pan for a savory, satisfying casserole with a comfort food twist.
Essentials:
Chef knife
Cutting board OR food processor
Large oven-safe skillet (not cast iron)
Can opener
Wooden spoon
Small bowl
TBSP and TSP measure
Pantry:
1-2 TBSP chopped fresh thyme, or, 2 – 3 TBSP dried thyme;
3 – 5 TBSP unsalted butter, (olive oil can be used to replace some or all the butter in the casserole, but not on the biscuits.)
1 – 2 TBSP chopped fresh or dried garlic
¼ tsp cayenne pepper
1 TSP brown sugar, packed;
2 TSP whole grain mustard
Wash grape tomatoes and allow them to dry on a clean towel. They can be sliced in half or whole for this dish.
Note – M32 Faroe Islands Bay Scallops can be added frozen or defrosted in the refrigerator overnight and drained before adding to the cobbler.
Preheat oven to 350 degrees.
Melt 2 TBSP butter in the small bowl and combine with the 2 tsp whole grain mustard. Set aside
Chop 1 medium onion. Open can of PICS Italian Seasoned Diced Canned Tomatoes
Place skillet on the stovetop and add 1-2 TBSP butter or olive oil. When oil is warm, add onion and sauté for several minutes. Add garlic and 1 TBSP of fresh thyme, or 1.5 TBSP dried thyme. Simmer on low and stir occasionally for about 1 minute, until onion is lightly browned.
Add grape tomatoes and stir, allowing them to soften for 2-3 minutes. Add canned tomatoes, stirring to combine. Allow some of the liquid to cook off to concentrate flavors. Open the PICS Biscuits container.
Add the brown sugar and stir to combine.
If defrosted, drain the bag of M32 Bay Scallops, then spoon them into the tomato mixture in the skillet.
Top the tomato and scallop mixture with the PICS Biscuits. Brush the tops of the biscuits with the butter- mustard mix, and sprinkle remaining thyme on top of them.
Place the skillet in the oven, following the cooking directions for the biscuits, approximately 25 minutes, or until the biscuits are a golden brown. Remove the skillet from the oven and serve the cobbler with a fresh salad side. A Dole Chopped Salad or Ceasar would add complementary crunchy texture and flavor to this easy Mediterranean meal!
Adapted from:
Tomato Cobbler – ‘Garden to Table’ – Saving Room for Dessert (savingdessert.com), accessed 5/2/2024
Meal 2: Chicken Fajita Pasta
This is a true one pot meal, with a magic milk and cheese hack that will bring everyone to the table.
Essentials:
5 Cups PICS Milk
Large 4 – 6-quart saucepan (pasta pot)
Chef knife and cutting board
Wooden spoon
Tongs
Pantry:
PICS Olive or Vegetable Oil
Place 2-3 TBSP oil in the saucepan, and heat on high. Carefully place the sliced chicken pieces in the pot and sauté until done. Remove from the pot and keep warm on a plate.
Place 1 TBSP oil in the saucepan, and add the frozen peppers and onions, stirring until they are cooked and lightly browned. Turn the heat down to medium.
Place 4 cups of PICS Pasta (we like penne, gemelli or shells for this meal) into the pot with the vegetables, add the 5 cups of milk, and Fajita seasoning package. Bring the milk to a simmer. As the pasta cooks, the sauce becomes creamy. Add the cup of cheese and cooked fajita chicken to the pot and combine with the rest of the ingredients. Serve it up and enjoy!
Adapted from:
One-Pot Chicken Fajita Pasta Recipe by Tasty, accessed 5/2/2024

“The phrase ’working mother’ is redundant.” — Jane Sellman
Being a mother is an exquisitely wonderful and enormously challenging family role. There is a quote on a meme somewhere that frames the unending efforts Moms put into their children’s lives as akin to being an air traffic controller – always working to set the best course for each child, for present and future and every day in between. They organize and plan like the CEOs of major companies but can pivot and reprioritize in the moment when their children need them. We see you, Mom, and we value you for all your efforts to nourish our growth, wellbeing, and success throughout our lives. For all these reasons and more, we want to be sure we can help your family show you how much they value all your efforts with some special meals for this most special day.
Our team worked hard bringing these ideas together, knowing our “value treatment” includes ensuring your family can make these meals taste and look wonderful. Check out the plan and tips that bring it all together and can be done by experienced and not-very experienced cooks. We hope you and your family enjoy these special treats and that your entire Mother’s Day is filled with delicious food, hugs, and smiles. Let’s check out what we have planned for you!
Eggs Benedict:
1 pack Thomas English Muffins
1/2 lb. Market 32 Off the Bone Ham
1 container PICS Hollandaise Sauce
18 pack PICS Eggs
Shop for Eggs Benedict here!
Surf & Turf
1 1/2 lbs. Butcher’s Promise Top Sirloin Steak
1 lb. Market 32 Farm Raised Raw Shrimp
1 package Pero Farms Green Beans
Shop Surf & Turf here!
Meal 1: Eggs Benedict
Starting Mom’s Day in a very special way!
Eggs Benedict is a “big deal” meal for many, a classic brunch beauty that is saved for special days and savored for how it transforms humble ingredients into a culinary celebration. Our step-by-step recipe makes it easy to bring it home without having to bring the chef!
The key to success is preparation: the muffin, ham and extras like fresh fruit are done first, then the sauce, and finally the eggs. We have laid it out here to ensure you can whisk it right to Mom while warm and wonderful!
Essentials:
At least two sturdy, microwave safe coffee mugs (one clean cup per each egg cooked)
1 medium sauté pan (optional if you will sauté the Market32 ham before assembling the egg, muffin and sauce)
1 small saucepan
1 small whisk or a spoon to stir and serve the PICS Hollandaise sauce,
Measuring cups
Slotted spoon (that will fit into the mugs to remove the poached eggs)
Small plate or Simply Done plastic wrap,
Oven safe plate
Simply Done Aluminum Foil
Butter knife
Tablespoon
Pantry:
PICS Vegetable Oil Spray
Butter (room temperature for easy spreading)
Ready…..
Preheat oven to the lowest setting, “Warm” or 200 degrees F.
Make the coffee or set up the mimosa bar. Set up the number of serving plates needed for your family near the stove or cooking area. If you are serving fresh fruit with the Eggs Benedict, portion that out on the plates.
Split the English Muffins and set them by the toaster. Each person should have both halves of the muffin as the base and will have a poached egg on each one. Smaller children may only need one half.
Place eggs by the microwave, with the mugs. Measure ½ -3/4 cup of water and place in each mug.
Set…..
Place Market 32 Off the Bone ham slices on a plate. Cut each slice in half – this ensures you can fit the ham on the muffin and its a flat surface that will keep the egg in place. Optional prep: Spray the sauté pan with PICS Vegetable Spray, set on low heat on a burner. Briefly brown the ham slices to warm and add flavor. You can hold the ham and toasted, buttered muffins on the oven-safe plate in the oven while cooking the other ingredients.
Start toasting the English muffins. Older children can help and can butter them when ready. Place the toasted, buttered muffins next to the ham on the plate in the oven. Cover the plate lightly with foil. They can also set up the mugs with the ¾ cup of water near the microwave. Younger children can put napkins on the table. Move the plates for the finished muffins to the other side of the microwave.
Go! Crunch time! You cook the sauce and poach the eggs at the same time. Mom should be at the table, (perhaps escorted there by your helpers) with her beverage, enjoying the show (and the knowledge that she isn’t cleaning up either. 😊)
Hollandaise sauce – follow directions on the package for the PICS Hollandaise Sauce, whisking in the small saucepan. When it is almost done, take the plate with warm ham and muffins out, and set near the stove so you can poach eggs and assemble the Eggs Benedict quickly and easily.
Microwave poached eggs – super easy, and easy clean up!
These steps are quick – have each plate ready with the warm muffin and ham set up and ready to place each poached egg and two tablespoons of sauce.
Place one microwave-safe coffee mug with water in the microwave. Microwave the mug/water on high for 45 seconds. Water should be steaming but not boiling. Crack the egg into the hot water. Place a small clean plate on the mug (or cover with cling wrap). Return to the microwave and cook for 45 seconds. Due to the different levels of power in microwaves, plan on experimenting with the first egg. SAFETY TIP – sometimes eggs explode when the plate or wrap are removed – keep your face away from the top of the cup during this step for each egg. Children may want to “see”; consider having them already at the table, or waiting at the kitchen door to ensure you can prep and finish safely. Check the egg for desired doneness – whites should be completely cooked, and the yolk should be tender and gooey. If it is not quite ready, return the mug to the microwave for 10 seconds, and/or leave the plate on the cup for 10 more seconds. Use the slotted spoon to lift the eggs out and drain the water at the same time. Place the poached egg on the ham, and top with warm Hollandaise. So special! Enjoy!
Meal 2: Surf & Turf
Surf and Turf – a great way to end a special day!
This fantastic dinner is simple but delivers all the special you want to put into Mom’s day. The top sirloin steak on sale can be subbed for the ribeye in this recipe, with a couple of tips to ensure it is tender and awesome! Marinate with Italian dressing, and broil to seal in the juices and tenderness. Slice it thin and consider topping with some garlic butter for an unctuous extra touch. Prepare the fresh green beans in a shallow, wide saucepan – steam or boil until they are tender, and top with butter for a wonderful side. The parmesan Market 32 shrimp are the crowning glory for this amazing entrée!
Check out our Ribeye Steak with Parmesean Shrimp!
Extra! Extra!
Dressed up Dessert – Market 32 Cheesecake slices with berries/sliced fresh fruit, or the Market 32 Fresh Chocolate Dipped fruit are both winners for a great family meal honoring that most important guest. Check out our cheesecakes here!
Happy Mother’s Day!
Get in the swing of quick Spring meals this week! Fresh Panko Chicken Cutlets offer a quick way to enjoy different flavors with easy prep and pairing. There are many flavors of our cutlets to choose from, which makes this versatile for different meals and taste buds. A few of our Panko Breaded Cutlet flavors include:
Apple breaded, Buffalo & Blue Cheese Cutlets, Cheesy Garlic Ciabatta, Cranberry breaded, Garlic Parmesan, Italian breaded, & Lemon Pepper just to name a few.
We know your family will love these! Check out this week’s meal items below.
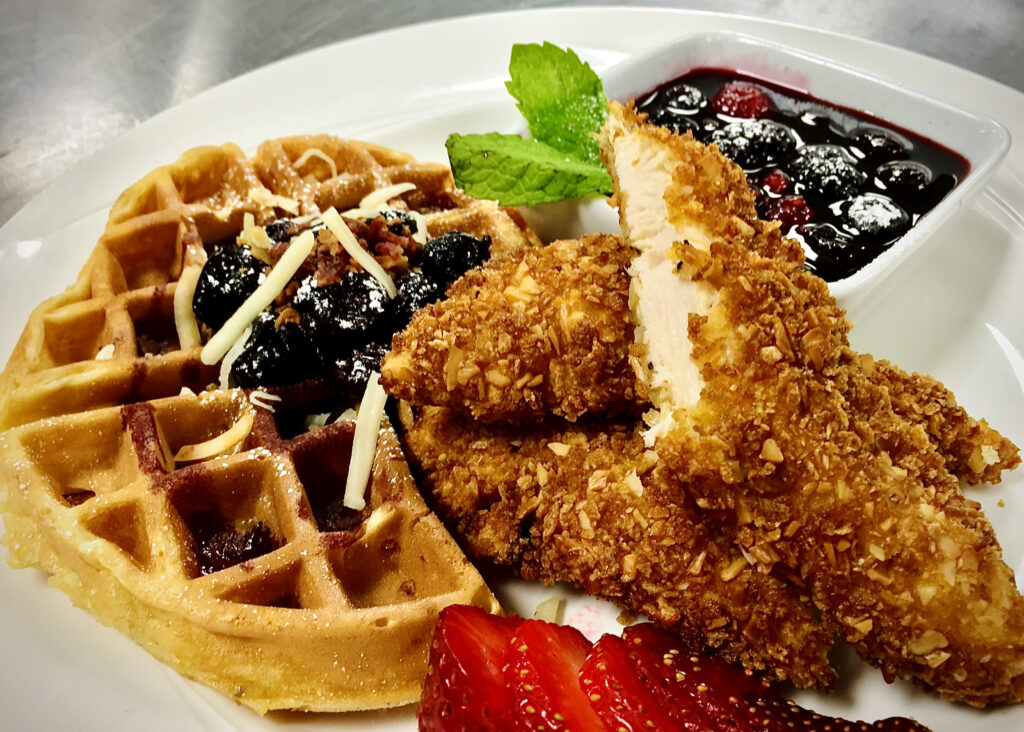
Market 32 Panko Chicken & Waffles (or pancakes!)
1 lb. Market 32 Panko Breaded Cutlets
Krusteaz Pancake & Waffle Mix
1 container Strawberries
Shop for Panko Chicken & Waffles here!
Lemon Chicken Pasta
1 lb. Market 32 Panko Breaded Cutlets
1 Lemon
1 package PICS Pasta
1 package PICS Frozen Spinach
Shop for Lemon Chicken Pasta here!
Meal 1: Breakfast for Dinner – Market 32 Panko Chicken and Waffles (or pancakes!)
Essentials:
Waffle maker/iron
Large bowl
Measuring cups
Spatula
Oven-safe bowl or casserole dish
Large skillet
Chef knife
Serrated knife
Tongs
Pantry:
PICS Maple Syrup
PICS Vegetable Oil Spray
PICS Vegetable Oil
Water or milk per waffle mix directions
Egg
Preheat oven to Warm.
Wash strawberries under cool running water, allowing them to dry on a towel. For older children and adults, that may be all the prep needed; cut green tops off and slice into smaller pieces for smaller children.
Follow directions on the package to prepare the Krusteaz waffle batter. You will need 1 egg and vegetable oil (waffle batter recipe is on the package). The Buttermilk flavor is the most authentic for this fun meal. If using a waffle maker, be sure to follow appliance and recipe directions. Tip – spray PICS Vegetable Oil on both sides of the waffle maker between each waffle/serving and use tongs to ensure hot waffles can be safely and easily removed from the waffle grid. Place waffles in the bowl or casserole dish as each serving is done to keep warm. They will take a few minutes each round to cook; estimate 2 waffles per person. Hack – No waffle maker? No problem! Pancakes are a great substitute, or you could use PICS Frozen Buttermilk Waffles for a very quick fix!
While waffles are cooking, spray the large skillet and allow to warm. Place the panko chicken cutlets in the skillet and allow to cook for about 4- 5 minutes per side. Panko should be brown and may be slightly crunchy. Check internal temperature with an instant read thermometer, 165 degrees is done.
Set up 4 plates for serving. Slice chicken cutlets into 4-5 pieces. Place 1-2 waffles or pancakes on the plate and top with a pat of butter. Top the waffles with the Market 32 Panko Chicken cutlets. Drizzle PICS Maple Syrup on the chicken and waffles. Add strawberries and serve to some very happy people! Oh, and we can’t forget to mention that there is an eCoupon for strawberries this week! Be sure to clip the eCoupon here.
Meal 2: Lemon Garlic Panko Chicken & Pasta
This spring fling dinner is full of flavor! Minimal preparation keeps time on your side, while the fragrant lemon and garlic aromas bring everyone to the table. You can go big on with either flavor by juicing and zesting the lemon, and/or doubling up on the garlic.
Essentials:
Large saucepan
Colander
Tongs
Large skillet
Zester or grater
Citrus press/juicer
Small paring or chef knife
Pantry:
PICS Olive Oil
1 (10 oz.) Bag PICS Frozen Chopper or Leaf Spinach
3 fresh garlic cloves or 3 TBSP jarred minced garlic
1 cup unsalted chicken stock or broth
Fill the large saucepan with water and follow directions on the PICS Pasta box to prepare. Angel Hair, Farfalle or Spirals are great for this recipe. When the pasta is simmering, add the frozen spinach.
Place the skillet on the stove and add 2 TBSP PICS Olive Oil. Allow oil to warm gently and when shimmering, add 1 diced clove of garlic. Allow the garlic to cook and flavor the oil. Note – Garlic burns easily. Cook the minced garlic for a few minutes and scoop out the bits and discard as they brown. Turn the heat down slightly, add the chicken cutlets, the juice from ½ of the lemon, 1 clove minced garlic, and cook for 4-5 minutes per side until done, internal temperature at 165 degrees.
The pasta should be cooked just before the chicken is finished. Drain the pasta and return to the saucepan. Once chicken is done, remove to a plate, and add the chicken stock, remaining garlic, remaining juice from the other lemon half, and lemon zest to the skillet. Scrape the bottom of the pan, and stir while warming.
Plate each chicken breast and divide the pasta and spinach evenly between each plate. Top with 1-2 TBSP of lemon-garlic sauce, and fresh parsley or a sprinkle of Market 32 Parmesan Cheese. Enjoy!
And just like that – it’s spring!
The Northeast is a great place to live, especially for the variety changing seasons brings to our landscape and our tables! Last weekend I had snow in my gardens and flowers popping up through it with their bright and hopeful colors. A few days later, and the temperatures are rising, my neighbors are out walking, and families are getting busy with spring sports and clubs. Those busy days call for quick meals that make everyone happy and keep budgets on track.
This week, Shady Brook Turkey Sausage is the star – affordable, versatile, and available in sweet or hot flavor profiles. Our recipes are so easy and appetizing, you may even plan to double up on the sales and have these meals again in the next couple of weeks!
Savory Turkey Sausage & Pasta Dinner
1 pack Shady Brook Farms Italian Turkey Sausage
1 box PICS Spaghetti
1 loaf PICS Italian Bread
1 lb. Broccoli Crowns
1 jar (24oz) PICS Pasta Sauce
Shop Savory Turkey Sausage & Pasta Dinner here!
Sweet or Spicy Red Beans & Turkey Sausage Bowl
1 pack Shady Brook Farms Italian Turkey Sausage
3 cans (15.5oz) PICS Kidney Beans
1 Green Bell Pepper
1 Vidalia Onion
Shop Sweet or Spicy Red Beans & Turkey Sausage Bowl here!
Meal 1: Savory Turkey Sausage & Pasta Dinner
Meal prep just became a lot easier with this recipe! Check out this turkey & pasta dinner for a new meal idea in the household.
Essentials:
1 large microwavable plate
1 large saucepans(or 1 each of a large skillet and saucepan)
1 small saucepan
A can opener
Tongs
Colander
Spatula
Serrated knife
Cutting board
Aimply Done Aluminum Foil
Pantry:
PICS Vegetable Oil Spray
15 OZ. can PICS Petite Italian Diced Tomatoes
PICS Unsalted Butter
Garlic powder
Preheat oven to 200 degrees fahrenheit.
Thoroughly rinse the broccoli and set on a clean towel to dry. Hack– no need to cut it up before cooking! Place the whole broccoli, crown down, in a large saucepan or high-sided skillet. Add water to cover the crowns and the lower part of the stalks. You will steam them up just before plating the meal!
Slice the Italian Bread in half lengthwise, and lightly butter both sides of the bread. Sprinkle garlic powder on the butter. Close the loaf and wrap in foil. Place the bread on the upper rack in the oven – the low temp will warm it and melt the butter without burning. You may turn it down to the “Warm” setting after 10 minutes or so.
Fill 1 large saucepan with water, and a pinch of salt if you like, for the PICS pasta. Place it on a back burner on high heat. Follow package directions for cooking the pasta. Drain in the colander when done.
While the pasta water is heating, open the jar of PICS Pasta Sauce and pour it into a large saucepan. Use a spatula to get all the sauce out, or, add a splash of water to the jar and swirl it around, then add to the saucepan to minimize waste. Open the can of PICS Diced Tomatoes and add to the pasta sauce. Turn the burner heat on to medium and stir often as it heats up – when it is gently simmering, turn the heat down to low and stir frequently.
Cooking and slicing turkey sausage – two options:
Turkey sausage is very tender, so cooking at least partially helps you cut it into uniform pieces. Cutting into similar size pieces helps the whole meal cook evenly and completely.
Hack – Place the sausage on the large microwavable plate. Place the plate into the microwave and microwave for two minutes; use the tongs to turn the sausage, and microwave for two to three minutes more. If you prefer, use a large skillet to brown the sausage first.
Then, slice into rounds, using tongs or a fork to keep them steady as they will be hot and add the sausage to the pasta sauce.
When you are about 10 minutes from serving the meal, turn a different burner on high and boil/steam the broccoli crowns for 3 – 5 minutes, until fork tender. Remove them from the pan with tongs and quickly cut the florets off into smaller pieces right on the serving plate!
Divide the pasta on four plates next to the broccoli, and ladle on the turkey sauce and pasta sauce. A sprinkle of parmesan cheese and you are ready!
Meal 2: Sweet or Spicy Red Beans & Turkey Sausage Bowl
The dish can be sweet or savory, depending on which flavor turkey sausage is used. If you prefer sweet, eliminate the hot sauce. Tip – If Cajun seasoning is not on your list, try curry! Add ½ tsp of spice at a time until you’re happy with the seasoning.
Essentials:
Large, deep skillet or pot
Can opener
Colander
Wooden spoon
Chef’s knife
Cutting board
Liquid measuring cup
Pantry:
PICS Olive Oil
Three 15 OZ. cans PICS Red Beans, rinsed and drained
2 cloves of garlic (or 2 TBSP minced garlic)
1.5 Tsp Cajun Seasoning
Dash hot pepper sauce
Optional:
Hot cooked PICS rice or quinoa, cooked according to package instructions.
Wash green pepper and allow to dry on a clean towel.
Chop 1 medium onion and dice the green pepper. Mince garlic cloves.
Add 1-2 TBSP olive oil to the skillet, heating until oil is warm and shimmering. Add the chopped vegetables, sautéing until tender. Add the minced garlic, and stir, cooking for one additional minute. Remove the vegetables to a bowl.
Add 1 TBSP olive oil to the skillet, and add the Turkey Sausage, using tongs to turn them occasionally. Cook on medium until brown and done. Remove to a plate or cutting board, and slice into rounds.
Add vegetables, red beans, Cajun seasoning, and hot sauce, and 1 cup of water to the skillet. Allow liquid in the pan to come to a simmer, and add the sliced sausage, stirring and combining all ingredients together in the skillet.
Place a serving of rice in each of four bowls and spoon the Red Beans and Sausage on the rice.
Enjoy!
Adapted from Taste of Home, accessed 4/8/2024. Red Beans and Sausage Recipe: How to Make It (tasteofhome.com)
Cooking up value and flavor this week with our Turkey Burrito Bowls and Sloppy Joe’s! Everyone can enjoy these quick and easy recipes, using Shady Brook Ground Turkey (BOGO) and fun fixins’!
Let’s take a look at this week’s meal items…
Ground Turkey Burrito Bowl
1 pack (1.3 lbs) Shady Brook Farms Ground Turkey
1 large bag (10oz) PICS Boil in Bag White Rice
1 jar (15oz each) PICS Salsa
2 cans (15oz) PICS Canned Beans
1 can (15oz) PICS Canned Corn
1 pouch McCormick Taco Seasoning
1 pack (8oz) PICS Shredded Cheese
Shop for Ground Turkey Burrito Bowls here!
Ground Turkey Sloppy Joes
1 pack (1.3 lbs) Shady Brook Farms Ground Turkey
1 can (15oz) PICS Sloppy Joes Sauce
1 lb. Sweet Potatoes
1 lb. Celery
1 pack (8 ct.) PICS Hamburger Buns
Shop for Ground Turkey Sloppy Joes here!
Ground Turkey Burrito Bowls
Take your traditional burrito bowl to the next level with this delicious and filling meal! This is sure to be a hit in your household.
Optional:
Fresh chopped or dried Cilantro Corn chips
Essentials:
Large skillet
Medium saucepan
Large bowl
Colander
Can opener,
Wooden spoon
Large spoon
Pantry:
1 medium Red Onion, chopped
1 -2 cloves of garlic, chopped, or 2 TBSP jarred minced garlic;
PICS Vegetable Oil
PICS Italian Dressing
Set a large skillet on the stove. Add 1 – 2 TBSP PICS Vegetable Oil and turn on to medium heat. When the oil is warm, add the contents of 1 package (1#) Shady Brook Ground Turkey. Add ground turkey and sauté, using the wooden spoon to break it up into smaller pieces. Cook until there is no pink color left and the turkey is slightly browned. If using a packet of seasoning, follow directions on the packet or container to add seasoning to the ground turkey.
In the medium saucepan, follow package directions for the PICS Boil-in-Bag Rice.
Looking to get creative or mix up your burrito toppings? Try our Cowboy Caviar! This is a very fun, easy recipe, and good as a dip or topping on any protein.
Cowboy Caviar: You can be flexible with the types of beans you use, and the other vegetables or fruit you chop and add, such as chopped peppers, yellow onion, and in season now, fresh mango! (Tip -the optional corn chips will be a great way to finish this off, if there are any leftovers!)
While the turkey is cooking, open the cans of beans and corn. Empty the cans into the colander, and rinse with cool water. Allow to drain, shaking a few times to drain excess water.
Place the beans and corn into a large bowl. Add the chopped red onion and garlic, and ½ cup of PICS Italian Dressing. Mix thoroughly and allow to sit at room temperature.
When the rice and turkey are done, drain in the colander if needed. Portion rice out into 4 bowls and repeat with the turkey. Top the warm turkey and rice with shredded PICS Shredded Taco or Cheddar Cheese and add a generous 2-3 TBSP of Cowboy Caviar on top. Garnish with Cilantro and enjoy!
Skillet Ground Turkey Sloppy Joes
Sloppy Joes are tried and true – a favorite fast meal that pleases all generations! This quick dinner gives you back some time in the evening on a busy day. It is also a flexible meal – ground turkey and PICS Sloppy Joe Sauce can be cooked ahead of time and quickly warmed up for those crazy sports-season-shifted supper times. Sweet potatoes bring the yum and a big bang of great nutrition to this family favorite!
Essentials:
Large skillet
Dinner-sized microwavable plate
Sheet pan
Simply Done Aluminum Foil
PICS Vegetable Oil Spray
Can opener
Wooden spoon
Pantry:
PICS Vegetable Oil Spray
PICS Unsalted Butter
PICS Vegetable Oil
Preheat oven to 375 degrees Fahrenheit.
Wash fresh Sweet Potatoes and place them on a towel to dry.
Line sheet pan with foil, and spray lightly with PICS Vegetable Oil spray,
Prick sweet potatoes with a fork several times and place them on a microwave safe plate. Microwave the potatoes for 5 minutes. This will speed up the baking time, allowing you to get them done in a shorter time without losing all the mellow roasted flavor goodness. When the microwave is done, remove the potatoes with a clean towel or tongs – they will be hot! Place them on the sheet pan and put them into the oven.
Place the skillet on the stove and add two TBSP of PICS Vegetable Oil. When the oil is warmed, add the ground turkey to the skillet, using the wooden spoon to break it up into smaller pieces. Cook until there is no pink color left, and it is slightly browned.
Open the can of PICS Sloppy Joe Sauce and add it to the warm turkey, stirring in until all the turkey is coated with the sauce.
Using a fork, check sweet potatoes for doneness. They should be easy to pierce and tender. Carefully remove the sheet pan from the oven to the stove top.
Toast the PICS Hamburger Buns if you like. Spoon the warm Turkey Sloppy Joe mix onto the bun. Split the sweet potatoes in half, adding a pat of butter or a dash of chile powder or cinnamon for a fun flavor twist. Enjoy!
Welcome to the sizzling world of pork! Whether you’re a dedicated carnivore or simply on the hunt for a new culinary adventure, pork offers a delicious array of possibilities that can tantalize taste buds and satisfy cravings.
We are changing up this week’s Value Meals, and bringing you two incredible pork recipes we think you’ll love. Let’s check out this week’s ingredients:
Sheet Pan Pork Chops
Bone-in pork chop savings pack (4 chops)
5 medium yellow potatoes
1 lb. Fresh Asparagus
Shop here for Sheet Pan Pork Chops!
Pulled Pork (Chops) & Cole Slaw
Bone-in pork chops savings pack (4 chops)
1 kit – Dole Cole Slaw
1 package PICS Hamburger Buns
1 Medium Onion, peeled & chopped
Shop here for Pulled Pork (Chops) & Cole Slaw!
Meal 1: Sheet Pan Pork Chops
Essentials:
Sheet pan
Simply Done Aluminum Foil
Cutting board
Chef knife
Large microwavable bowl
From the Pantry:
¾ cup PICS Crumbled Feta or Shredded Parmesan
Garlic Powder
Salt & Pepper,
PICS Vegetable Oil Spray
PICS Extra Virgin Olive Oil
This sheet pan dinner is flexible and flavorful! The key to great sheet pan meals is making sure you know the cooking times for each food, so you can adjust preparation and timing as needed to finish cooking at the same time. We share some hacks and tips here to help you create a delicious meal and get the best value from each ingredient.
Preheat the oven to 400 degrees fahrenheit.
Wash and dry the potatoes, and wash the asparagus, setting them aside on a clean towel to dry.
Dice the potatoes (skins on for extra flavor, texture and fiber!), and place in the microwavable bowl. Toss the potatoes with 1 Tbsp PICS Olive Oil, and 1 tsp of garlic powder, salt and pepper to taste. Microwave on high for 3 – 5 minutes.
(#Hack – “pre-cooking the potatoes ensures they will be done when the rest of the meal is finished, and reduces risk of overcooking the chops and asparagus.)
Line the sheet pan with the foil, and spray the foil with the PICS Vegetable Oil Spray.
Place the 4 chops side-by-side in the center of the pan, leaving some space between each, and leaving two large spaces at each end of the sheet pan.
Remove the potatoes from the microwave and add them to one end of the sheet pan, spreading them out so they cook evenly.
Place the sheet pan in the oven on the top rack, and set the timer for 15 minutes.
Move the asparagus to the cutting board, and cut off the woody ends. You may leave them whole, or cut them into thirds. Place the cut vegetable in a bowl and toss with a tsp of PICS Olive Oil. Place the vegetables and cheese near the stove, and keep the meat thermometer handy.
When the timer is up, remove the sheet pan and place on the stove top. Sprinkle the cheese on the pork chops and asparagus. Return the pan to the oven and set the timer for 8 minutes.
When the timer is up, check the pan – the cheese should be melted and bubbling. Remove the sheet pan and check one of the chops – the temperature should be about 145 degrees. Allow the pan to rest on the stove top, and serve up the potatoes and vegetables, moving the chops last to allow for a few minutes rest.
Enjoy!
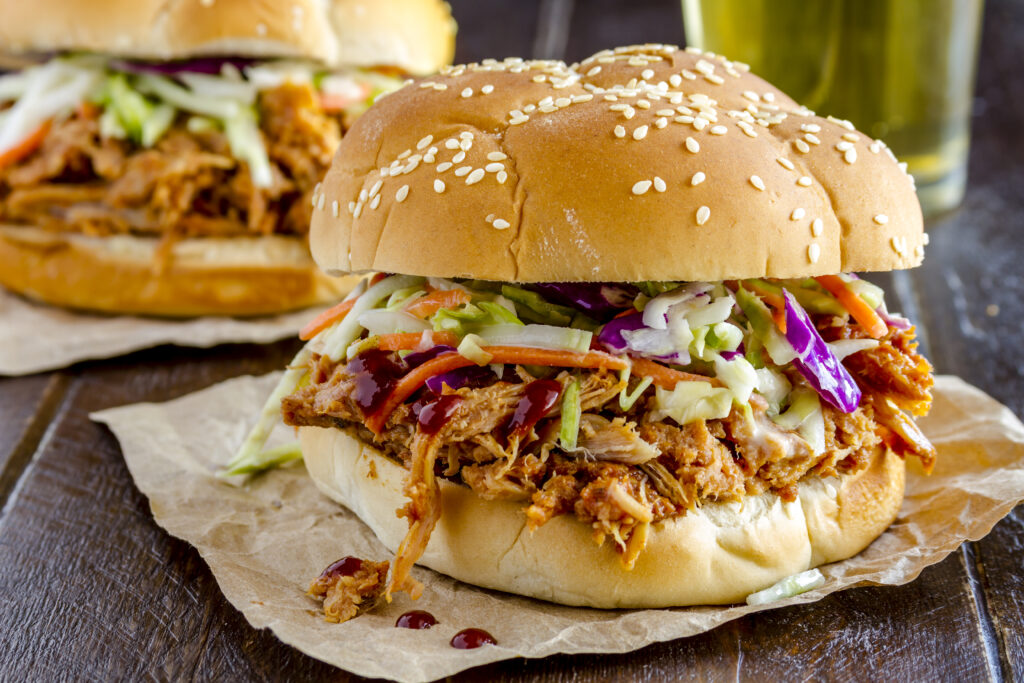
Meal 2: Pulled Pork (Chops) & Cole Slaw
Essentials:
1 large slow cooker
Chef knife
Cutting board
From the Pantry:
Kosher salt
Pepper
Onion powder
Optional apple or mandarin orange segments
This flexible recipe is a wonderful, hands-off, one-pot dinner you can start in the early afternoon and finish up in just a few minutes. The light base seasoning is good enough to enjoy as is, or easy to combine with other spices, BBQ sauce, Thai Peanut Sauce, or whatever you like! There won’t be any leftovers!
Combine 1 TBSP each of onion powder, Kosher salt and pepper. Place the first pork chop in the slow cooker and sprinkle the seasoning generously; repeat for each chop. Add the chopped onion to the cooker, on top of and around the chops. Cover and set for 4 hours on low.
An hour before the pork is finished, follow package directions and prepare the coleslaw. Make a great plate – stretch out the slaw, adding flavor and nutrients, by adding some fruit. Peel and chop the apple or mandarin orange (canned, drained mandarins can also be used). Add them into the coleslaw for a fun flavor twist.
When the pork is done, check for temperature – it should be 145 degrees or higher, and fall-apart tender. Use two large forks to shred the pork, allowing the meat to fall into the juices and melted onion, stirring to combine. Use tongs to remove the bones. Toast the buns if you like. Serve it all up and enjoy a great value family meal!
Enjoy!