


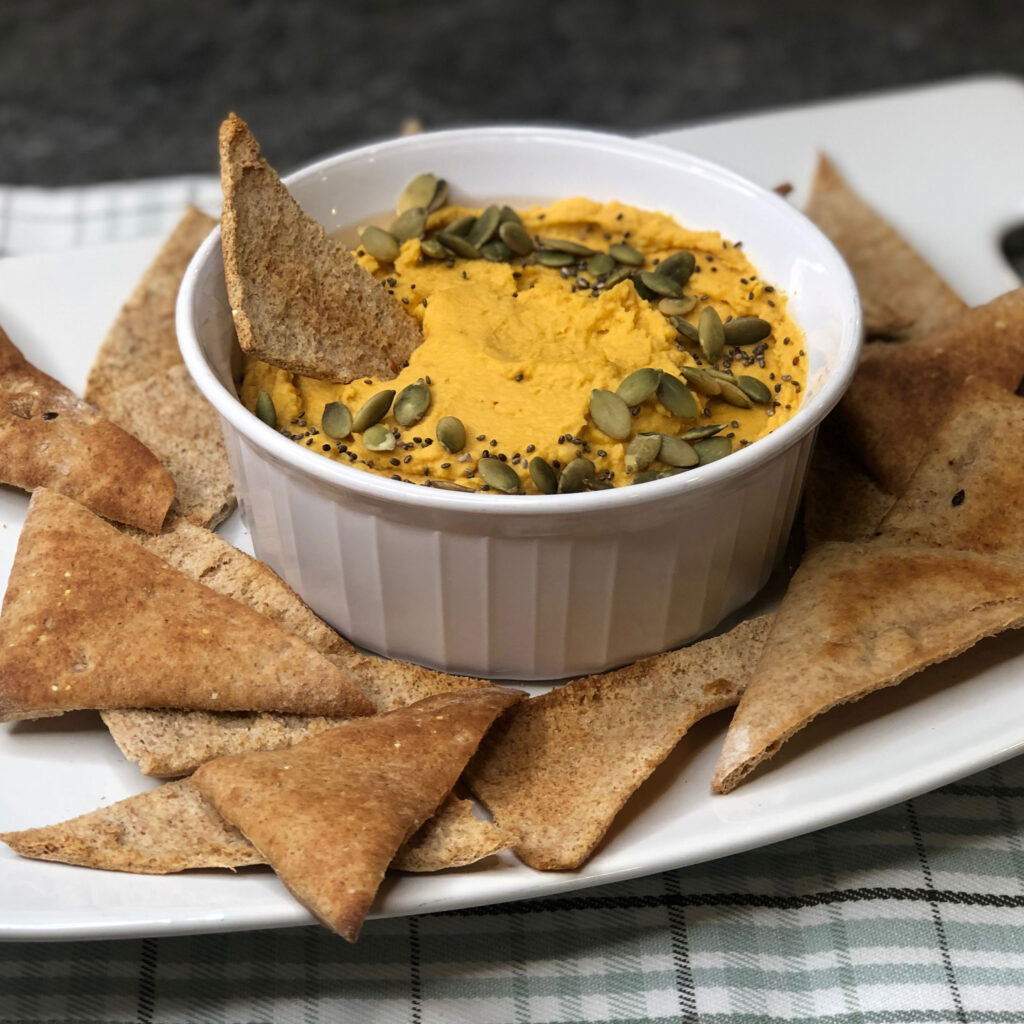
Pumpkin Hummus
by Jodie Fitz
1 can of PICS chickpeas
½ cup PICS pumpkin puree, 100%
1 large clove of garlic
3 tablespoons PICS olive oil
2 tablespoons tahini paste
1 tablespoon lemon juice
½ teaspoon sea salt
¼ teaspoon onion powder
¼ teaspoon garlic powder
1/8 teaspoon cinnamon
1/8 teaspoon coriander
Optional: Pepitas and Chia Seeds
Drain the chickpeas and place them in mini chopper or food processor. Add in the pumpkin puree, olive oil, garlic, tahini paste, lemon juice, sea salt, onion powder, garlic powder, cinnamon and coriander.
Blend the mixture together until the ingredients are mixed well. You most likely will have to pause and scrape the ingredients down one or two times during the mixing process.
Pour the hummus into a bowl.
Optional: Sprinkle around the edge with pepitas and/or chia seeds.
DIPPING? Dip with fresh veggies or pita chips.
How to Make Pitta Chips?
Preheat the oven to 375 degrees. Cut your pita(s) with a pizza cutter into triangle pieces and tear them apart for a single layer. Spray a nonstick baking sheet with a nonstick cooking spray. Place the pita pieces on the tray. Baste them with canola oil. Stir together 1 teaspoon of salt, ½ teaspoon onion powder and a ¼ teaspoon garlic powder. Sprinkle it on top and bake for 5 to 7 minutes.
Storing? Keep your extra hummus in the refrigerator in an airtight container for up to 3 – 5 days. You can store excess pita chips in a snap and seal style bag in the pantry for several days.
Lessons for Kids: Every recipe has lessons to share with our children. This recipe, even as simple as it is, teaches some of the following concepts:
· Measuring ingredients
· Can opening
· Draining
· Safety in using a food processor or mini chopper
· Cutting and blade safety
· Basting
· Sprinkling
· Prepping cookware
· Baking and oven safety
· Dipping
· Food storage
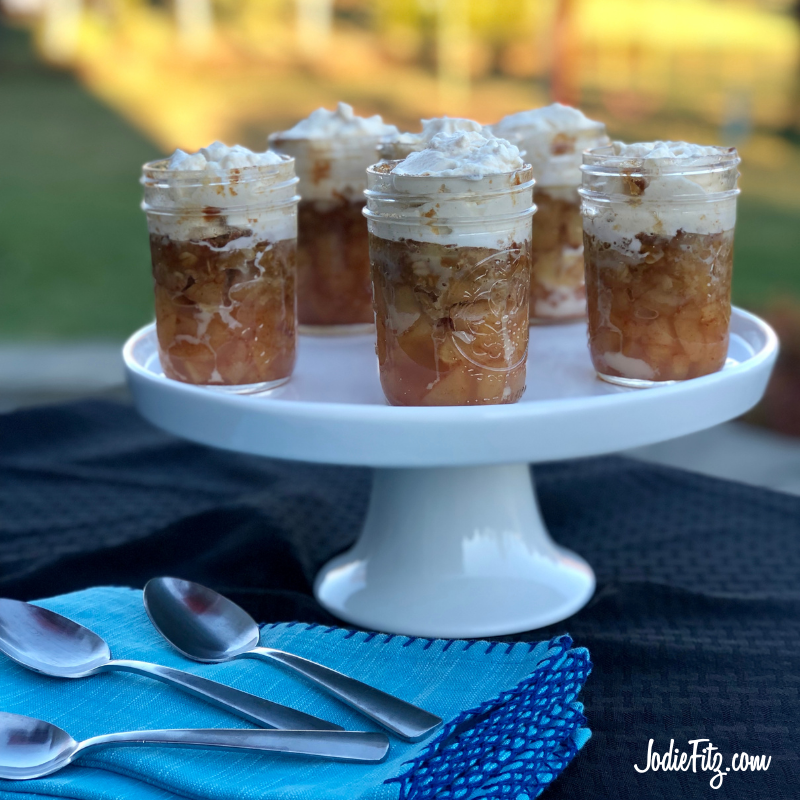
Honey Apple Crisp
by Jodie Fitz
5 apples, large
3 tablespoons water
3 tablespoons PICS honey
1 teaspoon PICS cinnamon
¾ cup PICS brown sugar, light or dark
1/3 cup PICS butter, room temperature
½ cup PICS flour, all purpose
½ cup PICS rolled oats, old fashioned
Pre-heat the oven to 375 degrees.
Wash, peel, core and dice the apples. Place them into a bowl.
Mix the water, honey & cinnamon together and stir it into the diced apples gently until the apples are fully coated.
Fill six 8 oz. glass mason jars three-quarters full with the mixture, packing it down.
In a separate bowl, mix the brown sugar, oats & flour together in a bowl with a fork. Using a pastry cutter (or a fork & knife) cut the butter into the mixture. It will be done when it’s all mixed well and the butter has broken into small cut, coated pieces.
Evenly distribute the topping to the individual jars heaping it over the top just a little.
Bake the jars on a baking sheet for approximately 25 to 30 minutes; until the topping is golden brown & the fruit mixture is bubbling.
Serve warm with Honey Cream.
Prep Ahead: This recipe can be made ahead. You can add the covers and keep them in the refrigerator for several days in advance. Remove the covers and bake the day you plan to serve. Let the jars set out of the refrigerator for 30 minutes before placing them in the hot oven.
Extras? Simply put the covers on the mason jars and keep the extra crisps in the refrigerator for up to five days.
Little Chefs! You can peel and slice the apples, let little chefs dice the apples with a plastic knife.
Kids in the Kitchen: Every recipe has lessons to share with our children. This recipe, even as simple as it is, teaches some of the following concepts:
- Peeling & coring apples
- Slicing and dicing
- Knife safety
- Measuring Ingredients
- Stirring
- Baking and oven safety
- Food storage
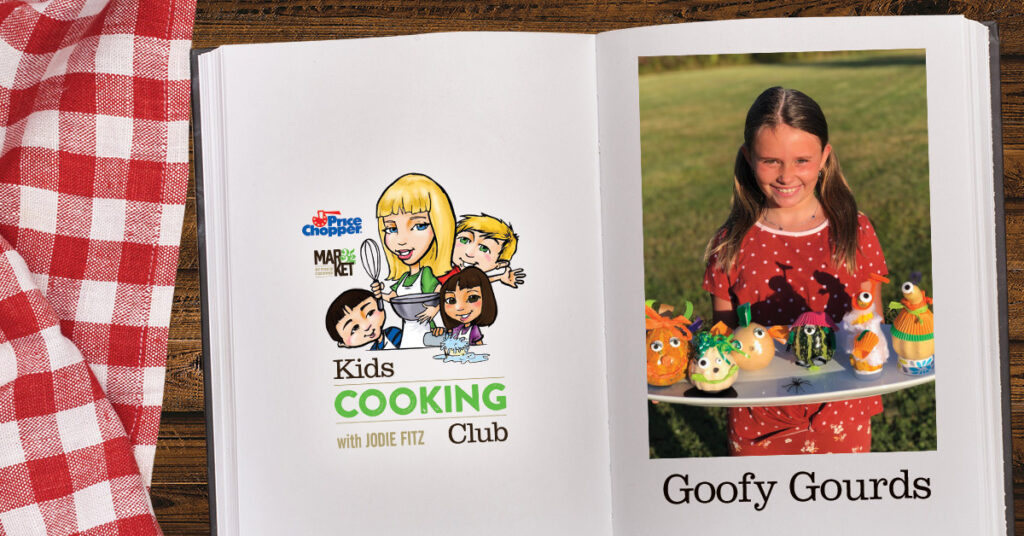
Goofy Gourds with Jodie Fitz
Ready to have a little family fun making goofy gourds? Follow these easy steps…
- Go for a hunt through your local Price Chopper/Market 32 Supermarket as a family and discover a whole lot of crafty fun.
- Bring your finds home.
- Make memories together creating goofy gourds!
It’s that easy.
Skies the limit…create a Cyclops, give your gourds hair and silly faces, dress them…whatever you envision you can create.
Suggested Supplies:
You can find everything you need at your local Price Chopper/Market 32 Supermarkets. Here’s a list along with an aisle aide for your shopping fun
Seasonal and Produce
- Gourds
- Spider Web
School Supplies
- Construction Paper
- Rubber Cement (glue)
- Pipe Cleaners
- Tape
- Scissors
Baking Aisle
- Candy Eyes
- Cupcake liners
Card/Wrapping Supplies
- Tissue Paper
- Ribbon
MINIMIZE the MESS!
Take a Price Chopper/Market 32 paper bag. Fold it flat and create on top of the bag so that you can simply fold it up and toss out the mess when you are finished.
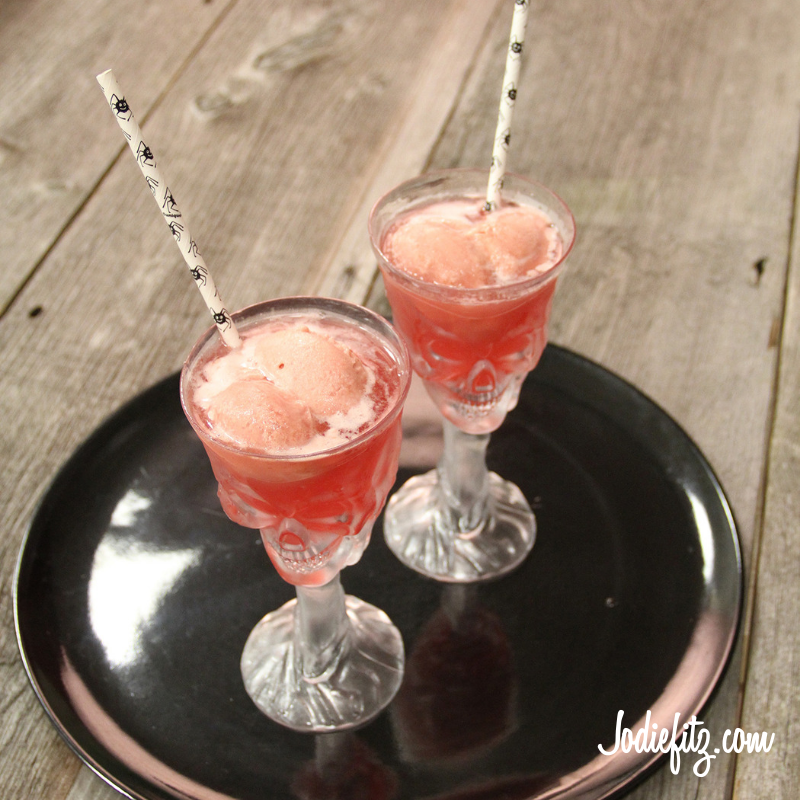
Beetle Juice
Beetle Juice, Beetle Juice, Beetle Juice! After you sip on this yummy blend you will definitely be calling out beetle juice three times.
It’s a fruity drink with just the right amount of fizz that’s fun and festive, but incorporates fresh, healthy ingredients .
Beetle Juice by Jodie Fitz
4 cups ice
2 lemons, fresh
2 cups water
½ cup PICS honey
½ cup PICS fresh frozen mixed berry medley
1 teaspoon PICS vanilla extract
1 teaspoon raspberry extract
Triple berry seltzer
PICS Raspberry sherbet (optional)
Cut the lemons in half. Squeeze the lemon juice from the lemons.
Note: If you have a citrus juicer simply squeeze the juice right into a blender pitcher. If you have to squeeze by hand, squeeze the juice into a glass or bowl first so that you can remove any seeds with a spoon before adding the juice to the blender.
Add the ice, lemon juice, water, honey, frozen mixed berry medley and extracts into the blender. Blend the ingredients together well.
Depending on the size of the glass, add 1 to 2 tablespoons of the triple berry seltzer to add fizz to the mix. Fill the rest of the glass with the blended fruit mixture.
The kids! Remember there are always valuable lessons to learn in every recipe. Here are a few with Beetle Juice…
- Blending
- Blender safety
- Measuring ingredients
- Following Directions
- Extracting juice from lemons
- Exploring healthier alternatives
The Brains! If you want to add a little dessert style fun add sherbet brains to the mix. If you want to keep it healthier, freeze some of the beetle juice without the seltzer in ice molds of either brains or bugs and add them to your finished drink before serving.
Basic Witch Hat with Homemade Chips
Looking for a healthy Halloween nosh? Look no further. Check out these festive homemade witch hat chips served with an orange Pico de Gallo salsa. The entire combination is total yum!
Basic Witch Hat Homemade Chips by Jodie Fitz
1 package of cedar spinach wraps
1 witch hat cookie cutter
2 tablespoons PICS canola oil
PICS Sea salt
Nonstick cooking spray
Place the spinach wraps, one at a time, on a cutting board. Use a cookie cutter to cut out witch hat shapes. Each cedar wrap should yield approximately 8 hats depending on the size of your cookie cutter.
Preheat the oven to 375 degrees.
Coat a nonstick baking sheet with the nonstick cooking spray.
Baste each hat lightly with the canola oil and then sprinkle them with sea salt.
Bake them for 5-7 minutes until the edges start to toast. Let them cook completely to finishing the crisping process.
Lessons and life skills to focus on when making this recipe with the kiddos:
- Basting
- Baking
- Oven safety
- Following directions
Homemade Pico de Gallo Salsa by Jodie Fitz
2 orange heirloom tomatoes, small
1 orange bell pepper
½ cup sweet onion, finely diced
1 small clove of garlic, minced
4 tablespoons fresh chopped cilantro
1 tablespoon PICS balsamic vinegar
Wash the tomatoes. Remove the top and bottom of the tomatoes. Slice the tomato and dice the tomato into small pieces.
Wash the bell pepper. Remove the top, seeds and insides of the peppers. Slice and dice the pepper.
Stir the diced tomatoes, the diced bell pepper, diced sweet onion, chopped cilantro and balsamic vinegar together.
Serve with your homemade witch chips.
Lessons and life skills to focus on when making this recipe with the kiddos:
- Dicing
- Knife safety
- Mincing
- Chopping
- Stirring
- Following directions
- Measuring ingredients
KCC Sun's Up Smoothie
by Jodie Fitz
3 cups ice
2 cups PICS 100% orange juice
1-cup PICS low fat milk
½ cup 100% pure carrot juice
1 banana
6 oz. PICS low fat vanilla yogurt
1 teaspoon PICS vanilla extract
1 tablespoon PICS honey
Add the ice, orange juice, milk, carrot juice, banana, yogurt, vanilla extract and honey into a blender. Blend the ingredients until the ice is fully crushed.
Serve and enjoy! After all, who doesn’t want to start their day with a cup of sunshine?
More on the Sun’s Up Smoothie Ingredients:
Dairy Allergies:
- The Milk: If you have a dairy allergy, replace the milk with your favorite dairy alternative. Depending on your allergy concerns, I suggest you consider rice milk or coconut milk for this recipe. The rice milk is very gentle in flavor. It allows the other flavors to ‘shine’ in this smoothie recipe. It does make the mixture a little icier. If you use coconut milk it adds a bit of a tropical flavor to this mix and is creamier. However, always use alternatives based on your dietary needs.
- The Yogurt: Replace the yogurt with one of your favorite vanilla dairy free yogurt alternatives based on your dietary needs. There are many great options on the market.
Leftovers? No worries turn them into freeze pops! Pour the leftovers into the 7 oz. PICS paper coated cups and place them in the freezer for one hour. Then add a wooden craft stick to the center and let them freeze overnight.
Carrot Juice: 100% carrot juice can be found in the produce aisle at Price Chopper/
Market 32 Supermarkets. There is also a delicious blend of 100% carrot juice with turmeric and ginger added.
Lessons for Children when making this smoothie recipe;
- Measuring ingredients
- Pouring
- Blending
- Blender Safety
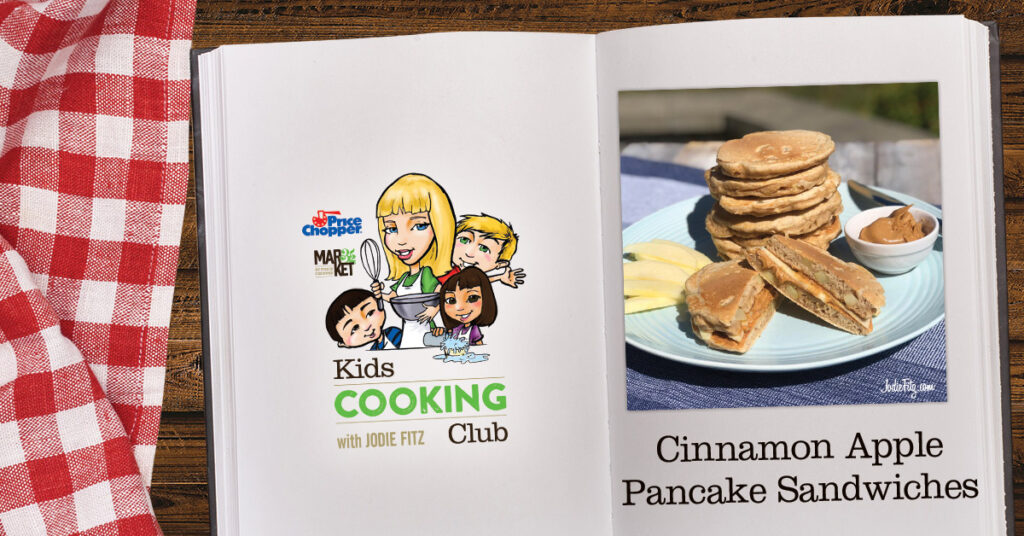
Cinnamon Apple Pancake Sandwiches
by Jodie Fitz
Great breakfast filler that you can have made ahead of busy days.
2 apples
1 ¾ cups PICS flour, unbleached
½ teaspoon PICS sea salt
1 tablespoon PICS baking powder
1 teaspoon PICS cinnamon
1 cup PICS milk
4 oz. PICS cinnamon applesauce
3 tablespoons PICS brown sugar
1 PICS egg, large
1 teaspoon PICS vanilla extract
Nonstick cooking spray
Peanut butter
Wash, peel, core and dice one apple into small pieces. Set it aside
Add the flour, sea salt, baking powder and cinnamon into a bowl. Stir the dry ingredients together so that the ingredients are evenly distributed.
Add the milk, cinnamon applesauce, brown sugar, egg and vanilla extract to the dry ingredients. Hand whisk the ingredients together.
Fold in the diced apples.
Cook the pancake batter in a griddle style pan coated with nonstick spray over medium heat until both sides are golden brown and the inside is fully cooked.
Wash, core and slice the additional apple. Create a breakfast pancake sandwich with peanut butter and apple slices.
Time Saver: Make the pancakes on a weekend. Let them cool completely. Wrap each one individually in parchment paper or waxed paper. Place each individually wrapped pancake in a freezer bag or container. Take them out and toast them on busy weekday mornings.
Gluten Free: Swap the flour for gluten free 1 to 1 flour options.
Peanut Allergy Alternatives: Swap the peanut butter for WOWButter® found in the allergy friendly aisle at your Price Chopper/Market 32 Supermarket.
Dairy Free: Try making this recipe with either rice milk or almond milk.
Lessons for Children when making this recipe;
- Measuring ingredients
- Leveling dry ingredients
- Whisking
- Dicing
- Spreading
- Slicing
- Knife safety
- Griddle Safety
- Pancake Flipping
- Following directions
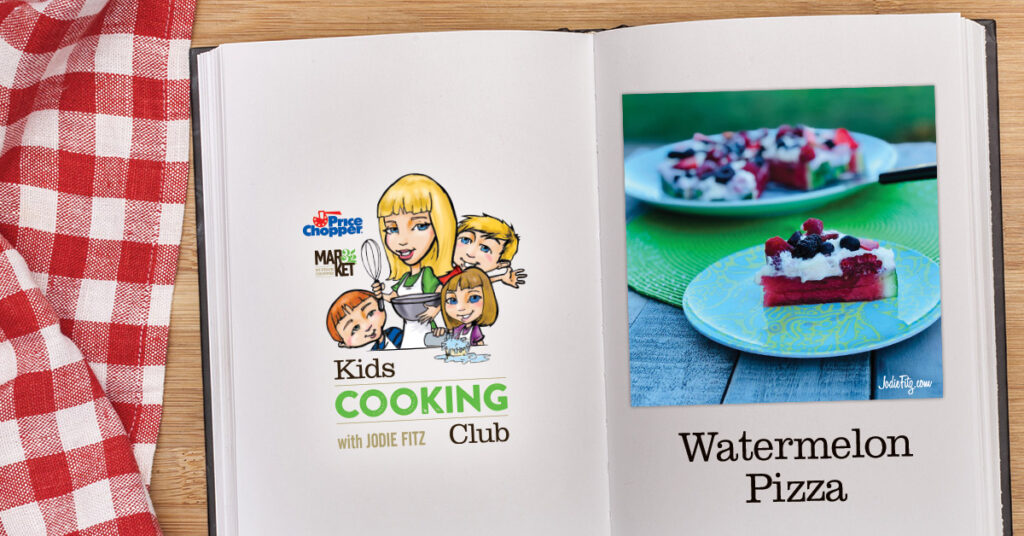
Looking for a lighter dessert option that’s delicious and fun to make? Try making an easy Watermelon Pizza; it’s fruity and fresh.
Watermelon Pizza by Jodie Fitz
8 oz. PICS whipping cream
¼ cup PICS confectioner’s sugar
1 teaspoon PICS vanilla extract
Watermelon
6 oz. PICS Greek vanilla yogurt
½ cup fresh strawberries
Fresh fruits (see below)
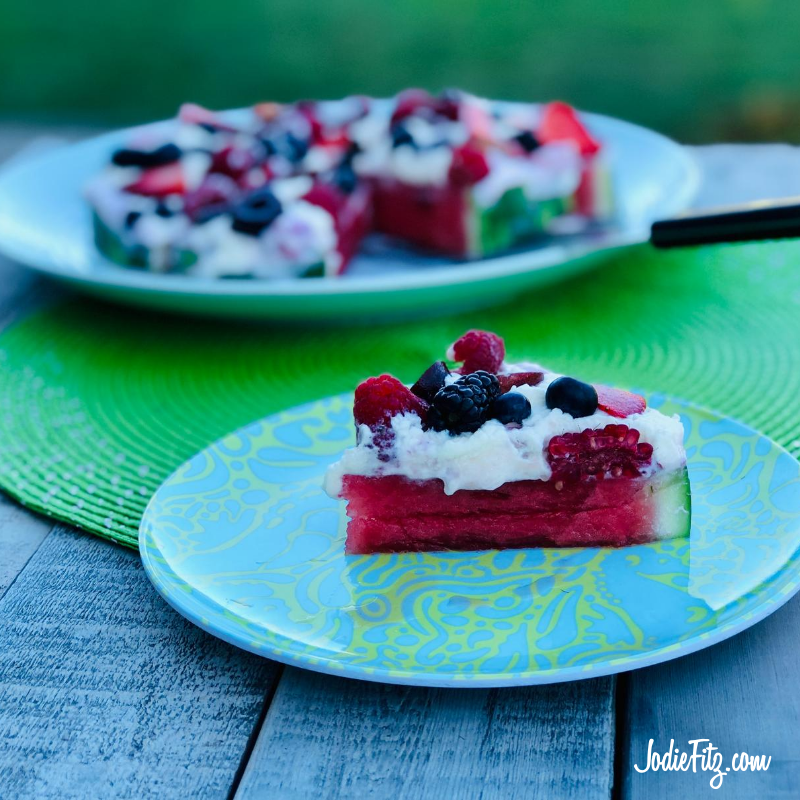
Prepare the whipped topping by adding the 8 oz. of heavy cream, the ¼ cup of confectioner’s sugar and 1 teaspoon of vanilla into a bowl. Whip it with an electric mixer until it reaches a stiff peak.
Layer 1:
Cut one large round slice out of the center of a whole watermelon. This will serve as your dough for your watermelon pizza. Place it on a flat surface.
Layer 2:
Rinse, hull and slice the ½ cup of strawberries. Place the sliced strawberries into a mini chopper, food processor or blender. Fold the strawberries and a third of the whipped cream into the Greek yogurt. Spread the mixture onto the watermelon circle.
Layer 3:
Spread the remaining whipped cream on top.
Pizza Toppings: Rinse and prep your favorite fruit to go on top. Here are some options, add your favorites,
- Sliced strawberries
- Blueberries
- Pitted, sliced fresh cherries
- Cut grapes
- Slices of kiwi
- Diced pineapple,
- Diced melon
- Banana slices
- Diced mango
Finally, cut your watermelon pizza into 8 slices and serve!
Dairy Free: Substitute the heavy cream with coconut cream. However, coconut cream will only reach a soft peak when whipping vs. a stiff peak.
Use your favorite dairy free yogurt alternative for the yogurt.
Lessons for children include…
- Whipping cream
- Stiff peaks when making whipping cream
- Slicing
- Dicing
- Spreading
- Folding
- Measuring ingredients
- Following directions
- Knife safety
- Electric mixer safety
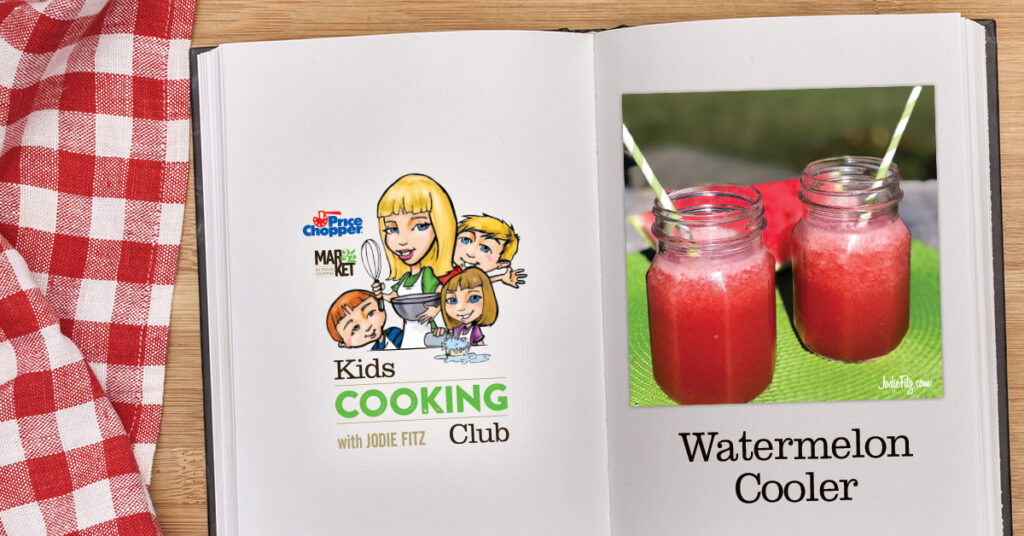
Keep the kitchen cool by making this watermelon cooler. It’s a light, refreshing drink with a whole lot of goodness in the mix. There’s just one thing….beware of brain freeze!
Watermelon Cooler by Jodie Fitz
3 cups diced watermelon
4 cups ice
2 lemons, fresh
½ cup PICS honey
1 teaspoon PICS vanilla extract
2 cups water
Remove the fruit of the watermelon from the rind and dice it into small chunks. Measure 3 cups of watermelon. Add it to the blender.
Measure and add 4 cups of ice to the blender.
Cut the lemons in half and extract the juice from the lemons using your hands, a citrus squeezer or juicer. If you are extracting the juice by hand, squeeze the lemon juice into a bowl and remove the seeds before adding the lemon juice to the blender.
Add the honey, vanilla extract and water to the blender.
Blend the ingredients well and serve!
Little Hands: Younger children can cut the watermelon using a plastic knife.
Lessons for children when making the Watermelon Cooler Recipe:
- Dicing
- Knife safety
- Measuring ingredients
- Extracting juice
- Blending and blender safety
- Following directions
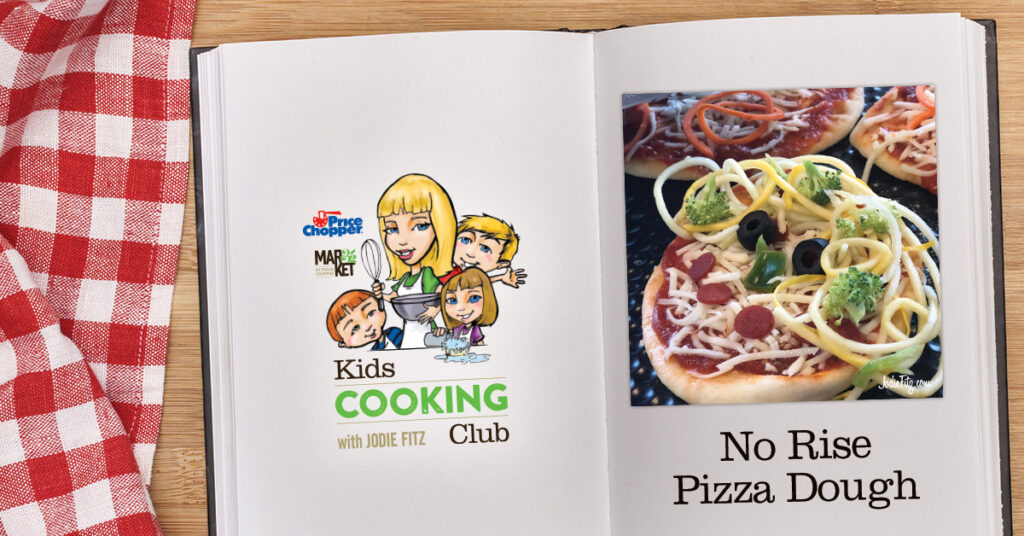
Did someone say pizza? Well if you did and you’re looking for an EASY dough recipe, you’ve come to the right spot. This no rise pizza dough is deliciously easy and fun to make.
It adds an interesting twist of flavor vs. traditional pizza dough, which is equally yummy. These cooked pizza dough’s are great to make for play dates, to serve as a lunch, snack or dinner. You can make them ahead and store them or eat them fresh out of the pan; well, once they’ve cooled.
No Rise Pizza Dough with Jodie Fitz
2 cups PICS all-purpose flour, unbleached
1 tablespoon PICS baking powder
1 teaspoon PICS sea salt
2 teaspoon PICS canola oil
1 ¼ cup of warm water
Crisco®
Saran Wrap
Measure the flour, baking powder and sea salt together into a bowl. Using a fork, stir the ingredients together so that everything is evenly distributed.
Add in the two teaspoons of canola oil and stir it though the dry ingredient mixture.
Slowly pour in the warm water, you may not need to use it all so pour and stir until all of the ingredients come together.
Remove the dough from the bowl and place it on a floured surface. Knead the dough until it’s smooth and forms into a ball of pizza dough. Sprinkle flour onto the dough as needed during the kneading process. Note: If it’s sticky, add flour lightly and continue to knead.
Lightly coat a bowl with the Crisco® using a napkin or paper towel. Place the dough in the bowl and cover it for 30 minutes.
Once the dough has rested and is ready to cook, remove it from the bowl and divide it into 5 equal pieces by simply pulling it apart with your hands. Place each piece of dough onto a floured surface and roll it out and stretch it with a combination of your hands and rolling pin to create five personal pan sized pizza dough’s.
Lightly coat a skillet style pan with 1 to 2 tablespoons of olive oil or canola oil and heat the pan over medium heat. Carefully add the pizza dough’s to the pan. Depending on the size of your pan you can add one or two at a time. Cook one side until it’s golden brown and the dough starts to puff slightly, flip it over with heat safety tongues and cook the other side until it’s golden brown.
Pizza Yum: Once your dough is ready to use, heat the oven to 375 degrees. Add your favorite toppings and baking until your cheese is melted and ready to eat!
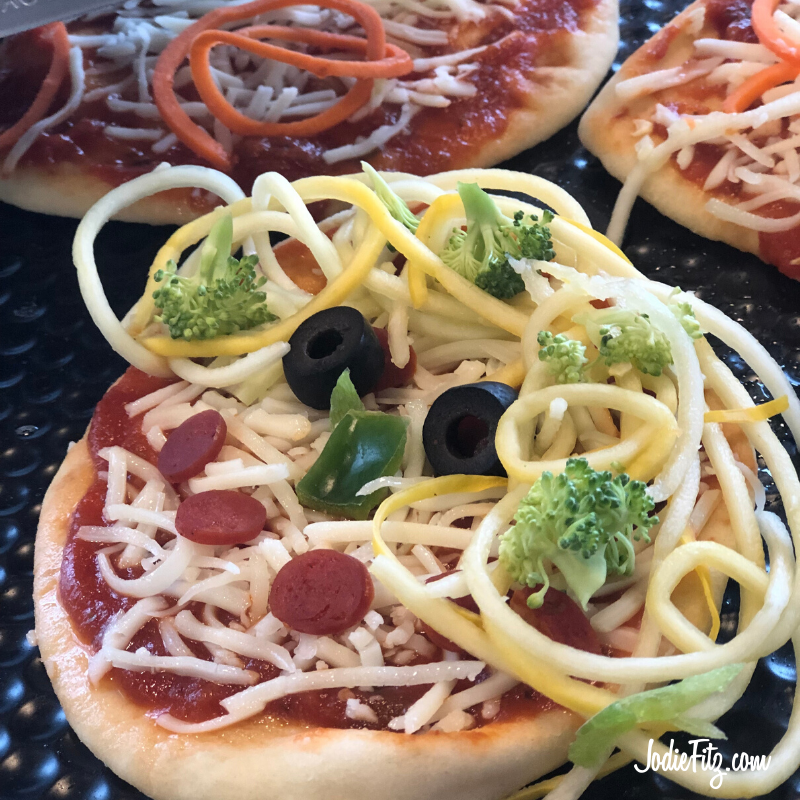
Get Creative: Like the picture above, use veggies to create a veggie face. Or, like the picture below, create a baseball. Use healthy ingredients and get creative!
Dough Storage: You can keep extra pizza dough’s in the refrigerator for up to 5 days. Let the dough’s cool completely. Separate them by placing parchment paper in between each of the dough’s. Keep them in an airtight container, snap and seal style storage bag or covered tightly with plastic wrap.
Adding Flavor: When you cook your dough in the skillet, use a flavored olive oil. I love the Tuscan flavored Saratoga Olive Oil that can be found at Price Chopper/Market 32 Supermarkets.
Cooking with Kids: Every recipe has steps and life skills to focus on when cooking with kids. Here are a few to focus on when making this recipe…
- Measuring ingredients
- Leveling dry ingredients
- Kneading dough
- Following directions
- Stove top or skillet safety
- Storing ingredients
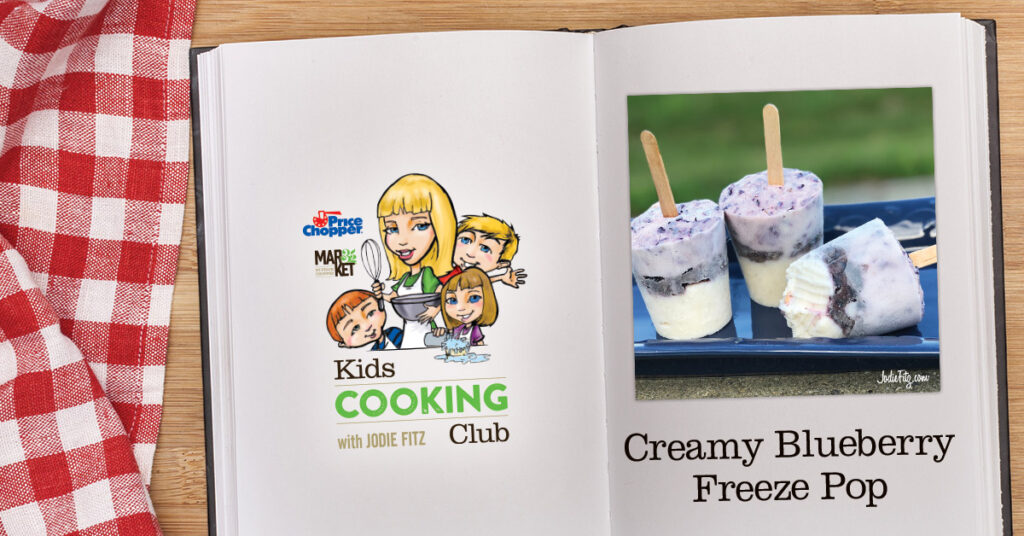
I love homemade freeze pops! They are easy, creative and delicious to make. July is one of my favorite times to pull out my Creamy Blueberry Freeze Pops, whip them up and keep a fresh batch in the freezer to snack on in the hot weather.
These freeze pops have a triple layer of flavor to savor while enjoying them for a summer cool down. They are packed with fresh blueberries and made with a base of Greek yogurt.
Making freeze pops is a great way to spend time with the kiddos in the kitchen and make memories as you complete a recipe together. It’s a also a great recipe to make without turning on the oven.
Creamy Blueberry Freeze Pops by Jodie Fitz
12 oz. Greek vanilla yogurt
1 1/2 cups of fresh blueberries
1/2 of a lime
2 tablespoons honey
4 – 5 oz. paper cups
4 wooden craft sticks
Makes 4 pops
Rinse the blueberries. Divide the blueberries by measuring and placing 3/4 cup of blueberries into a bowl and the remaining 3/4-cup of blueberries into a mini chopper, food processor or blender. Chop the 3/4-cup of blueberries until they are finely chopped.
Divide the yogurt into two bowls, 6 oz. in each.
Extract the juice from the lime using either citrus squeezer or your hands. It will yield approximately 1 tablespoon of lime juice. Divide the lime juice, approximately 1 1/2 teaspoons, into each bowl of yogurt.
Add 1 tablespoon of honey into each bowl of yogurt.
Add the chopped blueberries into one of the bowls of yogurt. Fold the ingredients together in each bowl using separate spatulas or spoons. Keep the two yogurt mixtures separate.
Line up your paper coated cups.
Layer One: Evenly distribute the vanilla mixture into the cups.
Layer Two: Evenly distribute the whole blueberries into each of the cups.
Layer Three: Evenly distribute the blueberry yogurt mixture into each of the cups.
Add a wooden craft stick into the center of each cup. Place the cups into the freezer and freeze overnight.
More on making these Creamy Blueberry Freeze Pops
Greek Yogurt: Use your favorite. Mine is currently the Cabot Vanilla Bean located in the dairy aisle of your local Price Chopper/Market 32 stores.
Removing the Cup: Remove the cup from the freeze pop by simply snipping the edge of the cup and peeling it from the cup. DO NOT wet the outside to remove it, the yogurt will melt quicker.
Wooden Craft Sticks: These can typically be found at your local Price Chopper/Market 32 Supermarkets in the school supply aisle or a craft store.
Can you use freeze pop molds? YES! It may make more or less pops depending on the mold and size.
Saving the extras: If you have extra pops, simply keep them in the freezer in a snap and seal style freezer storage bag. Keep them in the cups until you are ready to use them.
Lessons with making Creamy Blueberry Freeze Pops for Kids:
- Measuring
- Folding
- Chopping
- Extracting lime juice
- Following directions
- Making freeze pops