Silly Egg Head Planters by Jodie Fitz
Whether you’re an avid gardener or a novice, these eggshell planters are a great way to craft and recycle while celebrating Earth Day and starting your garden prep. You can plant vegetables, fruits or herbs, and if you don’t like to garden, you can plant flowers or grass and still have fun!
Supplies Needed:
Eggs
Egg Carton
Vegetable or herb seeds
Colorful permanent markers
Seed starting potting mix
Plastic Spoon
Easy Instructions:
To prepare in advance, when baking or cooking with eggs in the days before the activity, crack them at the top so that you keep three-quarters of the eggshell intact.
- Place the empty eggshells in an egg tray and let dry overnight. The tray will provide stability for your eggs once they are planted.
- Gently create silly faces on the eggs using permanent, colorful markers.
- Using a small plastic spoon, fill the eggs with potting soil.
- Add 1 to 3 seeds (depending on what you are planting) into the dirt and cover the seeds with a little more soil.
- Water the plants.
More on making Silly Eggshell Planters:
All Planted: Keep your silly egg heads in a sunny window and water as needed. Germination time depends on the plant. You can learn more on your seed packet(s).
Find the Supplies: You can find almost everything you need for this activity when shopping at Price Chopper/Market 32.
- Markers: school supply aisle.
- Plastic spoons: paper supply aisle.
- Eggs: dairy aisle.
- Seeds: floral department.
- Potting soil: seasonal aisle or floral dept.
Watering Suggestion: PICS brand paper coated cups are great for watering. You can squeeze the cup to create a spout and control the amount of water. They can also be found in the paper supply aisle.
Transplanting: Eventually, the seedlings will outgrow the eggshells. You can transfer them to a larger planter or your garden, depending on the weather. Gently break the shell and plant it with the seedlings; it helps to feed the soil and your plant.

KCC Grilled Egg and Cheese Sandwich
Grilled Egg and Cheese Sandwich by Jodie Fitz
Have leftover, hard boiled Easter Eggs? We’ve got you covered at the Price Chopper/Market 32 Kids Cooking Club. You can turn them into a simple, but delicious, grilled egg and cheese sandwich. This combo is perfect for a breakfast sandwich, lunch or an easy dinner. YUM, yum and more yum…
2 slices PICS whole grain bread (or your favorite)
1 PICS hardboiled egg
½ cup PICS shredded sharp cheese
1/8 teaspoon PICS ground mustard
1/8 teaspoon PICS salt
1/8 teaspoon PICS paprika
1/8 teaspoon PICS black pepper
¼ teaspoon PICS onion powder
PICS butter
Peel and slice the hardboiled egg.
Stir the ground mustard, salt, paprika, black pepper and onion powder together with the shredded cheese.
Sprinkle half of the cheese onto one slice of bread. Place the egg slices on the cheese and then top with the rest of the cheese. Finish with the second slice of bread.
Melt butter in a pan over medium to low heat. Add the sandwich, toast one side and carefully flip to toast the other side.
Side Serves: This sandwich is great for breakfast with fruit on the side. It’s also delicious for lunch and you can add fresh veggies or salad.
Cooking with Kids: Every recipe is filled with life skills that help to encourage a child’s confidence in the kitchen. Here are a few to focus on when making this recipe;
- Peeling eggs
- Slicing
- Knife safety
- Measuring ingredients
- Stirring
- Grilling a sandwich
- Stovetop safety
- Flipping
- Following Directions
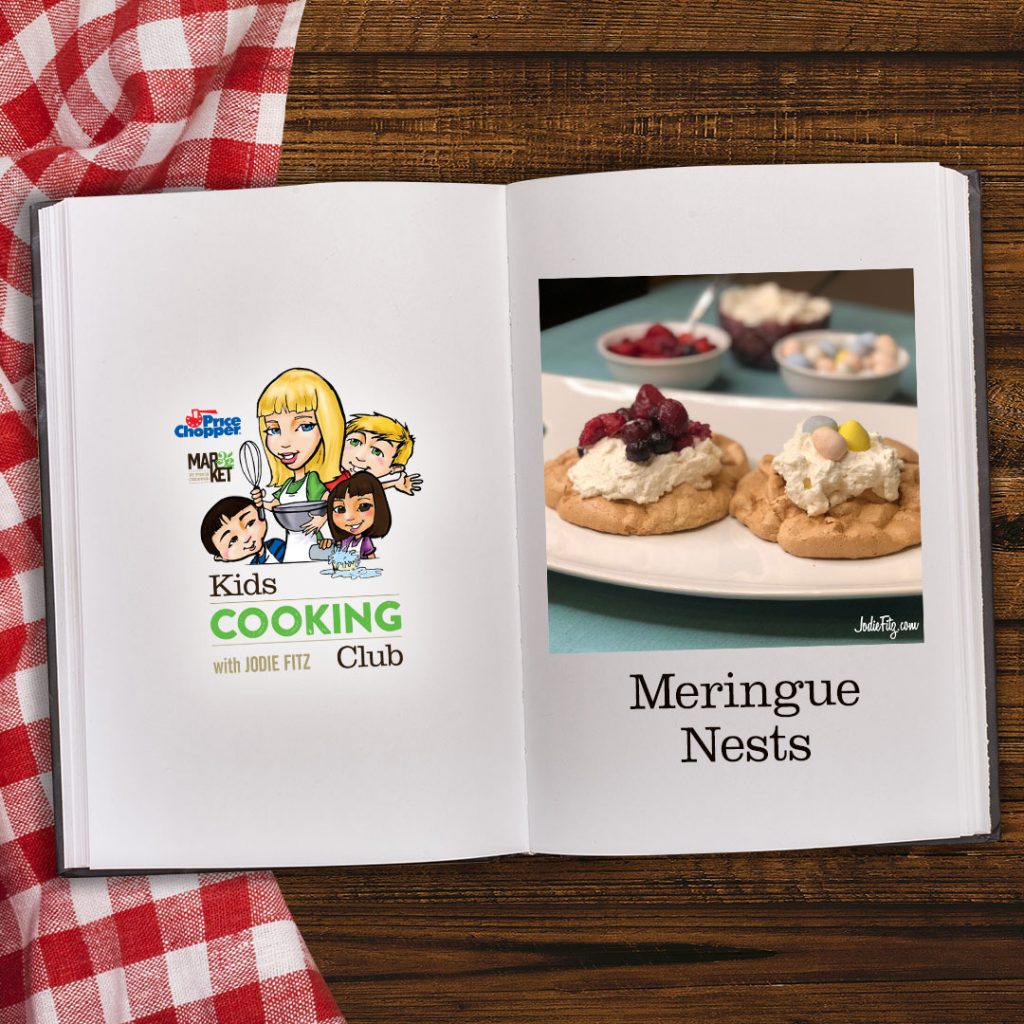
Meringue Nests
by Jodie Fitz
5 egg whites
2 teaspoons PICS vanilla extract
1 cup PICS light brown sugar
8 oz. PICS whipping cream
1/4 cup PICS confectioner’s sugar
1 teaspoon PICS vanilla extract
Pre-heat the oven to 325 degrees. Spread the brown sugar on a non-stick baking sheet. Place it in the oven for approximately eight minutes, remove it and let it fully cool.
Place the dried brown sugar into a mini chopper or food processor to bring it to a dried, granulated state.
Beat the egg whites with an electric mixer until they form stiff peeks. Add in the vanilla extract and sprinkle in approximately an 1/8 cup of the granulated brown sugar at a time and continue to mix with the electric mixer until it has all been added and mixed thoroughly.
On a piece of parchment paper, make approximately four – 4” circles with a permanent marker. Flip the paper so that the ink is face down on a nonstick baking sheet; you will be able to see the lines through the paper. Using a spoon to scoop the meringue onto the paper on the inside of the ring. Bake the meringues at 325 degrees for 30 – 35 minutes.
Turn off the oven, but open it a crack and let the meringues cool in the opened oven for an additional 35 – 40 minutes.
Just before serving, add the whipping cream, confectioner’s sugar and vanilla extract together in a mixing bowl. Whip until it is stiff.
Fill each nest with cream and top it off with Cadbury mini chocolate filled eggs with the crisp colored shells or PICS frozen mixed berries that have been thawed.
Egg White Time Tip: Yes, you can crack the eggs and separate the yolk from the whites. However, then you have all of the yolks that you either toss or find another way to use. Or, you can simplify and buy the PICS egg whites located near the regular eggs at your Price Chopper and Market 32 Supermarkets.
Drawing the Circles: I trace a small bowl, but you can use a ruler or protractor to create the circles as well. Just make sure you turn the ink side down before adding the meringue. You can make smaller circles for smaller bites if desired.
Storing Extras: If you have additional nests and cream, store them separately.
Cooking with Kids: Every recipe is filled with life skills that help to encourage children’s confidence in the kitchen. Here are a few to focus on when making this recipe;
- Separating eggs
- Whipping eggs
- Electric mixer safety
- Scooping
- Baking
- Oven safety
- Mini chopper or food processor safety
- Measuring ingredients
- Following directions
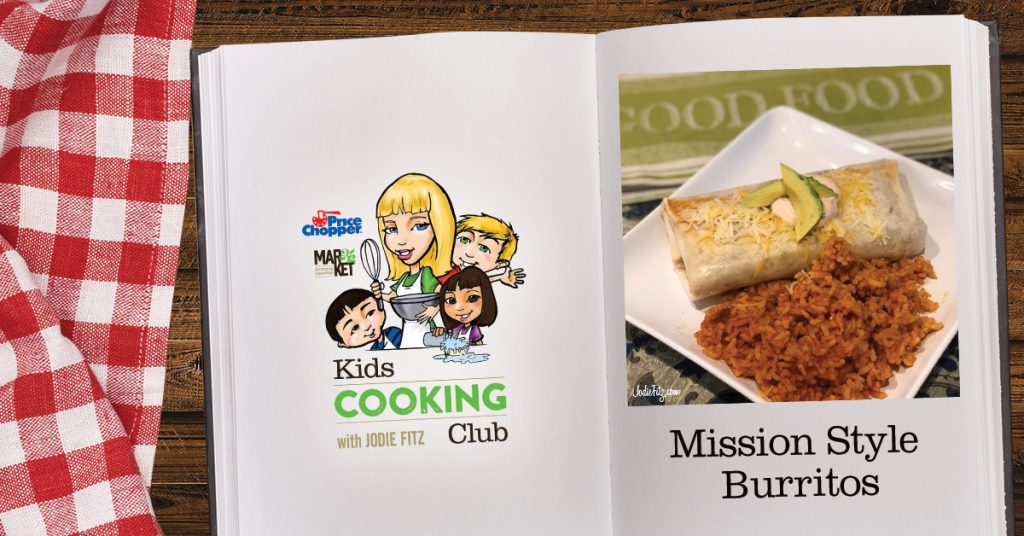
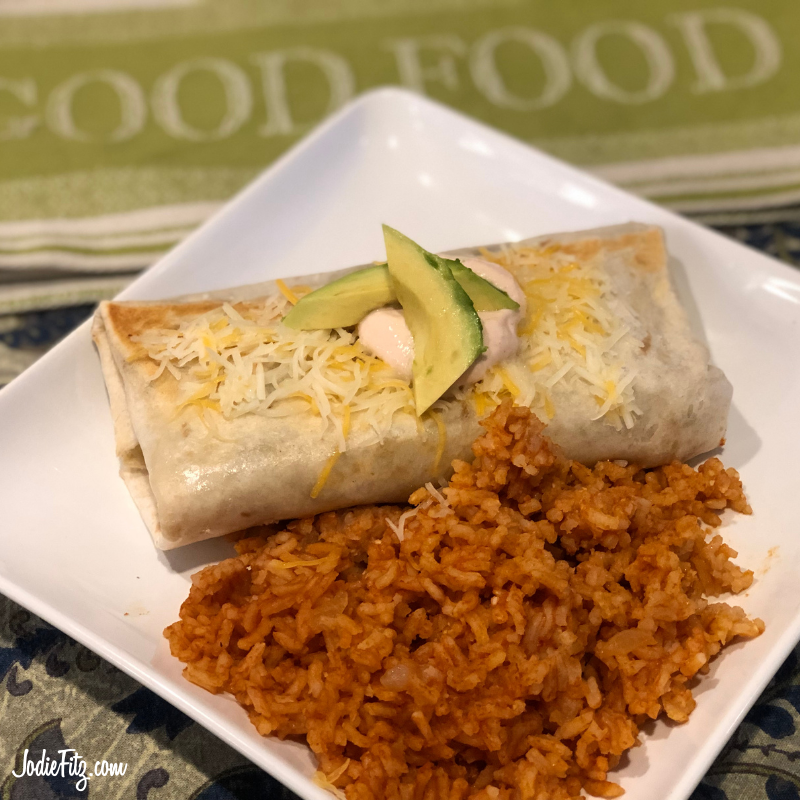
Mission Style Burritos by Jodie Fitz
1 Rotisserie cooked chicken
1 – 15 oz. can of refried beans, traditional or black bean
½ cup PICS sour cream
2 tablespoons taco sauce
Fresh salsa
2 pounds PICS frozen corn
1 green bell pepper
1 lime
Fresh cilantro
Avocado
PICS shredded Mexican cheese blend
Tortilla wraps, large
PICS butter
Remove the chicken from the bones and cut the chicken into small pieces.
Remove the refried beans from the can and place them in a bowl.
Stir the sour cream and taco sauce together. Keep it refrigerated until you are ready to build your burritos.
Prep the salsa by either opening a container or making it (see below).
Cook the corn and drain it.
Wash the green bell pepper, remove the seeds and dice it.
Chop a ½ cup of fresh cilantro.
Stir the corn, bell pepper and chopped cilantro together. Cut the lime in half and squeeze the fresh juice onto the corn mixture and stir it together.
Remove the skin and seed from the avocado and cut it into slices.
Steam the tortilla wraps by placing one on a plate, placing a damp paper towel over the top and put it in the microwave for 20-30 seconds.
Add the ingredients to the center of your tortilla; refried beans, fresh salsa, the corn mixture, the chicken, the cheese and fresh avocado.
Fold the tortilla burrito style by folding in the sides and rolling it up.
Melt a little butter in a skillet style pan; just enough to coat it. Toast the burritos on either side like you would a grilled cheese.
Rotisserie Chicken: You can find this in the prepared food area at your Price Chopper and Market 32 Supermarkets.
Salsa: You can find fresh salsa in the produce aisle at your Price Chopper and Market 32 Supermarkets. Or, you can make your own.
Simply place 1 pint of grape tomatoes with ½ cup of finely diced sweet onion into a mini food chopper or food processor and chop the ingredients. Add in 1 green bell pepper that’s been rinsed, seeded and diced along with 1 clove of peeled garlic and chop them together with the tomatoes and onions. Add in a ½ cup of fresh cilantro and 1 tablespoon of PICS balsamic vinegar. Chop again and serve.
Extra Corn: Simply serve it on the side or add it to the top of a salad if you have extra.
Spanish Rice: Spanish rice is a great side dish and can be added into the tortilla as part of your burrito or served on the side.
The Plastic Knife: If you have younger children, they can help to cut many of the ingredients in the recipes to help strengthen this motor skill. For example, cut the bell pepper into strips and let them cut it into small pieces. Or, remove the avocado from the skin, let the children cut it into strips.
Cooking with Kids: Every recipe is filled with life skills that help to encourage children’s confidence in the kitchen. Here are a few to focus on when making this recipe;
- Measuring ingredients
- Stirring
- Cutting skills
- Knife Skills
- Dicing
- Avocado prep
- Burrito folding
- Stove top safety
- Following directions
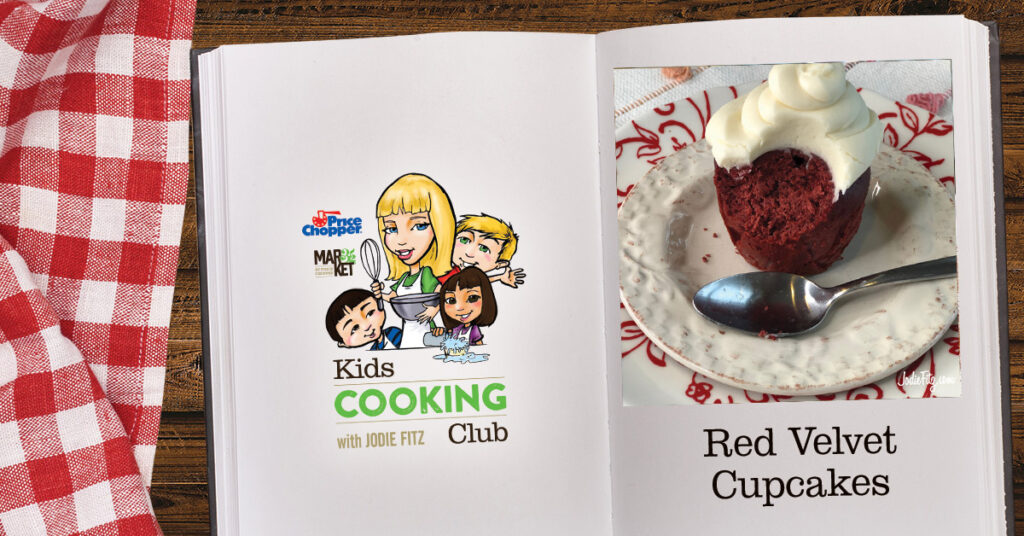
Healthy Red Velvet Cupcakes by Jodie Fitz
3 PICS eggs, large
1-cup buttermilk
¾ cup PICS brown sugar
¾ cup PICS granulated sugar
2 teaspoons PICS vanilla extract
4 oz. PICS cinnamon applesauce
½ cup PICS pureed beets (see below)
1 ½ cups PICS all-purpose flour
½ cup PICS cocoa powder, unsweetened
1 teaspoon PICS baking soda
1 teaspoon PICS baking powder
1 teaspoon PICS salt
1-tablespoon red food dye
Combine the eggs, buttermilk, brown sugar, granulated sugar, vanilla extract, applesauce and pureed beets together in a bowl. Whip the ingredients together using an electric mixer.
Once they are mixed well, add in the dry ingredients; the flour, cocoa powder, baking soda, baking powder and salt.
Mix in the red food dye.
Preheat the oven to 350 degrees.
Line a cupcake/muffin tin with cupcake liners. Fill the cupcake liners with the batter. Bake the cupcakes for 25 minutes.
Pureed Beets: Simply purchase sliced or diced PICS beets. Drain the liquid. Place the beets in a food processor, mini chopper or blender and puree them until the look like a purple applesauce.
Original Red Velvet Cupcakes: When this recipe originated, the cupcakes turned a natural burgundy through a chemical reaction that took place with certain ingredients. Over time our ingredients have changed and cocoa powder is now alkalized so the chemical reaction no longer naturally occurs.
Red Food Dye: If you have an allergy to red food dye, you can eliminate the red food dye all together. The color will lean towards a darker burgundy. A typical red velvet recipe requires ½ cup of red food dye. This recipe allows us to greatly reduce the amount of red food dye used.
Top it off! Simply serve with a traditional Cream Cheese Frosting by combining a ½ cup (1 stick) of PICS butter at room temperature with 8 oz. PICS cream cheese at room temperature, 3 cups of PICS confectioner’s sugar and 2 teaspoons of PICS vanilla extract.
Pipe it on top of the cupcakes using decorating utensils or simply fill a quart sized snap and seal freezer bag and clip a corner to pipe on the frosting.
Cooking with Kids! Every recipe has lessons, small and big, that encourage life and cooking skills. Here are a few to focus on:
Measuring ingredients
Level ingredient measurements
Pouring
Pureeing
Food processor safety
Scooping
Baking
Oven safety
Following directions
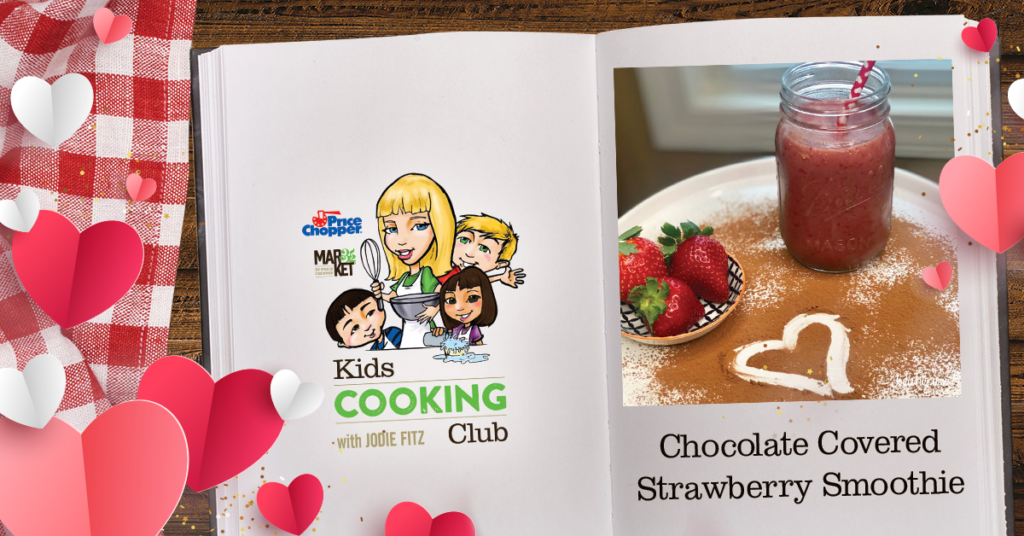
Chocolate Covered Strawberry Smoothie by Jodie Fitz
3 cups PICS fresh frozen strawberries
1 ½ cups PICS low fat milk
1 tablespoon PICS unsweetened cocoa powder
1 teaspoon PICS vanilla extract
2 tablespoons PICS honey
Add the fresh frozen strawberries, milk, cocoa powder, vanilla extract and honey into the blender. Blend well; until everything is thick and creamy like a milkshake.
NOTE: Make sure the 1-tablespoon of cocoa powder is a level measurement.
Dairy Allergies? Swap the low fat milk with your favorite dairy free milk alternative; rice milk, almond milk, cashew milk, coconut milk, oat milk, etc.
Fun Facts:
• A strawberry can have up to 200 seeds on it!
• Strawberries are a source of vitamin C.
• Cocoa powder has been dated back before the Mayans; an ancient civilization.
Cooking with Kids! Every recipe has lessons, small and big, that encourage life and cooking skills. Here are a few to focus on:
• Measuring ingredients
• Level ingredient measurement
• Blending
• Blender safety
• Pouring
• Following directions

The Melted Snowman Smoothie by Jodie Fitz
3 cups ice
1½ cups low-fat milk
6 oz. PICS low fat vanilla yogurt
1 banana
3 tablespoons PICS honey
1 ½ teaspoons PICS vanilla extract
Add all ingredients to a blender, blend well and serve.
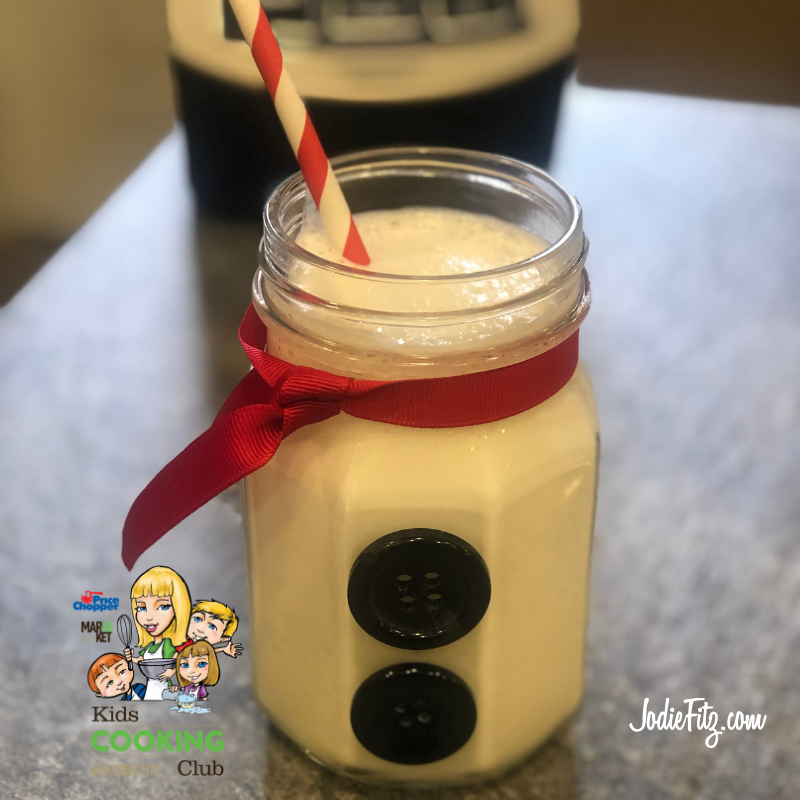
Create a Snowman Mason Jar! This craft is simple and fun. Here are the supplies you will need:
Mason jar
Ribbon
2 buttons
Double stick tape
Scissors
Decorative Paper Straws (optional)
Measure, cut and tie ribbon around the jar rim and adhere two buttons to the front of the jar with double stick tape. Serve your Melted Snowman with a colorful paper straw.
Dairy allergies? Substitute your favorite dairy free yogurt and milk alternatives. Coconut based products help keep this recipe thick and creamy.
Cooking with Kids! Every recipe has lessons, small and big, that encourage life and cooking skills. Here are a few to focus on:
- Measuring ingredients
- Peeling a banana
- Blending
- Blender safety
- Pouring
- Following directions
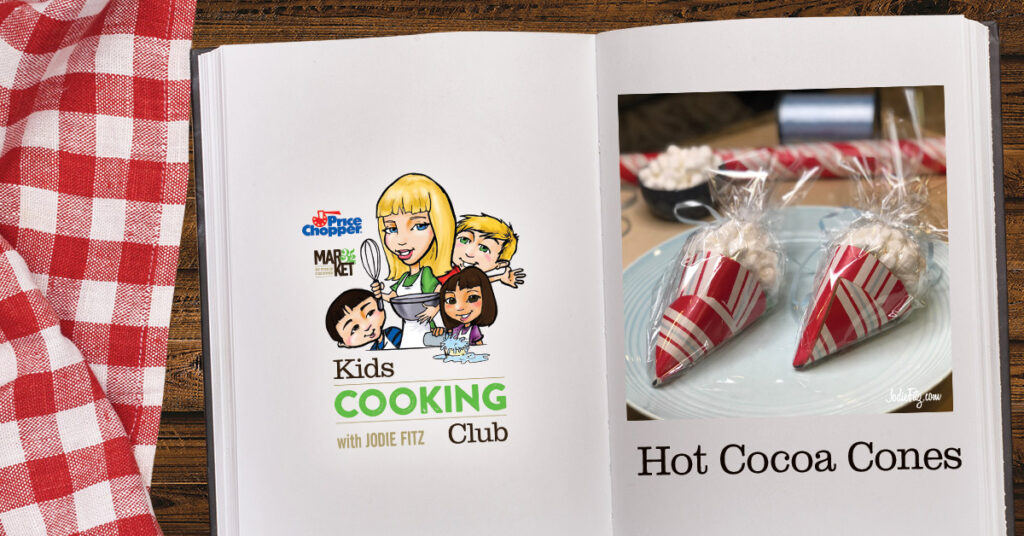
KCC Hot Cocoa Cones by Jodie Fitz
Supplies Needed:
Price Chopper or Market 32 Paper Grocery Bag (or craft paper)
Double sided tape
Regular tape
Holiday wrapping paper
Cellophane
Ribbon
PICS Instant Hot Chocolate Packets
PICS Mini Marshmallows
PICS Snap and seal sandwich size bag
Tools Needed:
Scissors
Pencil
Bowl

Directions:
- Create a template on the paper bag or craft paper by flipping a bowl upside down and tracing it with a pencil. The bowl should be a medium sized bowl, approximately 8 “ in diameter. It does not have to be exact.
- Using scissors, cut out the paper circle. Note: You need a paper bag circle for every cone you create; it provides the stability to the cone.
- Lay the paper bag circle on top of wrapping paper, trace a circle and cut it out. Attach the two circles together with double sided tape.
- Draw a pencil circle in the center of each circle.
- Cut out a pie shaped triangular piece like in the video. It will look almost like a Pac-Man character.
- Roll the circle by overlapping the cut pieces until it forms a cone shape. Keep it in position by placing a double-sided piece of tape where the overlap pieces come together.
- Roll the hot chocolate packet and insert it into the cone.
- Fill the snap and seal bag about a third of the way full with mini marshmallows. Release the air before sealing it. Roll the empty end and tuck it into the cone. Tape it into place.
- Cut a square piece of clear cellophane. Place the pointed end of the cone in the center, bring the cellophane up around the cone and tie the top off with a ribbon.
Optional: Add a personal note and share with friends!
Where to Find Everything?
Paper Bags: Reuse a brown paper grocery bag. Or, you can purchase a roll of brown craft paper.
Double sided tape, regular tape, pencils & scissors: You can find these in the school supply aisle.
Holiday wrapping paper, cellophane and ribbon: You can find these items in the seasonal aisle, and also the greeting card section at Price Chopper/Market 32.
Hot Cocoa Packets: This is typically located in the coffee and tea aisle.
Mini Marshmallows: Typically found in the baking aisle.
Chocolate Covered Pretzels with Caramel and Peanut Butter
Jodie Fitz
PICS Pretzel rods
PICS Mini chocolate morsels, dark, milk or semi-sweet
Caramel apple wraps
PICS Peanut butter (optional)
Colored sprinkles
PICS Nonstick cooking spray

Coat a pizza cutter with nonstick cooking spray.
Place the caramel wraps, one at a time, on a cutting board with a piece of parchment paper between the caramel wrap and your cutting board. Note: The caramel comes with parchment paper dividers that you can use; this prevents the caramel from sticking to the cutting board.
Using the pizza cutter, cut the caramel wraps into one inch strips.
Starting at least two inches from one end of the pretzel, carefully wrap the caramel strips around the rest of the pretzel. Set the caramel wrapped pretzels onto a wax paper lined cookie sheet and set aside.
Pour chocolate morsels into a tall drinking glass, Microwave the chocolates in the glass on high for one minute. The chocolate will not look fully melted, stir the morsels together until they fully melt after removing the glass from the microwave.
Dip the caramel covered pretzel into the chocolate leaving the unwrapped end exposed.
Set the pretzel back onto the waxed paper and coat with a thin layer of colored sprinkles.
Let the pretzels set until the chocolate has hardened.
Keep the pretzels in cool storage.
The Caramel Wraps? You can typically locate these in the produce area of your Price Chopper and Market 32 Supermarkets near the apples.
Add Peanut Butter! Simply spread a light layer of peanut butter onto the pretzel before wrapping it with caramel. Follow the rest of the directions as is.
Nut allergies? Replace the peanut butter powder with WowButter®. It’s a delicious nut free, tree nut free, gluten free peanut butter alternative. It can be found in the allergy friendly aisle at your Price Chopper and Market 32 Supermarkets.
So Much Fun with Kids! There’s lessons in every recipe making experience for the kids in your life. Here are a few activities to concentrate on when making this no bake pretzel fun;
- Cutting safety
- Wrapping
- Dipping
- Melting chocolate
- Spreading
- Sprinkling
- Following directions
Chocolate Caramel Filled Shortbread Cookies
Jodie Fitz
½ cup PICS butter, room temperature
1 teaspoon PICS vanilla extract
1 PICS egg, large
½ cup PICS confectioner’s sugar
1 ½ cups PICS all-purpose flour
¾ cup PICS mini chocolate chips
Filling
2 tablespoons PICS butter
3 tablespoon PICS milk
5 oz. Caramel candies, unwrapped
¼ cup mini chocolate chips
Preheat the oven to 350 degrees.
Using an electric mixer, whip together the room temperature butter with the vanilla extract, egg and confectioner’s sugar. Slowly add in the flour continuing to mix with the electric mixer until all ingredients are mixed well.
Using a spatula, fold in the mini chocolate chips.
Form the dough into small cookie dough balls and slightly flatten them and place them onto a parchment paper lined baking sheet.
Using a tablespoon sized measuring spoon, dip the base of the measuring spoon into confectioner’s sugar and press it into each cookie to create an indent.
Bake the cookies for 10 – 12 minutes.
Recipe makes approximately 18 cookies.
While the cookies are baking and cooling, prep the filling by first melting 2 tablespoons of butter over low heat in a saucepan. Once melted, over low heat, add in the 3 tablespoons of milk, 5 oz. unwrapped caramel candies and stir until the candies have melted and the three ingredients are mixed together well. Turn off the heat and add in ¼ cup of mini chocolate chips. Continue to stir until they are fully melted and mixed in.
Add the filling into a piping bag once it’s slightly cooled and can be handled. If you don’t have a piping bag, add the filling to a quart sized freezer bag and clip one corner.
Pipe the filling into the cookie indent. Let the cookies set until the center hardens, approximately 30 minutes.
Optional: Add sprinkles on top before the center hardens.
Storing: If you are layering the cookies when storing in an airtight container, keep a of layer parchment paper between the layers to prevent the cookie centers from sticking to other cookies.
So Much Fun with Kids! There’s lessons in every recipe making experience for the kids in your life. Here are a few activities to concentrate on when making these cookies:
- Measuring ingredients
- Mixing
- Electric mixer safety
- Melting
- Stovetop safety
- Piping
- Following directions
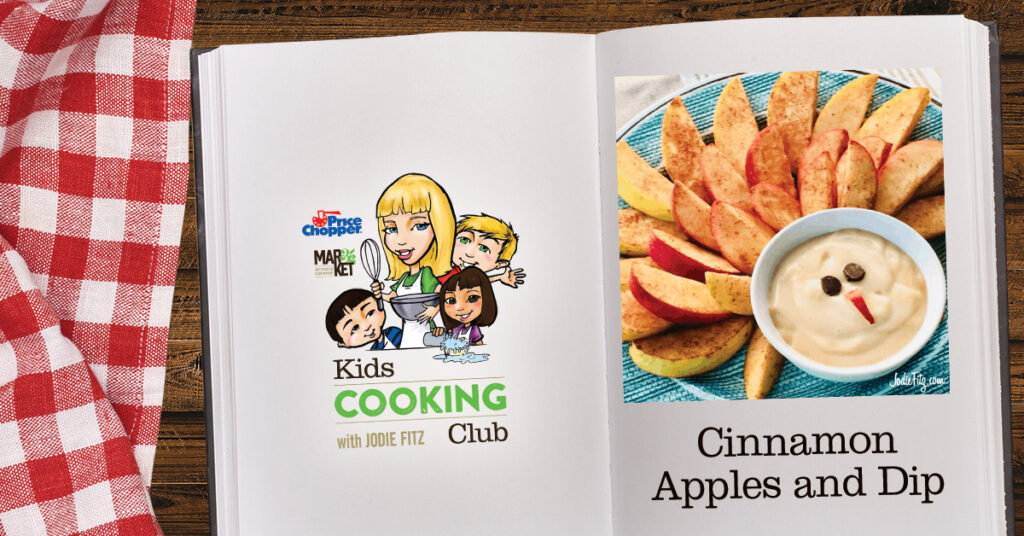
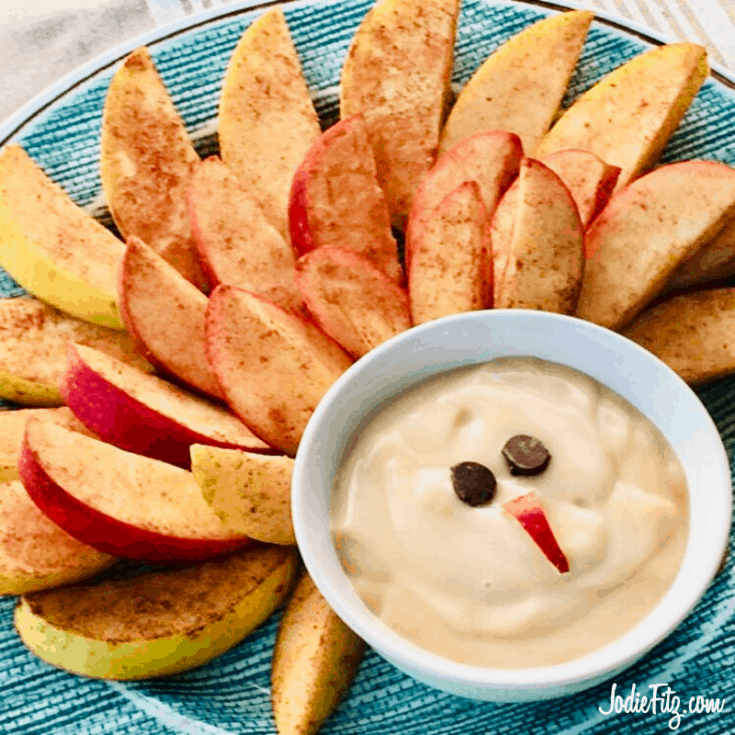
Cinnamon Apples and Dip
by Jodie Fitz
1 Golden Delicious Apple
1 Gala Apple
¾ teaspoon PICS cinnamon
3 oz. PICS Greek vanilla yogurt
2 oz. PICS Vanilla low-fat yogurt
1 tablespoon caramel dip
1 tablespoon peanut butter or WOWButter®
Fold the yogurts together with the caramel dip, peanut butter (or WOWButter®) and ½ teaspoon of cinnamon.
Wash, core & slice the apples. Place the apples in a large snap & seal storage bag. Add in a few shakes of the cinnamon approximately a ¼ teaspoon, seal the bag & shake until the apples are coated with the cinnamon.
Serve the apples with the dip!
Thanksgiving YUM FUN:
For a Thanksgiving twist place the dip into a small bowl. Use either chocolate chips or raisins to serve as eyes on the dip & cut a small piece of apple to serve as a turkey beak. Place the cinnamon covered apples around the dip bowl, on a larger plate to serve as turkey feathers alternating the colors of the apples.
WOWButter® is a peanut free, tree nut free, gluten free peanut butter alternative that can be located in the allergy friendly aisle in your Price Chopper and Market 32 Supermarkets.
Snack, snack, snacking? This recipe is great to pack in the lunchbox or to serve as an afterschool snack. The cinnamon apples help to avoid the brown apple blah.
Storage? You can keep cinnamon apples in a snap and seal storage bag in the refrigerator for several days. And, the dip can be stored in an airtight container in the refrigerator for up to 5 days – 7 days.
Kiddos in the Kitchen: Every recipe has lessons to share with our children. This recipe, even as simple as it is, teaches some of the following concepts:
Cutting and Knife safety
Measuring Ingredients
Folding
Avoiding browned apples
Food storage
Crafting with food