


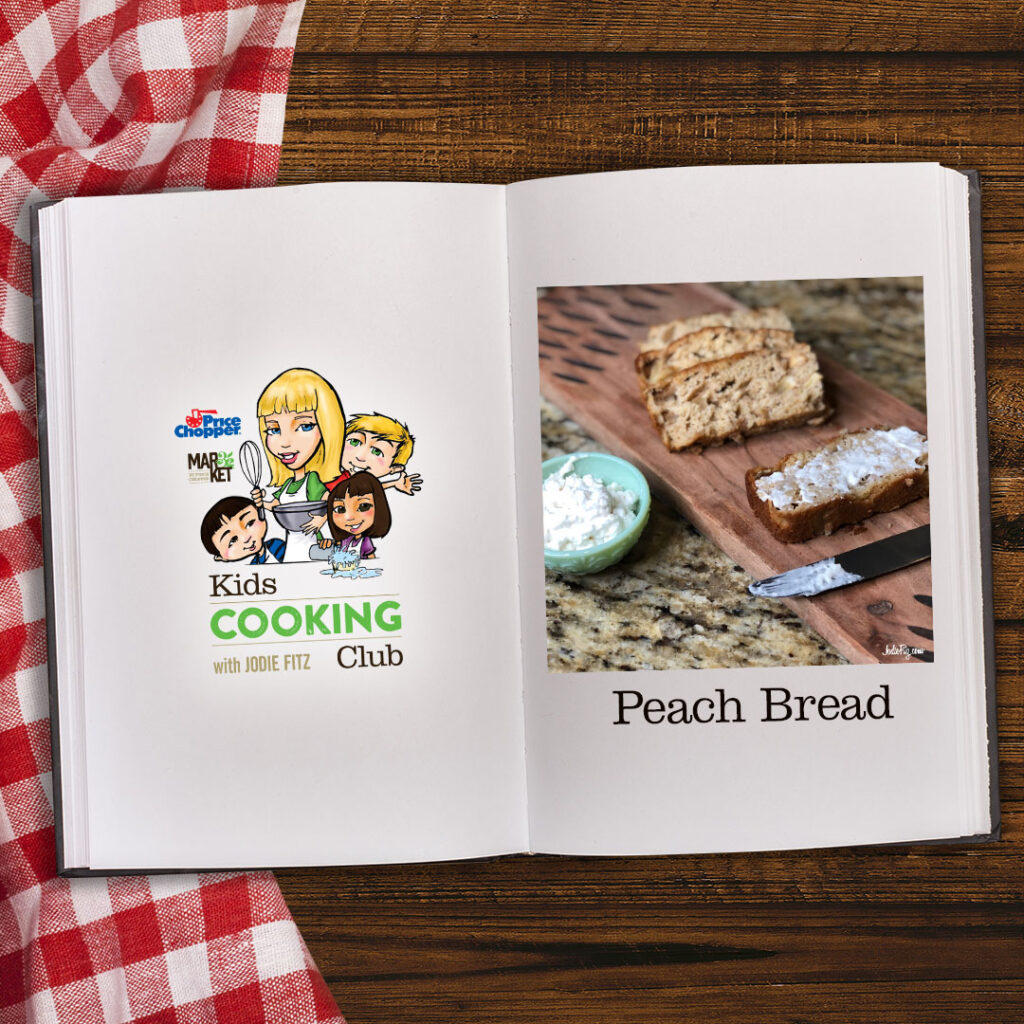
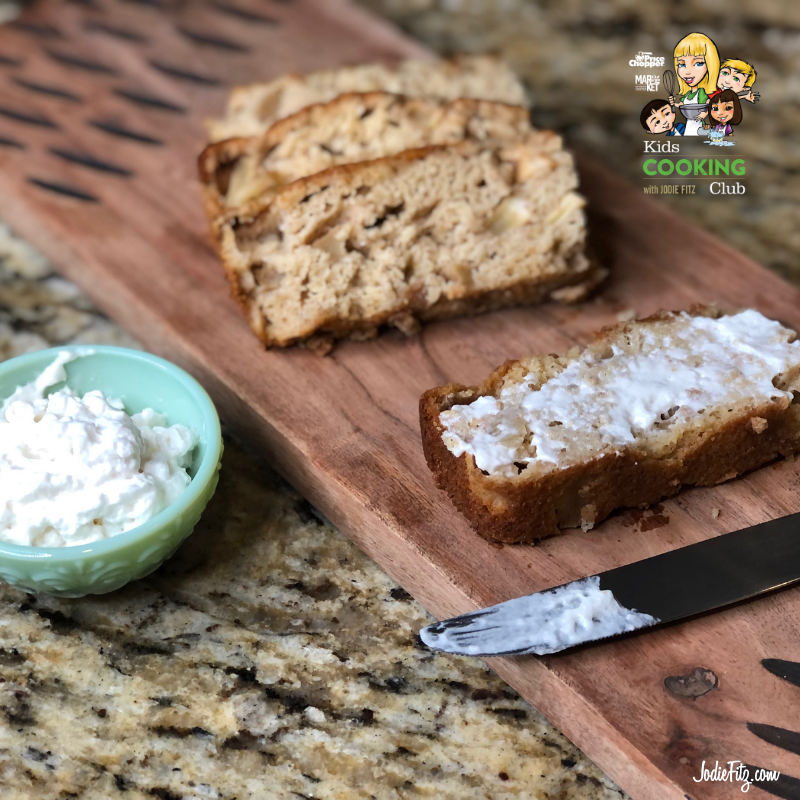
KCC Peach Bread by Jodie Fitz
Perfect for a breakfast sandwich on the run, this bread can also be used to change up a lunchbox sandwich or after-school snack.
4 peaches
1 ½ teaspoons PICS cinnamon
2 PICS eggs, large
½ cup PICS brown sugar
½ cup PICS organic cane sugar
4 oz. PICS cinnamon applesauce
1/3 cup PICS milk, low fat
1 teaspoon PICS vanilla extract
1 ¾ cups PICS all-purpose, unbleached flour
1 tablespoon PICS baking powder
½ teaspoon PICS sea salt
Preheat oven to 350 degrees.
Wash and peel peaches. Remove pits, then slice and dice.
In a bowl, mix diced peaches with 1 teaspoon cinnamon until evenly distributed and fully coated. Set aside.
In a separate bowl, combine eggs, sugars, applesauce, milk and vanilla extract. Mix well with an electric mixer.
In another bowl stir together ½ teaspoon cinnamon, flour, baking powder and salt.
Add dry ingredients to the egg mixture and combine using an electric mixer.
Fold peaches into the batter.
Grease an 8” x 8” glass baking dish. Pour batter into the dish, making sure to spread evenly.
Bake for 50 minutes. Let cool completely before slicing and serving,
Sandwich Spread: Stir together 3 tablespoons PICS cream cheese with 1 tablespoon PICS honey. Spread between two slices of peach bread to make a sandwich. (This mixture will make two sandwiches.)
Removing the pit: With an adult’s help and permission, use a paring knife to carefully slice into the peach until you reach the pit Slowly cut all the way around the pit of the peach. Set the knife down and twist the peach halves in opposite directions to separate the two halves. Remove the pit and discard.
Cooking with Kids: Every recipe is filled with life skills that help to encourage children’s confidence in the kitchen. Here are a few to focus on when making this recipe;
- Peeling and peeler safety
- Slicing, dicing and knife safety
- Peach pit removal
- Electric mixer safety
- Stirring and/or folding
- Spreading
- Baking and oven safety
- Measuring ingredients
- Following directions
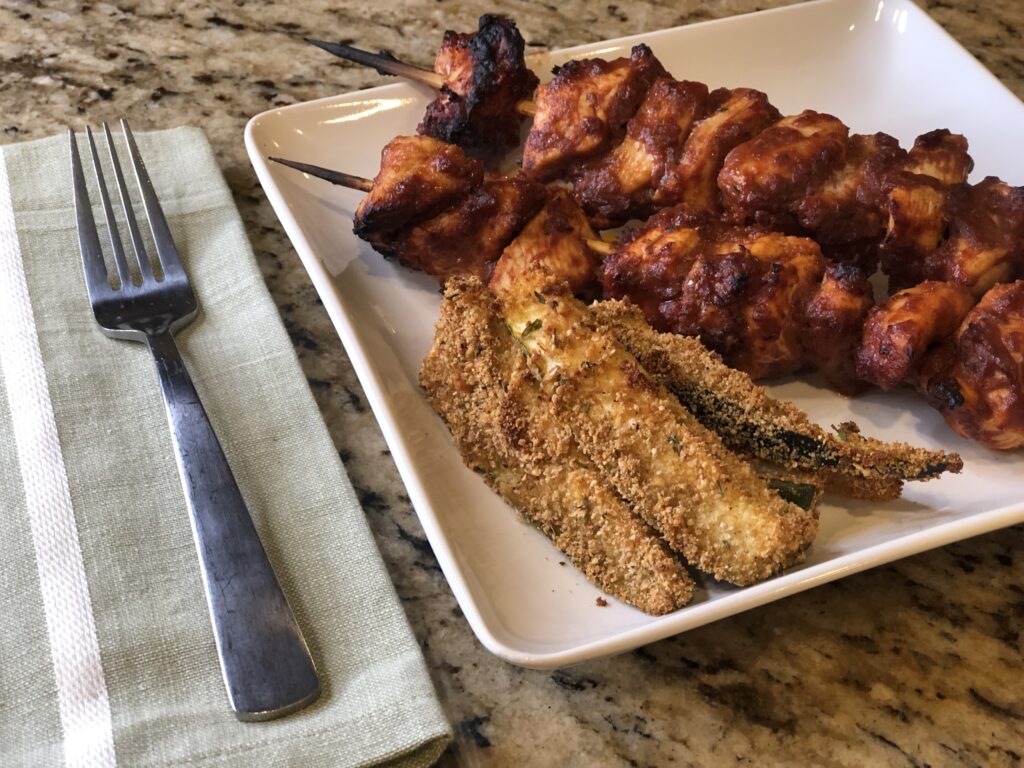
KCC Italian Chicken Kabobs and Zucchini Fries
by Jodie Fitz
Italian Chicken Kabobs
4 lbs. boneless chicken breast
6 oz. PICS tomato paste
¼ cup PICS balsamic vinegar
3 tablespoons PICS olive oil
1 tablespoon PICS Italian seasoning
1 teaspoon PICS onion powder
½ teaspoon PICS sea salt
½ teaspoon PICS garlic powder
Skewers
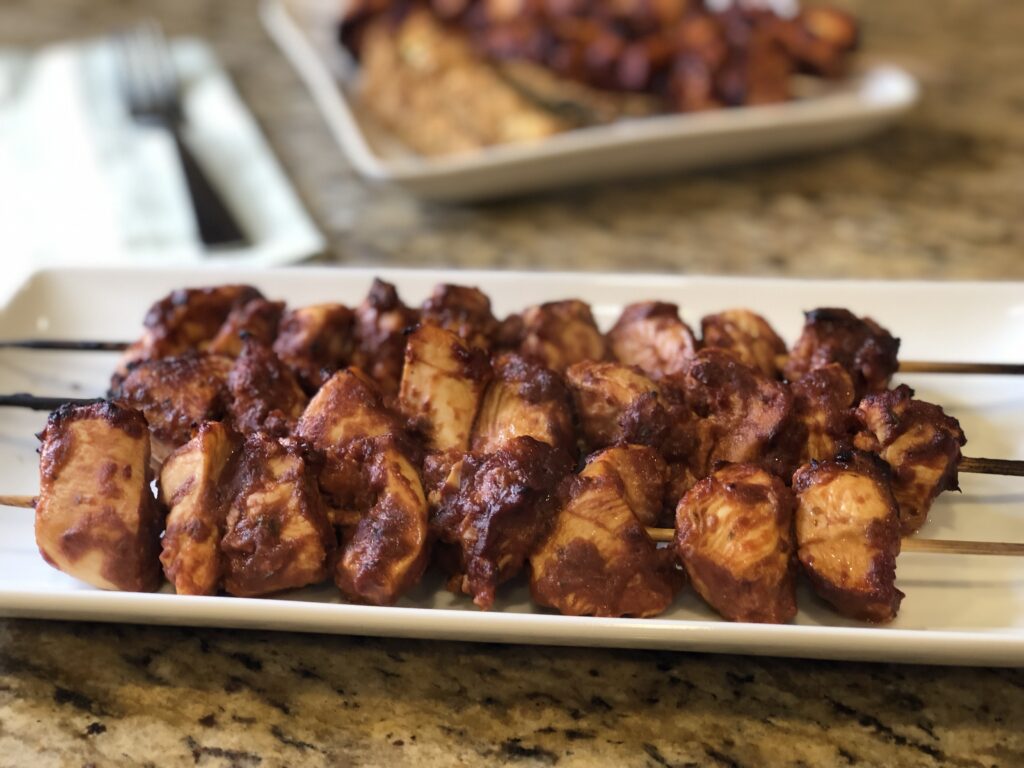
If using wooden skewers, soak in water for 20 minutes before threading chicken and cooking.
Stir together the tomato paste, balsamic vinegar, olive oil, Italian seasoning, onion powder, sea salt and garlic powder.
Cut the chicken into 1 ½ inch chunks and add to the marinade, making sure it’s well coated. Cover and refrigerate for 1 hour.
Carefully thread chicken pieces onto the skewers and place on a broiler pan or baking sheet.
Broil on medium to high until fully cooked, 15-20 minutes, depending on size of the chicken pieces. Rotate half way through.
Time Saving Tip: Toss the chicken and marinade together in a freezer bag or other airtight container, making sure it’s completely coated, and freeze. You can pull the marinated chicken from the freezer to defrost and marinate for a quick meal solution.
Clean Up: Line your pan with foil before adding the chicken kabobs, for easy clean up.
Cooking with Kids: Every recipe is filled with life skills that encourage children’s confidence in the kitchen. Here are a few to focus on when making this recipe:
- Following directions
- Measuring ingredients
- Cutting and knife safety
- Stirring
- Skewering
- Marinating
- Broiling and oven safety
Zucchini Fries
2 small to medium zucchini
1 cup PICS whole wheat seasoned bread crumbs
¼ cup PICS parmesan cheese, finely grated
1 ½ teaspoons PICS onion powder
1 teaspoon PICS paprika
¾ teaspoon PICS garlic powder
½ teaspoon PICS sea salt
¼ teaspoon PICS black pepper
2 PICS eggs
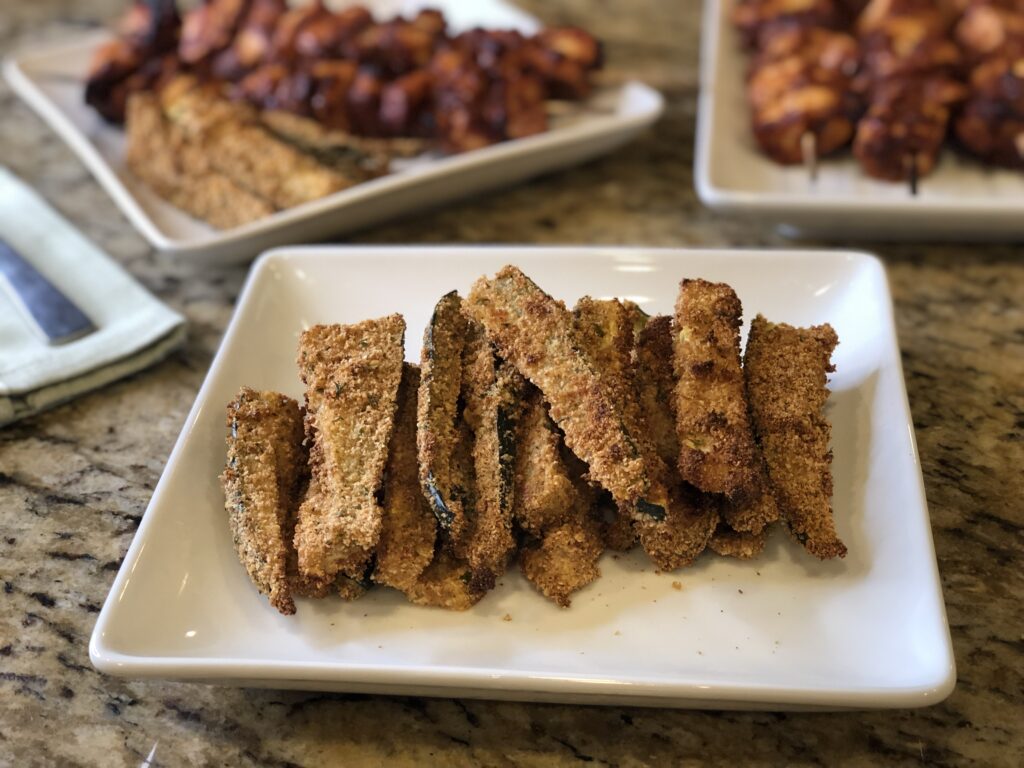
Preheat the oven to 425 degrees.
Remove ends of zucchini. Cut in half lengthwise, then cut each half in half again, creating four quarters. Cut each quarter into thin s to create zucchini fries.
In a bowl, stir together the seasoned bread crumbs, Parmesan cheese, onion powder, paprika, garlic powder, salt and pepper.
Whisk eggs.
Dredge zucchini fries in the eggs and then in the seasoned bread crumbs, until fully covered.
Place fries on a parchment paper-lined baking sheet.
Bake for 15 to 20 minutes.
Heating leftovers: Heat leftover zucchini fries on a parchment-lined baking sheet in a preheated oven at 400 degrees, until crispy and heated all the way through, 10-15 minutes.
Cooking with Kids: Every recipe is filled with life skills that encourage children’s confidence in the kitchen. Here are a few to focus on when making this recipe:
- Following directions
- Measuring ingredients
- Cutting and knife safety
- Whisking
- Stirring
- Dredging
- Baking and oven safety
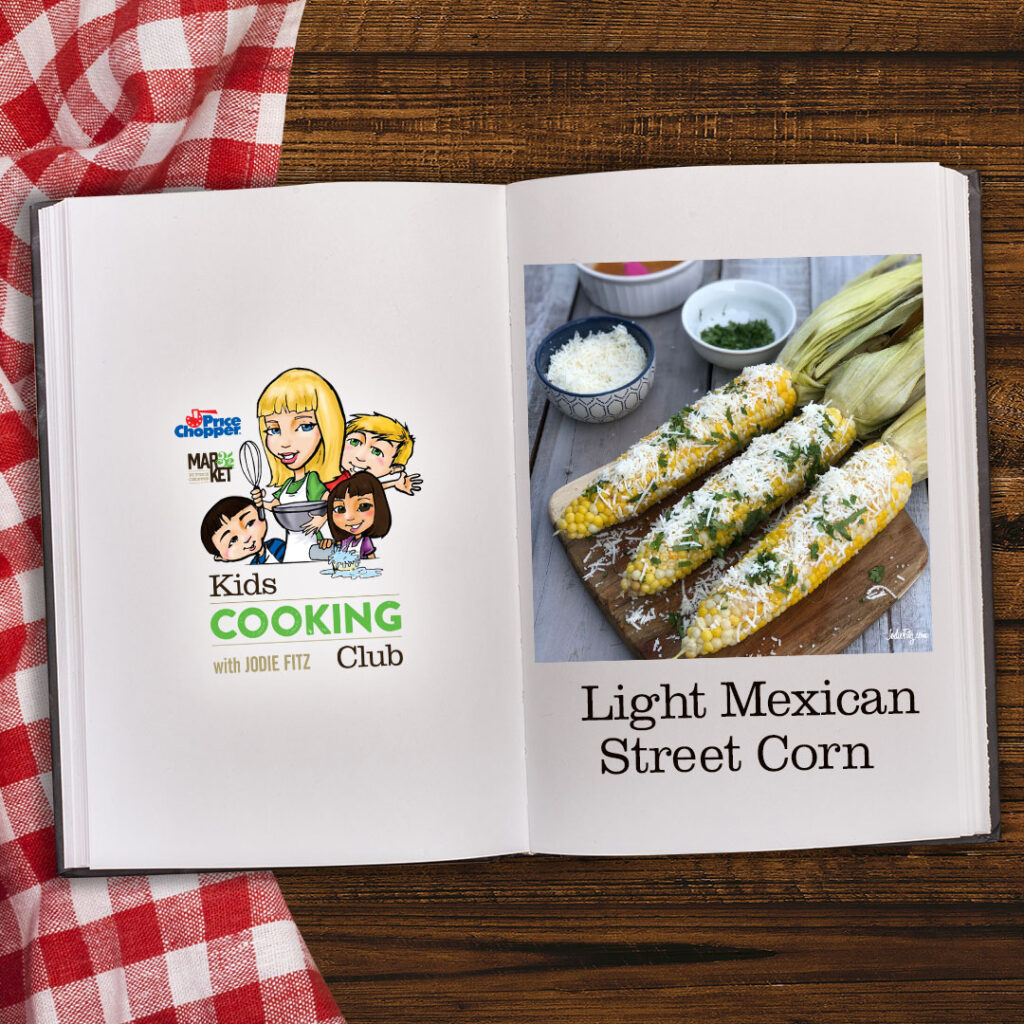
KCC Light Mexican Street Corn
by Jodie Fitz
3 ears fresh sweet corn
1/2 lime
2 tablespoons PICS canola oil
1 teaspoon PICS onion powder
1/2 teaspoon PICS sea salt
1/4 teaspoon PICS garlic powder
1/4 teaspoon PICS chili powder
4 oz. Cotija cheese
Fresh Cilantro
Preheat the oven to 350 degrees.
Remove any loose pieces from the husk and place the corn, in the remaining husk, directly in the oven on the rack.
Bake the corn for 40 minutes.
While the corn is cooking, squeeze the juice from the lime into a bowl. Add the canola oil, onion powder, sea salt, garlic powder and chili powder and stir together.
Finely shred the Cotija cheese and set aside.
Finely chop the cilantro using herb scissors or a knife and cutting board.
Once the corn has finished cooking, remove from the oven with an oven mitt and let cool until warm. Peel the husk back.
Baste all sides of the corn with the spiced lime mixture. Sprinkle one side with cheese and cilantro.
Cotija cheese: You can find Cotija cheese in the specialty cheese section near the deli at your local Price Chopper/Market 32.
Fresh Cilantro: Fresh cilantro can be found in the produce area, typically near the bell peppers at your local Price Chopper/Market 32.
Traditional Mexican Street Corn: Traditional Mexican street corn typically involves corn buttered and rolled in a spiced sour cream, and sometimes mayonnaise mixture, and topped with Cotija cheese and fresh cilantro.
Little fingers: Remember young children can help cut softer items like the cilantro with a plastic knife.
Cooking with Kids: Every recipe is filled with life skills that encourage a child’s confidence in the kitchen. Here are a few to focus on when making this recipe:
- Cooking corn
- Baking and oven safety
- Extracting juice
- Chopping and knife safety
- Stirring
- Basting
- Shredding and grater safety
- Measuring ingredients
- Following directions
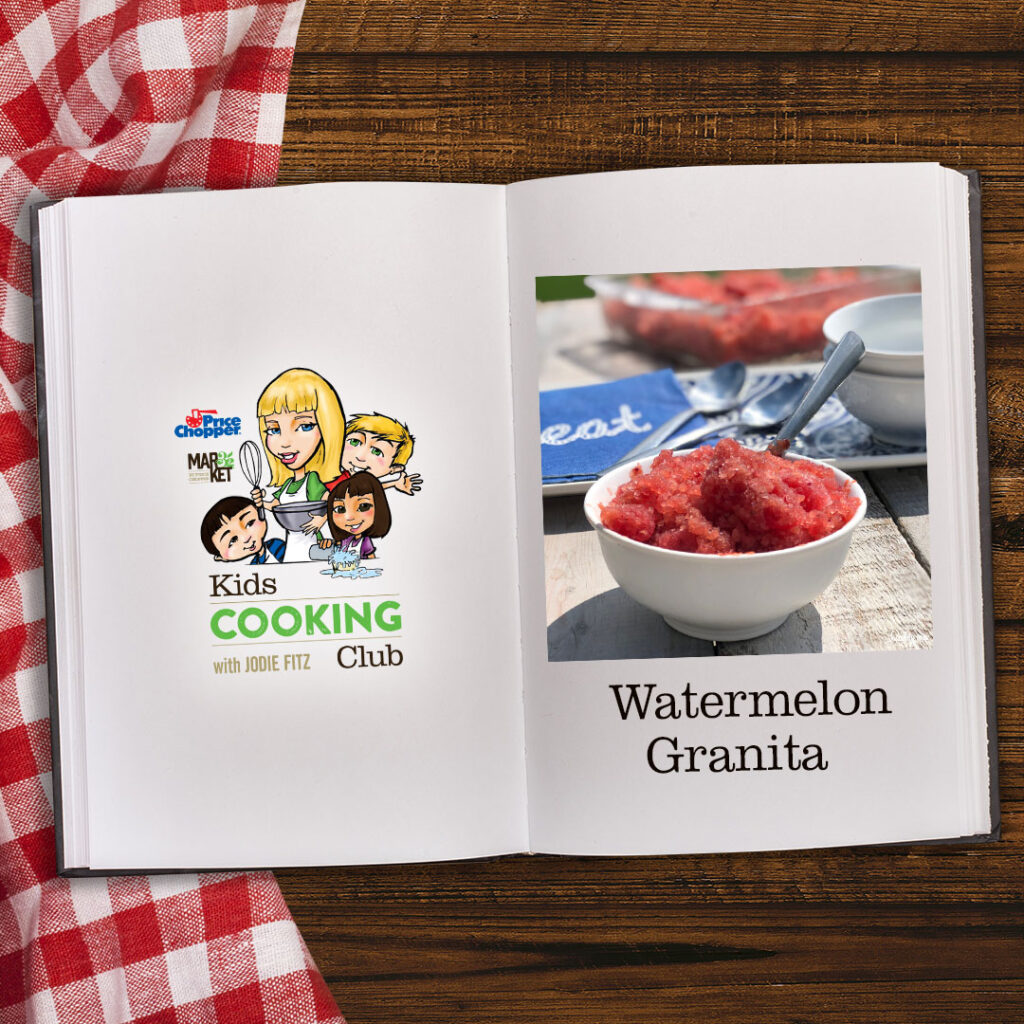
Watermelon Granita
by Jodie Fitz
3 cups diced watermelon
1 cup pitted fresh cherries
1 navel orange
2 tablespoons PICS honey
1 teaspoon PICS vanilla extract
Place the diced watermelon and pitted cherries in a blender.
Cut the navel orange in half and squeeze the juice from both halves into the blender. Add in the honey and vanilla extract. Blend all ingredients together until mixed well.
Pour the mixture into an 8 x 8 glass baking dish and freeze overnight.
Before serving, shave the iced mixture with a large serving fork, moving in different directions. Scoop and serve frozen.
Watermelon: You can save time and purchase pre-cut watermelon in the produce section of your local Price Chopper/Market 32.
Little hands: Young children can dice the watermelon using a plastic knife- a great way to help develop and strengthen motor skills, control and knife safety.
Pitting the Cherries: It’s simplest to pit cherries with a cherry pitter, but if you don’t have one, you can remove the stem and poke the pit through using a chopstick, toothpick, straw or even a thin pastry tip.
Leftovers: Store frozen fruit shavings in an airtight freezer container.
Alternative: Granita is a perfect, fruit-packed afternoon snack and great alternative to a traditional snow cone.
Cooking with Kids: Every recipe is filled with life skills that encourage a child’s confidence in the kitchen. Here are a few to focus on when making this recipe:
- Dicing and knife safety
- Pitting cherries
- Extracting juice
- Measuring ingredients
- Following directions
- Blending and blender safety
- Freezing
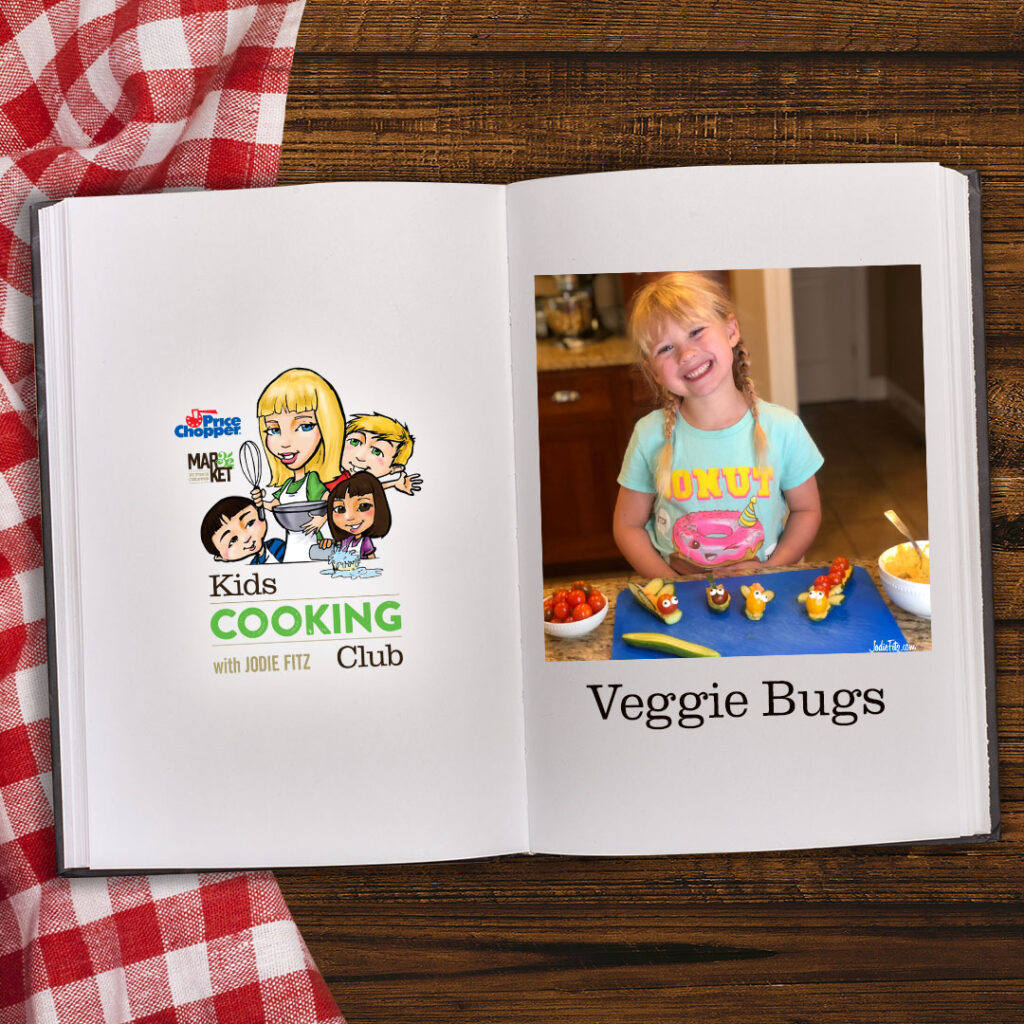
KCC Veggie Bugs
by Jodie Fitz
1 – 14.5 oz. can of PICS chick peas
1 cup PICS baby carrots
1 garlic clove
3 tablespoons tahini paste
3 tablespoons PICS olive oil
¾ teaspoon PICS sea salt
½ teaspoon PICS onion powder
Baby cucumbers
Fresh vegetables ie grape tomatoes, pepper, celery to create bug body
PICS cream cheese
Candy eyes
Drain and rinse the chick peas.
Place the baby carrots in a mini food chopper or food processor and finely chop.
Add 1 clove peeled garlic, chick peas, tahini paste, olive oil, sea salt and onion powder to the carrots. Grind together until a thick, creamy hummus consistency is reached.
Slice cucumbers in half length-wise. Scoop out the center with a spoon. Fill with hummus to make the bug body. Using fresh vegetables like grape and cherry tomatoes, sliced and cut cucumber pieces, create head, tail, wings and other bug body parts.
Add candy eyes using a dab of cream cheese as “glue.”
Bug creation can be deliciously limitless!
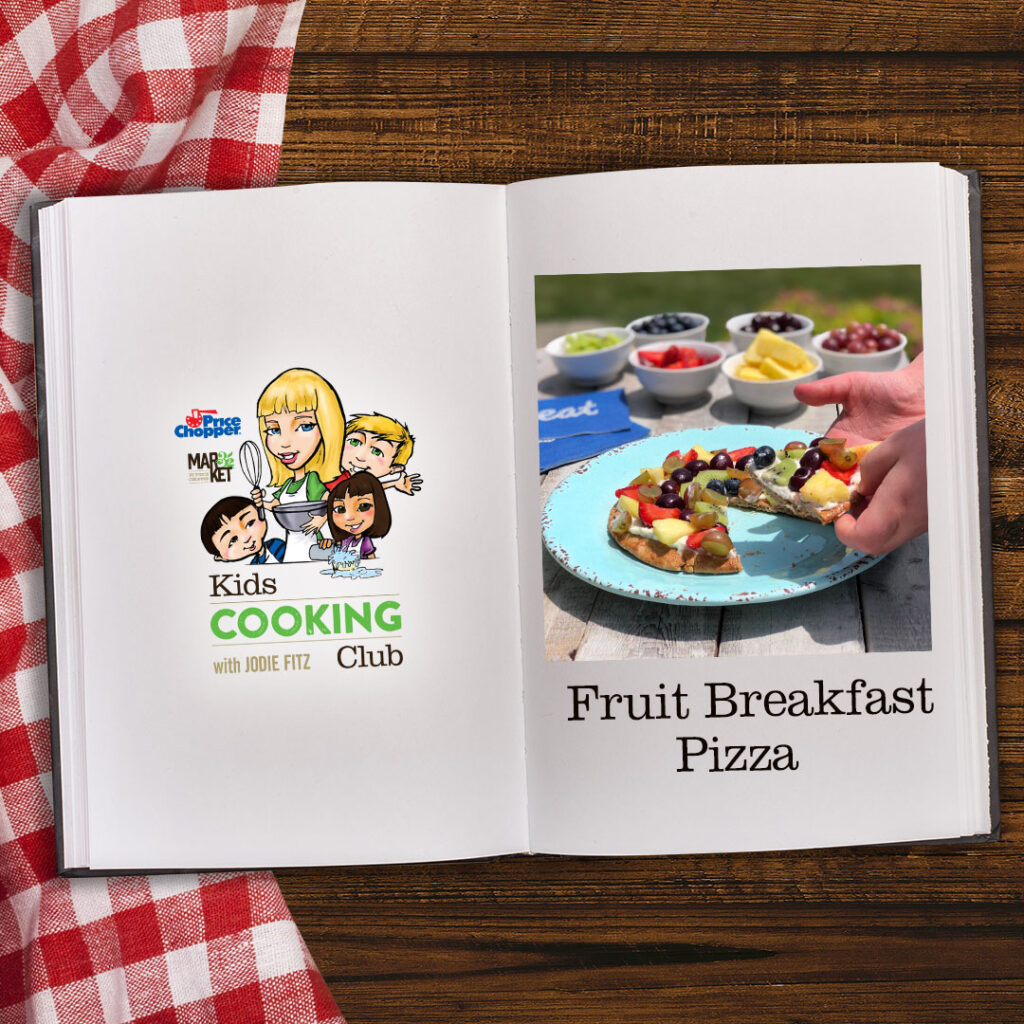
Fruit Breakfast Pizza Recipe
by Jodie Fitz
Ingredients
2 whole-wheat pitas
4 tablespoons PICS honey
1 tablespoon water
¼ teaspoon PICS cinnamon
PICS nonstick cooking spray
Fresh fruit
1/3 cup cream cheese, room temperature
Step-by-Step Directions
Preheat the oven to 375 degrees.
Stir together 2 tablespoons of honey with the water and cinnamon.
Baste the top of the two pitas with the honey, cinnamon mixture.
Coat a baking sheet with nonstick cooking spray. Place the basted pitas on the coated baking sheet. Bake the pita crusts for 10 – 12 minutes; until toasted.
Remove the pitas from the oven and let them cool completely.
While the pitas are baking and cooking prepare the fruit;
- Cherries: washed, pitted and cut in half or sliced.
- Strawberries: washed, hulled and sliced.
- Blueberries: washed and used whole.
- Grapes: washed and cut in half.
- Pineapple: skin removed, sliced and diced.
- Kiwi: peeled, sliced and diced.
Stir together 2 tablespoons of honey with 1/3 cup of cream cheese.
Divide the cream cheese mixture and spread it on top of each pita. Add the prepared fruit on top.
OTHER FRUIT OPTIONS: You can also use blackberries, raspberries, honeydew melon, cantaloupe melon, etc.
Cooking with Kids: Every recipe is filled with life skills that encourage children’s confidence in the kitchen. Here are a few to focus on when making this recipe:
- Following directions
- Stirring
- Basting
- Baking and oven safety
- Cutting and knife safety
- Hulling
- Layering
- Spreading
- Fruit preparation

KCC Red, White and Blue Freeze Pops
by Jodie Fitz
4 PICS paper coated 5 oz. cups
4 Wooden craft sticks
10-12 fresh strawberries, medium to large, washed
1 cup fresh blueberries, rinsed
4 tablespoons PICS honey
1 teaspoon PICS vanilla extract
10 oz. PICS Greek vanilla yogurt
Cut the greens off the strawberries, and place into a mini chopper or food processor, along with 2 tablespoons of honey and ½ teaspoon vanilla extract. Puree. Evenly distribute the strawberry mixture into four paper coated cups. Place the cups in the freezer for 1 hour.
Remove the cups from the freezer and evenly cover the strawberry puree with 10 oz. Greek vanilla yogurt. Add a wooden stick to the center of each cup. Return to the freezer for an additional hour.
Combine the blueberries, 2 tablespoons honey and ½ teaspoon of vanilla extract in a mini chopper or food processor and puree.
Evenly add the blueberry puree to each cup. Return cups to the freezer for several hours or overnight before serving.
Note: This recipe makes 4 freeze pops.
Cups and Craft Sticks: You can locate the 5 oz. coated paper cups in the paper aisle, and the craft sticks in the school supply aisle at your local Price Chopper/Market 32.
Cooking with Kids: Every recipe is filled with life skills that encourage children’s confidence in the kitchen. Here are a few to focus on when making this recipe:
- Following directions
- Mini chopper/food processor use and safety
- Cutting and knife safety
- Pureeing
- Layering
- Freezing
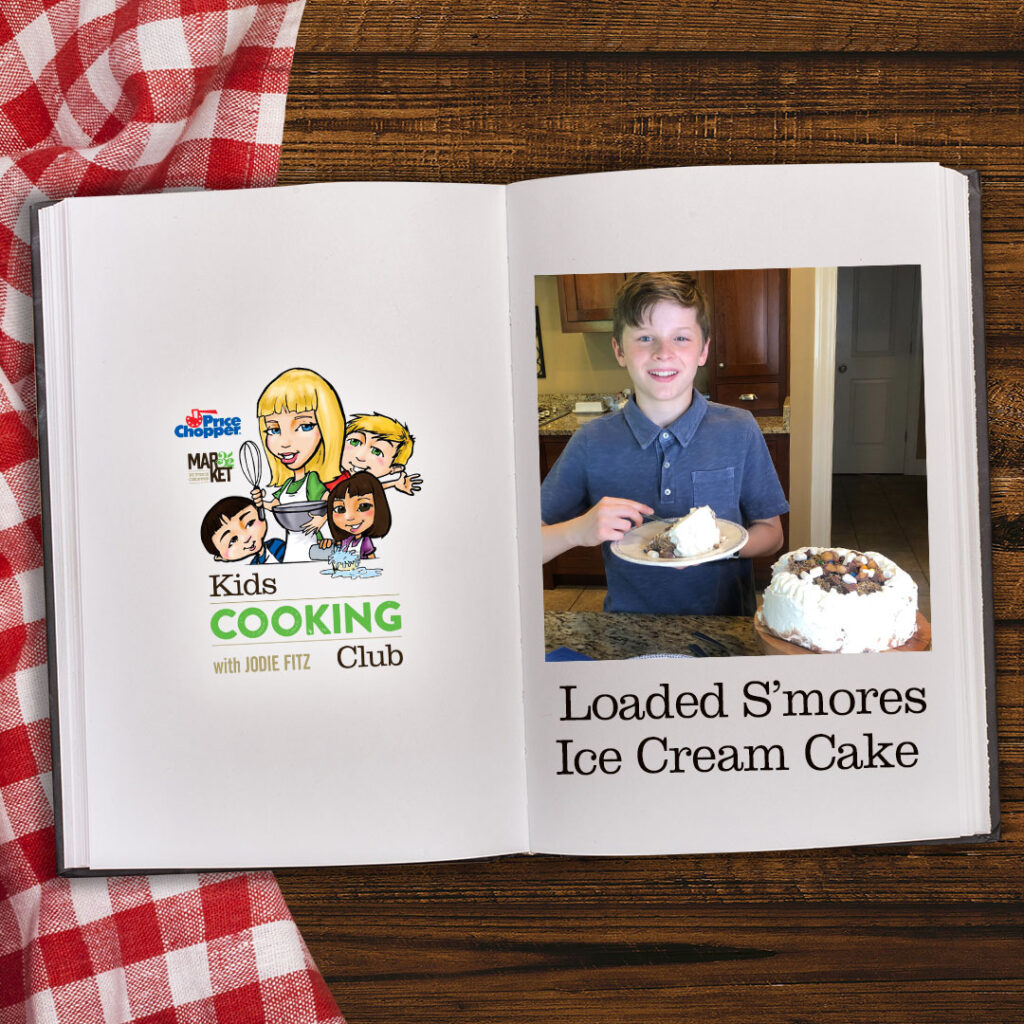
by Jodie Fitz
30 mini Reese’s peanut butter cups
½ cup peanut butter M&M’s
6 PICS graham crackers
¼ cup PICS chocolate syrup
48 oz. PICS Heavenly Hash Ice Cream
1 cup PICS mini marshmallows
24 oz. PICS Vanilla Bean Ice Cream
PICS canned whipped topping
Frosting:
1 cup PICS butter (2 sticks), room temperature
7.5 oz. jar of Marshmallow Fluff
2 – 3 cups PICS confectioners sugar
2 teaspoons PICS vanilla extract
Remove the heavenly hash ice cream from the freezer and let it slightly soften.
Cut the peanut butter cups into quarters.
Chop the peanut butter M&M’s in a mini chopper or food processor.
Break the graham crackers into quarters, and grind them into crumbs in a mini chopper or food processor.
In a bowl, stir the graham cracker crumbs and chocolate syrup together.
Spread the softened heavenly hash ice cream into an eight-inch spring form pan, filling it almost half way.
Remove the vanilla ice cream from the freezer to let it soften.
Create a center of the cake by adding half of the graham cracker mixture, ½ cup of mini marshmallows, half of the chopped peanut butter M&M’s and half of the Reese’s peanut butter cups. Pack the center ingredients gently into the ice cream, using a spatula or the back of a large spoon.
Fill the remainder of the pan with vanilla ice cream, and smooth the top with a spatula, spoon or butter knife.
Place the cake in the freezer for approximately 3 hours.
Before removing the cake from the freezer, make the frosting by whipping together the butter, fluff, confectioners sugar and vanilla extract with an electric mixer.
Once the cake has frozen, remove from the freezer and using a wet knife, loosen from the edges of the pan before releasing the spring and removing.
Frost the cake with the frosting. Add the remaining graham cracker crumb mixture, M&M’s, Reese’s peanut butter cups and mini marshmallows on top. Create a decorative edge with the canned whipped cream to help keep the candy topping in place.
Freeze the cake for at least an hour before serving.
Make Ahead: You can make this cake one to two days before serving.
Leftovers: Leftovers can be cut into slices and stored in an airtight container in the freezer.
Ice cream: You can use any combo of chocolate and vanilla based ice cream that complement the candies. There’s a wide variety of PICS brand ice cream at Price Chopper/Market 32.
Cooking with Kids: Every recipe is filled with life skills that encourage children’s confidence in the kitchen. Here are a few to focus on when making this recipe:
- Following directions
- Chopping and chopper safety
- Cutting and knife safety
- Stirring
- Layering
- Freezing
- Mixing and mixer safety
- Spreading
- Food storage
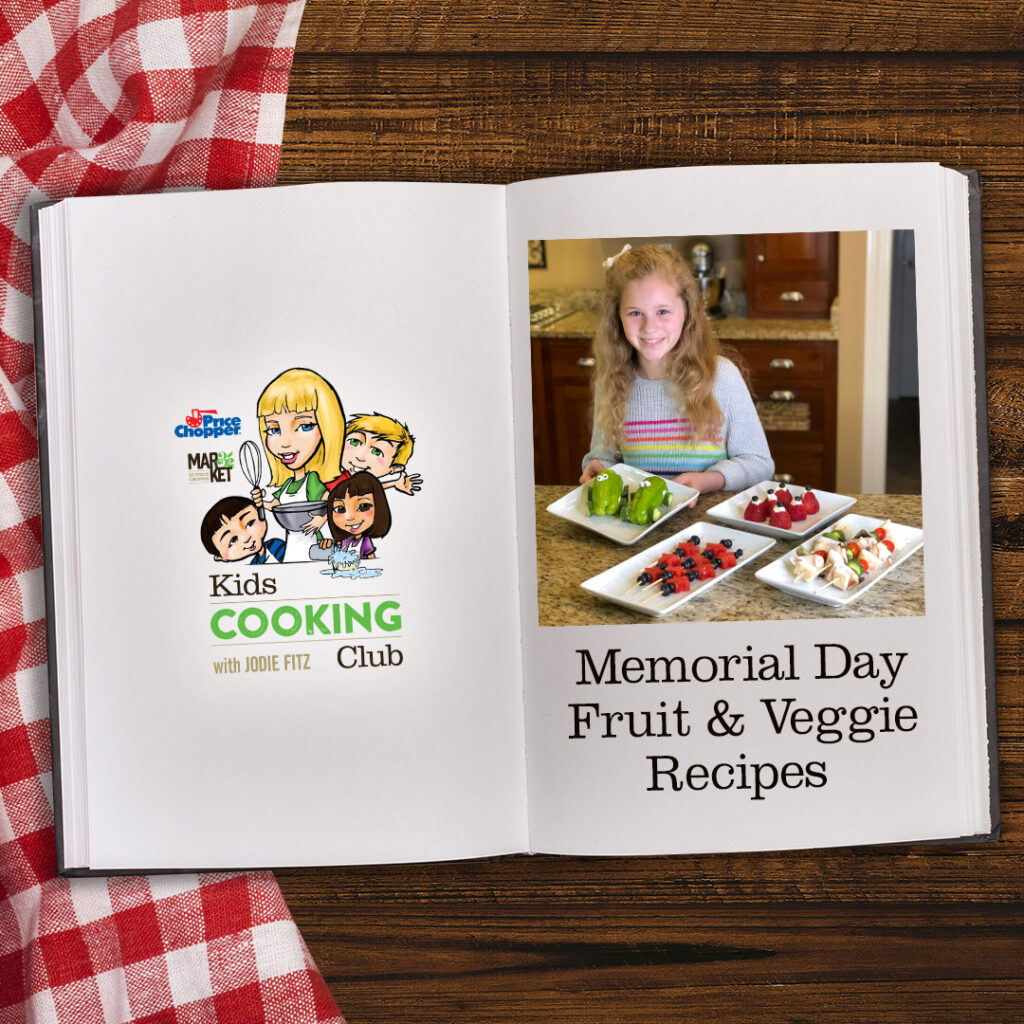
Any time is a good time to find ways to add fruits and vegetables to the plate. Picnic season is just one more opportunity to find creative ways to bring these delicious bites to the table.
While Memorial Day is a day of remembrance, it has also become the unofficial beginning of picnic season and summer gatherings. This month we are adding fruits and veggies to the menu plan with simple combinations that the entire family will love. At the Price Chopper/Market 32 Kids Cooking Club we had fun building Salad Stuffed Cars, making Sandwich Skewers, putting together Fruit Kabobs and preparing Cheesecake Stuffed Strawberries.
These are all easy recipes that the kids can have fun making and enjoy serving to family and friends.
Fruits and Veggies Picnic Fun
by Jodie Fitz
Salad Stuffed Cars
2 Cubanelle peppers
3 cups salad greens
2 tablespoons Craisins®
2 tablespoons sunflower seeds
2 tablespoons avocado ranch dressing
8 cucumber slices
PICS vegetable cream cheese
4 candy eyes (optional)
Cut the top off of two washed Cubanelle peppers and remove the seeds and insides of the pepper.
Place the salad greens, Craisins®, sunflower seeds and avocado ranch dressing into a mini chopper. Chop the ingredients.
Fill the hollowed peppers with the chopped salad and place them on their side on a plate or tray.
Using cream cheese as edible food glue, attach 4 cucumber slices to each of the peppers to create car wheels.
Optional: Add two candy eyes on top of each car using the vegetable cream cheese to hold them in place. You can find candy eyes in the baking aisle of your Price Chopper and Market 32 Supermarkets.
The Dressing: You can locate the avocado ranch dressing in the produce area coolers of your Price Chopper and Market 32 Supermarkets.
You can use your favorite ranch dressing as an alternative.

Sandwich Skewers
4 skewers
1 bagel
4 ounces PICS Colby Jack Cheese
8 grape tomatoes
8 slices of cucumber
4 slices of your favorite lunchmeat
Lettuce leaves
Cut the bagel in half. Then dice both pieces of bagel into large bite size pieces. You will need twelve pieces to make four skewers.
Cut the Colby jack cheese into bite size squares. You will need eight pieces for four skewers.
Cut the lunchmeat pieces in half to create eight pieces. Fold each one twice before skewing.
Add everything to the skewers by creating a pattern; bagel piece, folded piece of lunchmeat, lettuce pieces, cube of cheese, slice of cucumber, a grape tomato and then another piece of bagel. Repeat so that you have two pattern sequences on each skewer.
Cheese: You can use one of your other favorites of PICS cheeses if desired; Muenster, pepper jack, Vermont sharp, cheddar, mozzarella, etc.

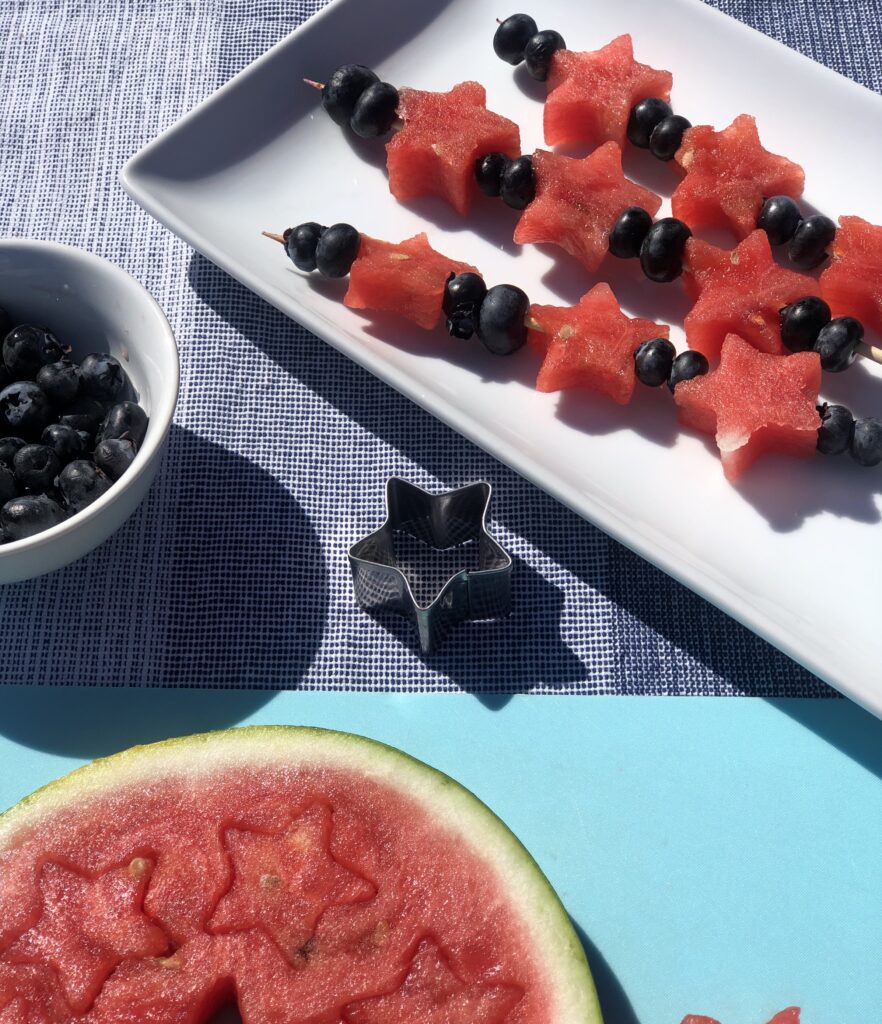
Fruit Kabobs
4 skewers
Watermelon, seedless
Blueberries
Slice your watermelon into large circle slices. Use a small heart shaped cookie cutter or large fondant cutter to create watermelon star shapes. You will need twelve stars for four skewers.
Wash the blueberries.
Add the fruit to the skewers by creating a pattern; two blueberries, a watermelon star and repeat that pattern three times on each skewer finishing it off with two additional blueberries. The blueberries help to keep the watermelon pieces securely in place on the skewer.
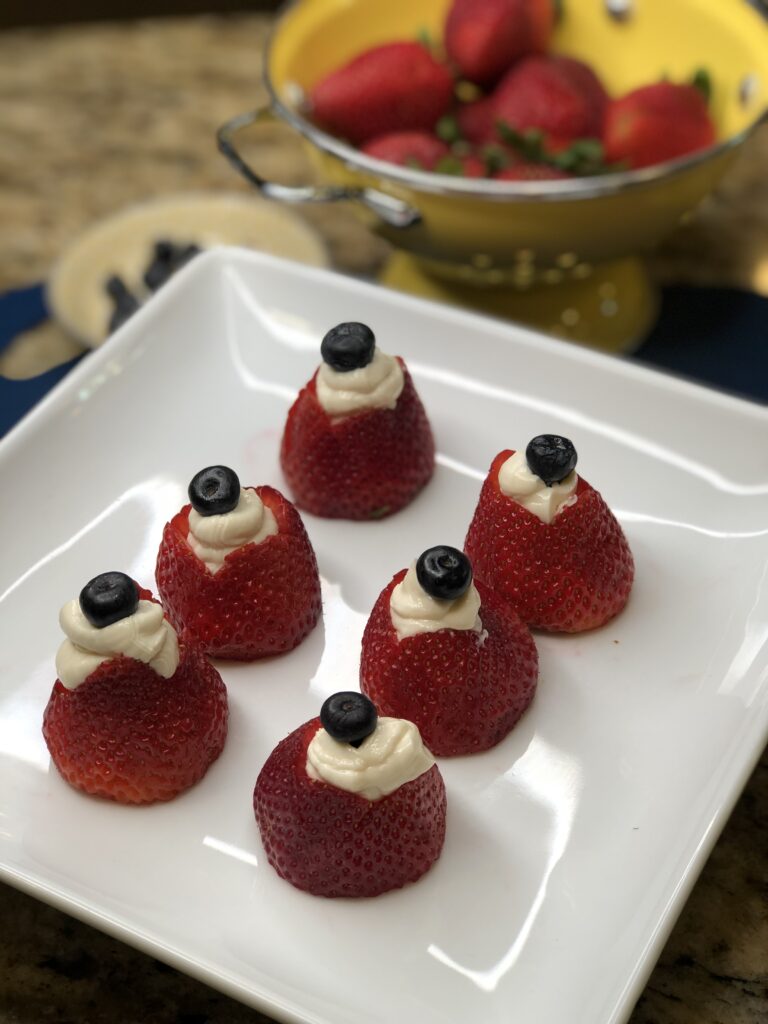
Cheesecake Stuffed Strawberries
12 strawberries
12 blueberries
½ cup PICS cream cheese
¼ cup PICS confectioner’s sugar
1 teaspoon PICS vanilla extract
Wash the strawberries and the blueberries.
Cut off the greens of the strawberries to create a flat edge. Set the strawberries on that flat edge.
Using a sharp knife cut into each strawberry on four sides, at a slant, to remove the top and hollow the center.
Mix the cream cheese, confectioner’s sugar and vanilla together with an electric mixer.
Place the cheesecake-flavored cream cheese into a quart sized snap and seal bag. Clip one corner. Pipe the mixture into each strawberry to fill it. Place a blueberry on top.
Cooking with Kids: Every recipe is filled with life skills that help to encourage children’s confidence in the kitchen. Here are a few to focus on when making this recipe:
- Measuring ingredients
- Following directions
- Mixer safety
- Preparing fruits and vegetables
- Cutting skills and knife safety
- Piping
- Skewing and skewer safety

KCC Dessert Tacos with Dulce de Leche
Jodie Fitz
These dessert tacos served with homemade Dulce de Leche are great for both Cinco de Mayo and Mother’s Day celebrations. When making the Dulce de Leche, set a timer with the kids for the slow cooking and stirring process to help teach them the concept of time. You can even turn it into a game with planned activities to do in between or use it as a time to get them to help you around the house.
This recipe is great to print and file for many celebratory activities including a fun, edible dish for ‘make your own sundae’ activities.
‘Kitchens are made for making memories and making messes.’ ~ Jodie Fitz
Dessert Tacos with Dulche de Leche (Mexican caramel sauce) by Jodie Fitz
16 oz. PICS light or heavy cream
1 cup PICS granulated sugar
1 cinnamon stick
2 teaspoons PICS vanilla extract
¼ teaspoon PICS salt
¼ teaspoon PICS baking soda
Flour tortillas, smaller sized
2 teaspoons PICS cinnamon
PICS nonstick cooking spray
PICS Ice cream
Combine the cream and ½ cup of sugar in a saucepan or Dutch oven and stir over low heat. Once the sugar has dissolved, add the cinnamon stick, vanilla extract and salt. Continue to stir, bringing to a boil. Lower the heat and cook for 15 minutes, stirring frequently.
Turn off the heat and add the baking soda. Stir as the mixture foams, and continue stirring until the foaming stops.
Return the sauce to a low heat and cook for approximately 60 minutes, stirring every 10–15 minutes. It will thicken and start to caramelize as it cooks. Allow the sauce to cool before transferring it to a squeeze bottle or storage container.
Preheat oven to 325 degrees.
Flip a muffin pan upside down and coat the bottom with a light layer of nonstick cooking spray.
In a pie plate or other flat dish, stir together the remaining ½ cup sugar and two teaspoons of cinnamon.
Baste both sides of each tortilla with water. Dredge both sides in the cinnamon sugar, and place folded in between the cups of a muffin pan to create a taco shell.
Bake until toasted, 15 -20 minutes. Remove from the oven and allow to cool completely in the muffin pan.
Fill the shells with ice cream and top them with your homemade dulche de leche, chocolate sauce, and any other toppings you enjoy.
Dulce de leche: A traditional Mexican caramel sauce, typically made with cow’s milk. Dulce de leche made with goat milk is known as cajeta.
Lighter Filling: You can fill these taco shells with your favorite fresh or frozen yogurt and top them with fresh fruit.
Storing Dulce de Leche: Can be stored in a container in the refrigerator for several weeks.
Storing Baked Taco Shells: The taco shells can be made ahead and kept in an airtight container for several days.
Other Toppings: You can also add additional toppings to the mix including chocolate sauce, sprinkles and fruit, etc.
Cooking with Kids: Every recipe is filled with life skills that help to encourage children’s confidence in the kitchen. Here are a few to focus on when making this recipe:
- Measuring ingredients
- Following directions
- Stovetop safety
- Boiling
- Concept of dissolving
- Concept of caramelizing
- Concept of thickening
- Baking and oven safety
- Food storage