


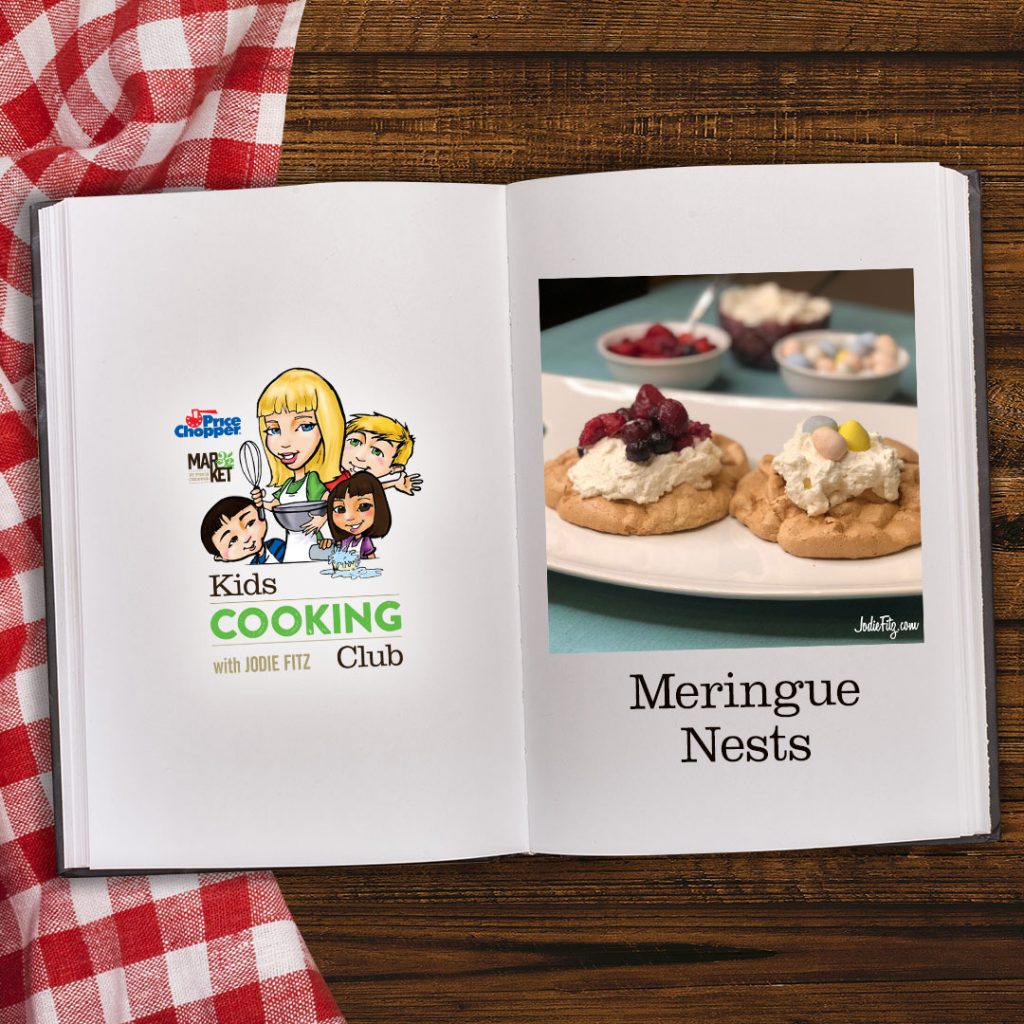
Meringue Nests
by Jodie Fitz
5 egg whites
2 teaspoons PICS vanilla extract
1 cup PICS light brown sugar
8 oz. PICS whipping cream
1/4 cup PICS confectioner’s sugar
1 teaspoon PICS vanilla extract
Pre-heat the oven to 325 degrees. Spread the brown sugar on a non-stick baking sheet. Place it in the oven for approximately eight minutes, remove it and let it fully cool.
Place the dried brown sugar into a mini chopper or food processor to bring it to a dried, granulated state.
Beat the egg whites with an electric mixer until they form stiff peeks. Add in the vanilla extract and sprinkle in approximately an 1/8 cup of the granulated brown sugar at a time and continue to mix with the electric mixer until it has all been added and mixed thoroughly.
On a piece of parchment paper, make approximately four – 4” circles with a permanent marker. Flip the paper so that the ink is face down on a nonstick baking sheet; you will be able to see the lines through the paper. Using a spoon to scoop the meringue onto the paper on the inside of the ring. Bake the meringues at 325 degrees for 30 – 35 minutes.
Turn off the oven, but open it a crack and let the meringues cool in the opened oven for an additional 35 – 40 minutes.
Just before serving, add the whipping cream, confectioner’s sugar and vanilla extract together in a mixing bowl. Whip until it is stiff.
Fill each nest with cream and top it off with Cadbury mini chocolate filled eggs with the crisp colored shells or PICS frozen mixed berries that have been thawed.
Egg White Time Tip: Yes, you can crack the eggs and separate the yolk from the whites. However, then you have all of the yolks that you either toss or find another way to use. Or, you can simplify and buy the PICS egg whites located near the regular eggs at your Price Chopper and Market 32 Supermarkets.
Drawing the Circles: I trace a small bowl, but you can use a ruler or protractor to create the circles as well. Just make sure you turn the ink side down before adding the meringue. You can make smaller circles for smaller bites if desired.
Storing Extras: If you have additional nests and cream, store them separately.
Cooking with Kids: Every recipe is filled with life skills that help to encourage children’s confidence in the kitchen. Here are a few to focus on when making this recipe;
- Separating eggs
- Whipping eggs
- Electric mixer safety
- Scooping
- Baking
- Oven safety
- Mini chopper or food processor safety
- Measuring ingredients
- Following directions
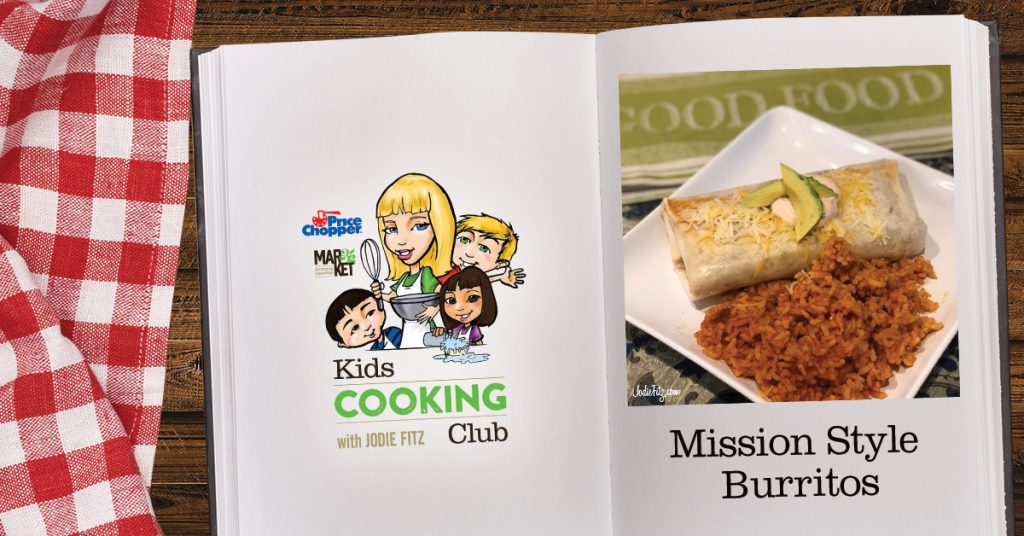
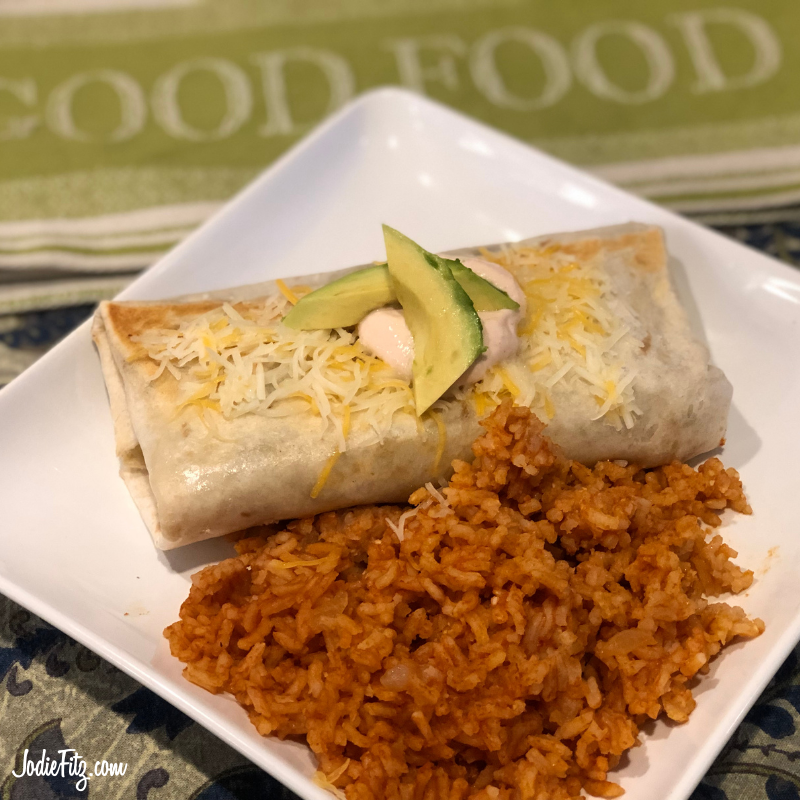
Mission Style Burritos by Jodie Fitz
1 Rotisserie cooked chicken
1 – 15 oz. can of refried beans, traditional or black bean
½ cup PICS sour cream
2 tablespoons taco sauce
Fresh salsa
2 pounds PICS frozen corn
1 green bell pepper
1 lime
Fresh cilantro
Avocado
PICS shredded Mexican cheese blend
Tortilla wraps, large
PICS butter
Remove the chicken from the bones and cut the chicken into small pieces.
Remove the refried beans from the can and place them in a bowl.
Stir the sour cream and taco sauce together. Keep it refrigerated until you are ready to build your burritos.
Prep the salsa by either opening a container or making it (see below).
Cook the corn and drain it.
Wash the green bell pepper, remove the seeds and dice it.
Chop a ½ cup of fresh cilantro.
Stir the corn, bell pepper and chopped cilantro together. Cut the lime in half and squeeze the fresh juice onto the corn mixture and stir it together.
Remove the skin and seed from the avocado and cut it into slices.
Steam the tortilla wraps by placing one on a plate, placing a damp paper towel over the top and put it in the microwave for 20-30 seconds.
Add the ingredients to the center of your tortilla; refried beans, fresh salsa, the corn mixture, the chicken, the cheese and fresh avocado.
Fold the tortilla burrito style by folding in the sides and rolling it up.
Melt a little butter in a skillet style pan; just enough to coat it. Toast the burritos on either side like you would a grilled cheese.
Rotisserie Chicken: You can find this in the prepared food area at your Price Chopper and Market 32 Supermarkets.
Salsa: You can find fresh salsa in the produce aisle at your Price Chopper and Market 32 Supermarkets. Or, you can make your own.
Simply place 1 pint of grape tomatoes with ½ cup of finely diced sweet onion into a mini food chopper or food processor and chop the ingredients. Add in 1 green bell pepper that’s been rinsed, seeded and diced along with 1 clove of peeled garlic and chop them together with the tomatoes and onions. Add in a ½ cup of fresh cilantro and 1 tablespoon of PICS balsamic vinegar. Chop again and serve.
Extra Corn: Simply serve it on the side or add it to the top of a salad if you have extra.
Spanish Rice: Spanish rice is a great side dish and can be added into the tortilla as part of your burrito or served on the side.
The Plastic Knife: If you have younger children, they can help to cut many of the ingredients in the recipes to help strengthen this motor skill. For example, cut the bell pepper into strips and let them cut it into small pieces. Or, remove the avocado from the skin, let the children cut it into strips.
Cooking with Kids: Every recipe is filled with life skills that help to encourage children’s confidence in the kitchen. Here are a few to focus on when making this recipe;
- Measuring ingredients
- Stirring
- Cutting skills
- Knife Skills
- Dicing
- Avocado prep
- Burrito folding
- Stove top safety
- Following directions
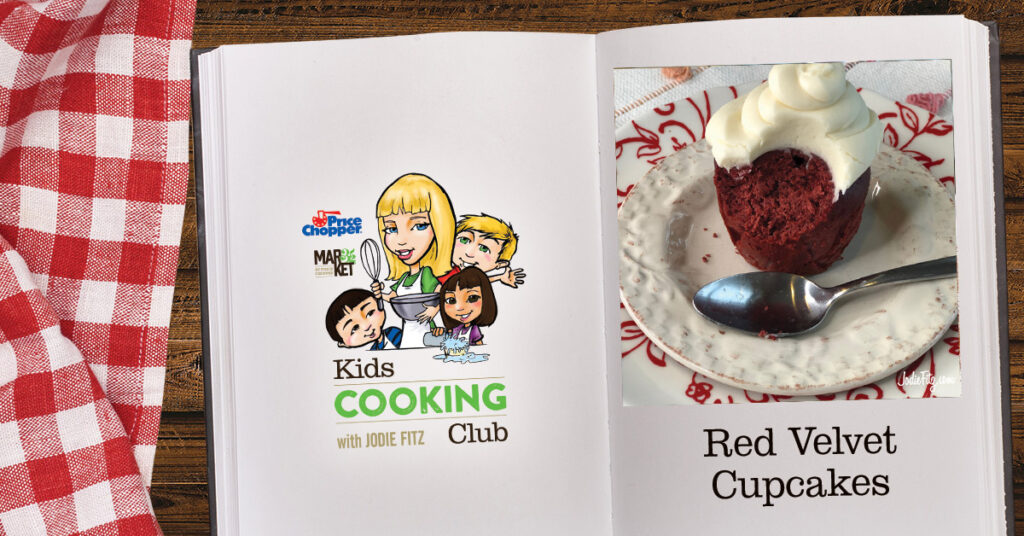
Healthy Red Velvet Cupcakes by Jodie Fitz
3 PICS eggs, large
1-cup buttermilk
¾ cup PICS brown sugar
¾ cup PICS granulated sugar
2 teaspoons PICS vanilla extract
4 oz. PICS cinnamon applesauce
½ cup PICS pureed beets (see below)
1 ½ cups PICS all-purpose flour
½ cup PICS cocoa powder, unsweetened
1 teaspoon PICS baking soda
1 teaspoon PICS baking powder
1 teaspoon PICS salt
1-tablespoon red food dye
Combine the eggs, buttermilk, brown sugar, granulated sugar, vanilla extract, applesauce and pureed beets together in a bowl. Whip the ingredients together using an electric mixer.
Once they are mixed well, add in the dry ingredients; the flour, cocoa powder, baking soda, baking powder and salt.
Mix in the red food dye.
Preheat the oven to 350 degrees.
Line a cupcake/muffin tin with cupcake liners. Fill the cupcake liners with the batter. Bake the cupcakes for 25 minutes.
Pureed Beets: Simply purchase sliced or diced PICS beets. Drain the liquid. Place the beets in a food processor, mini chopper or blender and puree them until the look like a purple applesauce.
Original Red Velvet Cupcakes: When this recipe originated, the cupcakes turned a natural burgundy through a chemical reaction that took place with certain ingredients. Over time our ingredients have changed and cocoa powder is now alkalized so the chemical reaction no longer naturally occurs.
Red Food Dye: If you have an allergy to red food dye, you can eliminate the red food dye all together. The color will lean towards a darker burgundy. A typical red velvet recipe requires ½ cup of red food dye. This recipe allows us to greatly reduce the amount of red food dye used.
Top it off! Simply serve with a traditional Cream Cheese Frosting by combining a ½ cup (1 stick) of PICS butter at room temperature with 8 oz. PICS cream cheese at room temperature, 3 cups of PICS confectioner’s sugar and 2 teaspoons of PICS vanilla extract.
Pipe it on top of the cupcakes using decorating utensils or simply fill a quart sized snap and seal freezer bag and clip a corner to pipe on the frosting.
Cooking with Kids! Every recipe has lessons, small and big, that encourage life and cooking skills. Here are a few to focus on:
Measuring ingredients
Level ingredient measurements
Pouring
Pureeing
Food processor safety
Scooping
Baking
Oven safety
Following directions
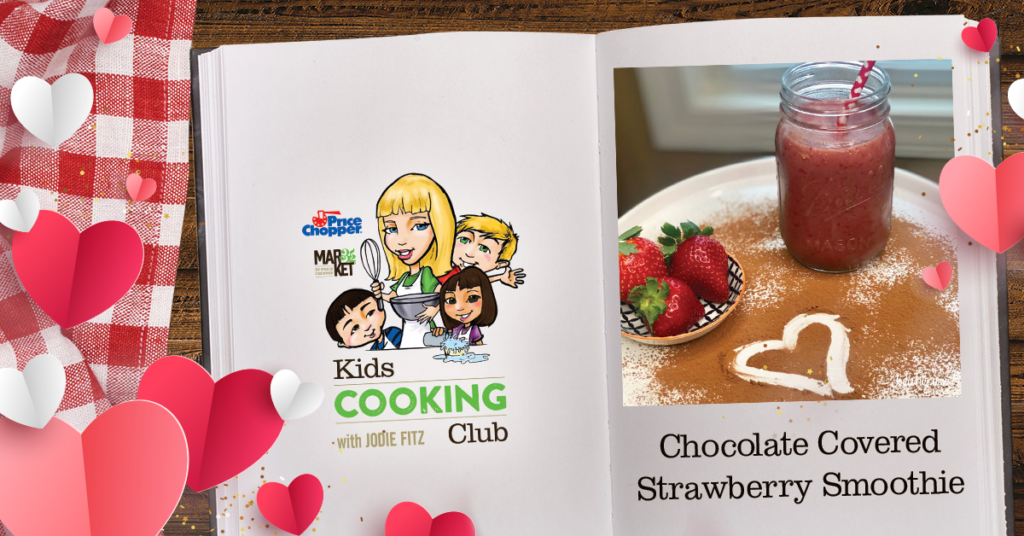
Chocolate Covered Strawberry Smoothie by Jodie Fitz
3 cups PICS fresh frozen strawberries
1 ½ cups PICS low fat milk
1 tablespoon PICS unsweetened cocoa powder
1 teaspoon PICS vanilla extract
2 tablespoons PICS honey
Add the fresh frozen strawberries, milk, cocoa powder, vanilla extract and honey into the blender. Blend well; until everything is thick and creamy like a milkshake.
NOTE: Make sure the 1-tablespoon of cocoa powder is a level measurement.
Dairy Allergies? Swap the low fat milk with your favorite dairy free milk alternative; rice milk, almond milk, cashew milk, coconut milk, oat milk, etc.
Fun Facts:
• A strawberry can have up to 200 seeds on it!
• Strawberries are a source of vitamin C.
• Cocoa powder has been dated back before the Mayans; an ancient civilization.
Cooking with Kids! Every recipe has lessons, small and big, that encourage life and cooking skills. Here are a few to focus on:
• Measuring ingredients
• Level ingredient measurement
• Blending
• Blender safety
• Pouring
• Following directions

The Melted Snowman Smoothie by Jodie Fitz
3 cups ice
1½ cups low-fat milk
6 oz. PICS low fat vanilla yogurt
1 banana
3 tablespoons PICS honey
1 ½ teaspoons PICS vanilla extract
Add all ingredients to a blender, blend well and serve.
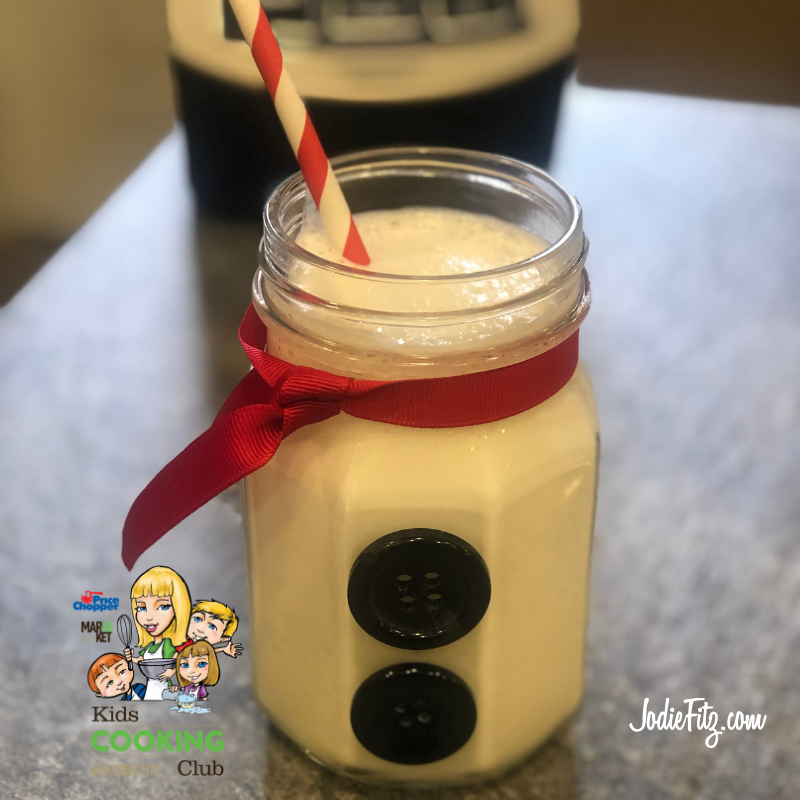
Create a Snowman Mason Jar! This craft is simple and fun. Here are the supplies you will need:
Mason jar
Ribbon
2 buttons
Double stick tape
Scissors
Decorative Paper Straws (optional)
Measure, cut and tie ribbon around the jar rim and adhere two buttons to the front of the jar with double stick tape. Serve your Melted Snowman with a colorful paper straw.
Dairy allergies? Substitute your favorite dairy free yogurt and milk alternatives. Coconut based products help keep this recipe thick and creamy.
Cooking with Kids! Every recipe has lessons, small and big, that encourage life and cooking skills. Here are a few to focus on:
- Measuring ingredients
- Peeling a banana
- Blending
- Blender safety
- Pouring
- Following directions
KCC Sun's Up Smoothie
by Jodie Fitz
3 cups ice
2 cups PICS 100% orange juice
1-cup PICS low fat milk
½ cup 100% pure carrot juice
1 banana
6 oz. PICS low fat vanilla yogurt
1 teaspoon PICS vanilla extract
1 tablespoon PICS honey
Add the ice, orange juice, milk, carrot juice, banana, yogurt, vanilla extract and honey into a blender. Blend the ingredients until the ice is fully crushed.
Serve and enjoy! After all, who doesn’t want to start their day with a cup of sunshine?
More on the Sun’s Up Smoothie Ingredients:
Dairy Allergies:
- The Milk: If you have a dairy allergy, replace the milk with your favorite dairy alternative. Depending on your allergy concerns, I suggest you consider rice milk or coconut milk for this recipe. The rice milk is very gentle in flavor. It allows the other flavors to ‘shine’ in this smoothie recipe. It does make the mixture a little icier. If you use coconut milk it adds a bit of a tropical flavor to this mix and is creamier. However, always use alternatives based on your dietary needs.
- The Yogurt: Replace the yogurt with one of your favorite vanilla dairy free yogurt alternatives based on your dietary needs. There are many great options on the market.
Leftovers? No worries turn them into freeze pops! Pour the leftovers into the 7 oz. PICS paper coated cups and place them in the freezer for one hour. Then add a wooden craft stick to the center and let them freeze overnight.
Carrot Juice: 100% carrot juice can be found in the produce aisle at Price Chopper/
Market 32 Supermarkets. There is also a delicious blend of 100% carrot juice with turmeric and ginger added.
Lessons for Children when making this smoothie recipe;
- Measuring ingredients
- Pouring
- Blending
- Blender Safety
Peanut Butter and Jelly Smoothie Bowl
by Jodie Fitz
1 – 1 ½ cups PICS frozen fresh strawberries
1 cup PICS Greek vanilla yogurt
¼ cup PICS honey
1 teaspoon PICS vanilla extract
Place the frozen strawberries, Greek yogurt, honey and vanilla extract into a blender or food processor. Blend until the ingredients form into a soft serve ice cream consistency.
Scrape the mixture into a bowl and top it with the following;
- 2 tablespoons PICS peanut butter
- Granola cereal
- Organic coconut flakes
- Chia seeds
- Flax seed, ground
- Fresh strawberries
Enjoy!
More thoughts on the Peanut Butter and Jelly Smoothie Bowl:
Dairy Allergies? Replace the Greek vanilla yogurt with your favorite dairy free yogurt alternative. There are several great options depending on your needs in the dairy aisle at your Price Chopper/Market 32 Supermarkets.
Peanut Allergies? Substitute the peanut butter for WOWButter®. It’s a peanut/tree nut free alternative located in the allergy friendly aisle at Price Chopper/Market 32 stores.
Lessons for Children when making this smoothie recipe;
- Measuring ingredients
- Blending
- Blender/Food Processor Safety
- Following directions