


Written by our friends at Little Leaf Farms
Summer is all about keeping things fresh, simple and delicious – and that’s exactly what you’ll
find in every package of Little Leaf Farms.
Founded with a mission to provide locally grown, consistently great-tasting lettuce year-round,
Little Leaf Farms is redefining what fresh means. Grown in the world’s largest and most
technologically advanced greenhouse, Little Leaf Farms Baby Greens are seeded, grown, cut
and packaged without ever being touched by human hands, making them clean and ready to
enjoy straight from the container. This protected process helps ensure exceptional freshness
and means there is no need to wash the greens before enjoying them. Just open the container,
serve and savor!
Sustainability is at the heart of every harvest. By growing in a controlled greenhouse
environment Little Leaf Farms uses up to 90% less water than traditional field-grown lettuce.
Water is delivered directly to the roots, minimizing waste while helping the plants thrive.
And when it comes to what’s not in your greens, that’s just as important. Little Leaf Farms
greens are grown without harmful chemicals, pesticides and are NON-GMO Project Verified,
giving consumers a flavorful choice they can feel good about serving their family.
Beyond their fresh flavor and crisp texture, baby greens are an easy way to add nutrition to
everyday meals. They’re a good source of Vitamin A and pair beautifully with everything from
seasonal berries and grilled peaches to fresh herbs, avocados and summer vegetables.
Whether you’re packing a picnic, hosting a backyard barbecue or looking for simple ways to add
freshness to everyday meals on busy summer days, Little Leaf Farms make it easy to bring
more crisp, delicious flavor to your summer table. While salads may be the star of the summer,
they aren’t the only way to let Little Leaf Farms greens shine. Get inspired with these fresh and
creative ways to enjoy them beyond the salad bowl,
● Add a layer of crunch to sandwiches and wraps
● Pile them onto burgers
● Use them as a fresh base for grain bowls and picnic-ready side dishes
● Top homemade pizzas with a handful of fresh greens just before serving
● Blend them into smoothies
● Use Little Leaf Farms Romaine Leaf lettuce alongside hummus, dip or your favorite
dressing (The leaves are sturdy enough to use like chips!)
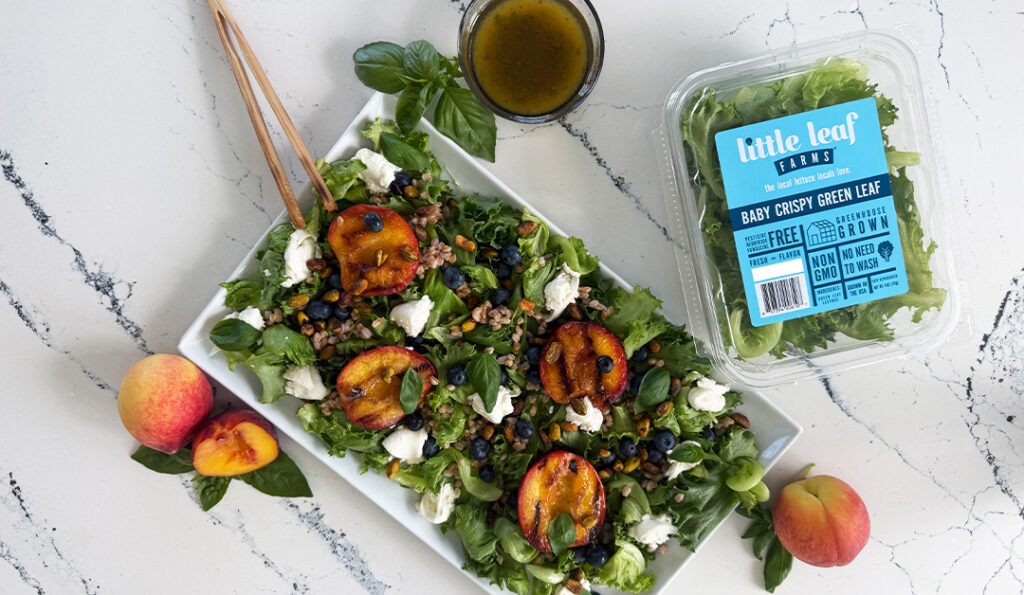
Grilled Peach and Burrata Summer Crunch Bowls with Honey Basil Vinaigrette
This vibrant summer bowl pairs sweet grilled peaches, creamy burrata and crunchy pistachios
with fresh Little Leaf Farms Baby Crispy Green Leaf lettuce for a restaurant-worthy meal that’s
surprisingly easy to make.
2 4 oz. packages Little Leaf Farms Baby Crispy Green Leaf lettuce
2 ripe peaches, halved and pitted
8 oz. burrata cheese’
1 cup cooked farro or quinoa, cooled
½ cup blueberries
⅓ cup roasted pistachios, roughly chopped
¼ cup fresh basil leaves
2 tablespoons olive oil
Honey Basil Vinaigrette
3 tablespoons olive oil
1 tablespoon white balsamic vinegar
1 tablespoon honey
2 tablespoons fresh basil, finely chopped
1 teaspoon Dijon mustard Pinch of salt and black pepper
Preheat a grill or grill pan to medium-high heat.
Brush peach halves with olive oil and grill for 2-3 minutes per side until lightly charred. Let cool
slightly, then slice.
In a small bowl, whisk together all the vinaigrette ingredients until well combined.
Arrange Little Leaf Farms Baby Crispy Green Leaf lettuce in a large bowl or on a platter. Top
with farro, grilled peaches, blueberries and pistachios. Tear burrata into pieces and nestle
throughout the salad.
Drizzle with Honey Basil Vinaigrette and garnish with fresh basil leaves
This recipe serves 4 as a main course salad or 6-8 as a side dish. Turn this into a complete
meal by adding grilled chicken, shrimp or salmon.
SHOP LITTLE LEAF FARMS!
Written by our friends at the American Dairy Association
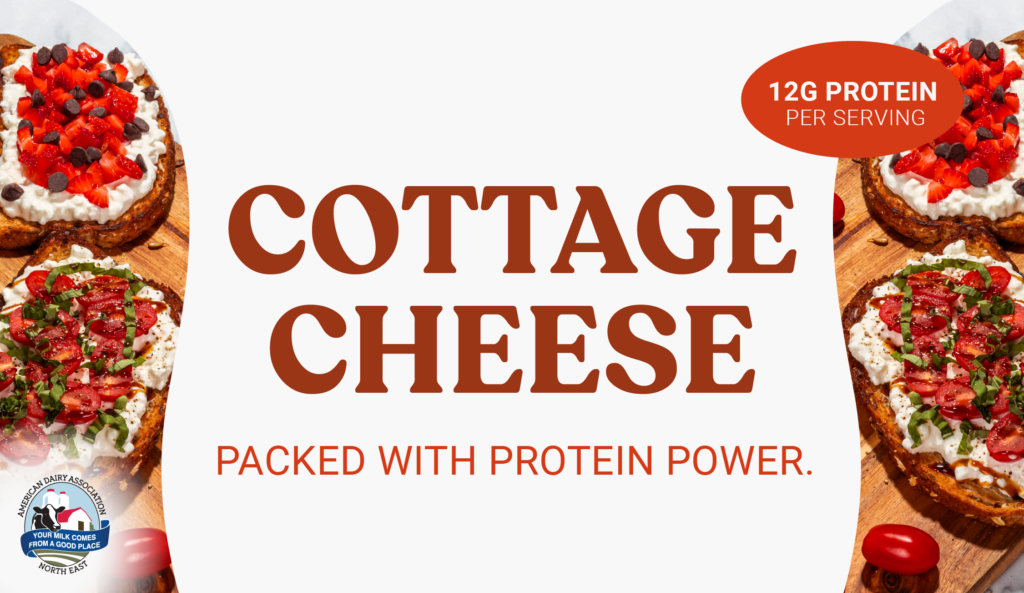
If you’re looking for a simple, nutritious food that works as hard as you do, cottage cheese is worth a second look. This fresh, mild-tasting cheese is making a comeback and for good reason. It’s packed with high-quality protein, essential nutrients, and endless ways to enjoy it.
One of cottage cheese’s biggest nutrition wins is its protein content. A half-cup serving of low-fat cottage cheese delivers about 12 grams of protein with only around 90 calories, making it a smart choice for anyone looking to stay full and energized throughout the day. Even more impressive, the protein in cottage cheese is primarily casein, a slow-digesting protein that helps support muscle repair and keeps you satisfied longer. That makes it a great option for busy mornings, post-workout recovery, or even a satisfying evening snack.
Beyond protein, cottage cheese offers a range of important nutrients your body needs. It’s a source of calcium, phosphorus, potassium, and vitamin B12—key players in maintaining strong bones and supporting overall health. Dairy foods like cottage cheese are linked to bone health across all life stages, helping build and maintain bone density as you grow and age.
Another benefit? Cottage cheese can support balanced blood sugar levels. With only about five grams of carbohydrates per serving and no added sugar in plain varieties, it’s a smart choice for those looking to manage energy and avoid spikes and crashes. Its protein content also slows digestion, helping you feel fuller longer and stay on track with your wellness goals.
Cottage cheese is also incredibly versatile—perfect for both sweet and savory meals. Spread it on toast, blend it into smoothies, or pair it with fruits, vegetables, or whole grains. If you’re looking for inspiration, try this delicious Cottage Cheese Toast for a quick, protein-packed meal or snack that fits seamlessly into your day.
When shopping, consider options like low-fat or reduced-sodium varieties to meet your nutrition needs, and check labels for added sugars in flavored versions.
Whether you’re fueling a busy day, supporting an active lifestyle, or simply looking for a satisfying snack, cottage cheese delivers a powerful combination of nutrition and convenience—making it an easy add-to-cart choice the next time you shop.
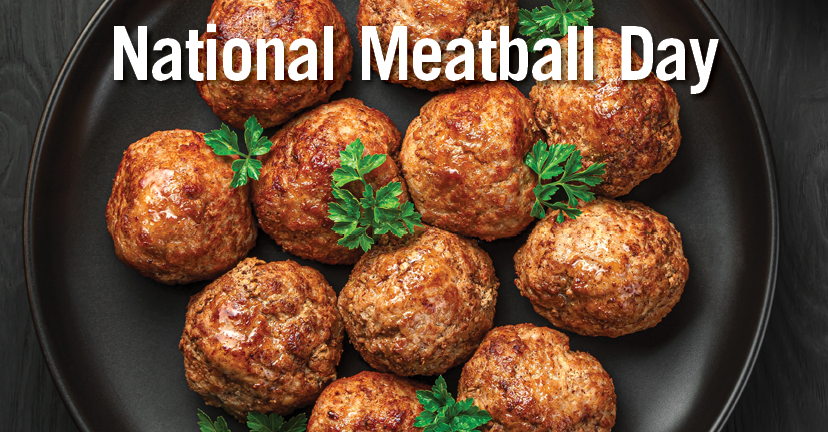
National Meatball Day
It’s National Meatball Day and we’re celebrating with our variety of recipe options. From classic Italian Sliders to Sriracha Chicken Meatballs, and exciting Buffalo Sliders, there’s something for everyone to try.
Tex-Mex Pork Meatballs: Take Tex-Mex further than you ever have with these tasty Tex-Mex Pork Meatballs.
Slow Cooker Sriracha-BBQ Meatballs: Slow cooked to perfection, these Sriracha BBQ Meatballs are worth the wait.
Honey-Sriracha Chicken Meatballs: The sweetness of the honey makes these Honey-Sriracha Chicken Meatballs a 10 out of 10.
Freezer-Friendly Slow Cooker Sweet & Spicy Chicken Meatballs: Who doesn’t love a good sweet and spicy combo?
Lamb Meatball Hummus Bowls: Mediterranean tastes for a delicious and refreshing option.
Italian Meatball Sliders: Can’t go wrong with a classic Italian Meatball Sandwich.
Check out these recipe videos for even more yummy options!
Recipes from Around the World
In spirit of the games starting up, we’re celebrating with recipes from around the world. Check out some of our favorite recipes below, learn about their origins, and try a dish you may not have had before, all while enjoying the games.
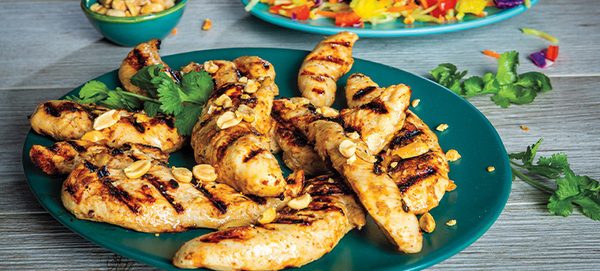
Grilled Thai Peanut Chicken Tenders with Pepper-Broccoli Slaw: Thai peanut chicken is a dish that originates from Thailand, where peanut sauces are commonly used in various recipes. The dish typically features chicken cooked in a rich, creamy peanut sauce made from ground peanuts, coconut milk, and a blend of spices. This sauce is often paired with vegetables and served over rice or noodles. The use of peanuts in Thai cuisine can be traced back to the influence of Chinese cooking, as peanuts were introduced to Thailand through trade. Over time, the dish has gained popularity worldwide, especially in Western countries, where it is often adapted to suit local tastes.
Middle Eastern Mushroom Burgers: Middle Eastern mushroom burgers are a modern culinary creation that draws inspiration from traditional Middle Eastern flavors and ingredients. This dish reflects the region’s rich culinary heritage, which often incorporates spices, herbs, and vegetables.
Mushrooms are commonly used in Middle Eastern cuisine, often featured in dishes like stuffed vegetables or as part of pilafs. The concept of a mushroom burger emerged as a response to the growing demand for plant-based alternatives, combining the savory umami flavor of mushrooms with spices typical of the region, such as cumin, coriander, and garlic.
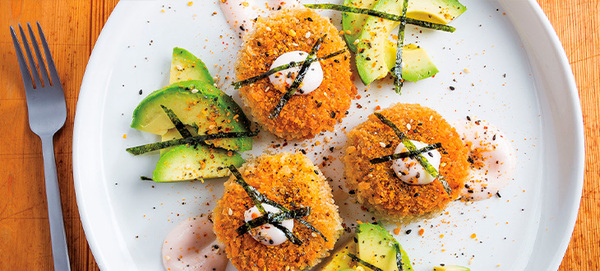
Japanese-Style Crab Cakes: Japanese-style crab cakes, often referred to as “kani korokke,” are a fusion of traditional Japanese cooking and Western influences. The concept of crab cakes itself is believed to have originated in the United States, particularly in Maryland, where blue crab is a staple. However, the Japanese adaptation incorporates local ingredients and flavors.
Kani korokke typically features a mixture of crab meat, mashed potatoes, and seasonings, which are then breaded and deep-fried until golden brown. The use of panko breadcrumbs gives them a light and crispy texture, which is a hallmark of Japanese cuisine.
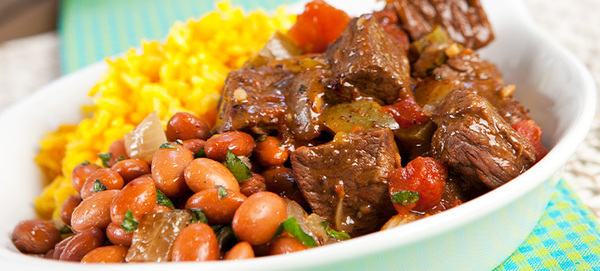
Carne Guisada Recipe | Price Chopper: Carne Guisada, which translates to “braised meat,” is a traditional dish with roots in both Mexican and Tex-Mex cuisine. Its origins can be traced back to the Spanish influence on Mexican cooking, where stews made with various meats and spices were common. The dish typically features beef that is slow-cooked with a variety of ingredients, including tomatoes, onions, peppers, and spices, resulting in a rich, flavorful gravy.
In Mexico, carne guisada is often served with rice, beans, or tortillas, and it varies by region, with different spices and cooking methods reflecting local tastes.
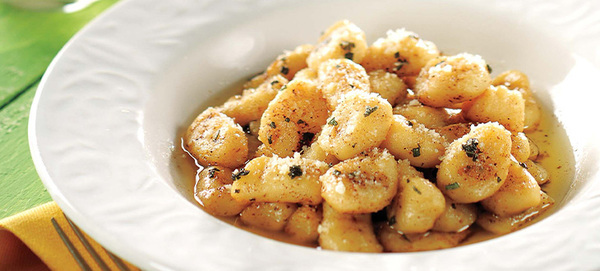
Gnocchi with Brown Butter & Sage: Gnocchi is a type of Italian dumpling that has its origins in ancient Roman times. The word “gnocchi” is believed to derive from the Italian word “nocca,” meaning “knuckle,” which may refer to the shape of the dumplings or the way they are formed. Traditionally, gnocchi were made from a mixture of flour and water, but over time, potatoes were introduced, particularly in the 18th century, leading to the soft, pillowy texture that is now characteristic of potato gnocchi.
The dish has evolved regionally across Italy, with variations that include different ingredients such as ricotta, semolina, or even spinach. Each region has its own unique take on gnocchi, often served with various sauces, from simple butter and sage to rich tomato or cream-based sauces.
Sheet-Pan Fish & Chips: Fish and chips is a classic British dish that originated in the United Kingdom during the 19th century. Its roots can be traced back to the introduction of fried fish by Jewish immigrants from Portugal and Spain, who brought the technique of frying fish in batter. The first recorded mention of fish and chips as a combined dish appeared in the 1860s, with the opening of the first fish and chip shop, believed to be in London.
The dish gained popularity during the Industrial Revolution, as it provided a cheap and filling meal for the working class. The combination of crispy fried fish, typically cod or haddock, served with thick-cut chips (fries) became a staple in British cuisine. It was often enjoyed with malt vinegar and mushy peas.
Sweet & Tangy Pulled BBQ Chicken and Slaw Sandwiches: BBQ sandwiches have their origins in the Southern United States, where barbecue culture is deeply rooted in regional traditions and cooking methods. The concept of barbecuing meat dates back to indigenous practices, but it evolved significantly with the arrival of European settlers, particularly in the 18th and 19th centuries.
The term “barbecue” itself is believed to come from the Taino word “barbacoa,” which referred to a method of cooking meat over an open flame. In the South, various meats, especially pork, were slow-cooked over wood or charcoal, resulting in tender, flavorful dishes. The practice of serving this smoked or grilled meat on bread, creating a sandwich, became popular as a convenient way to enjoy BBQ.
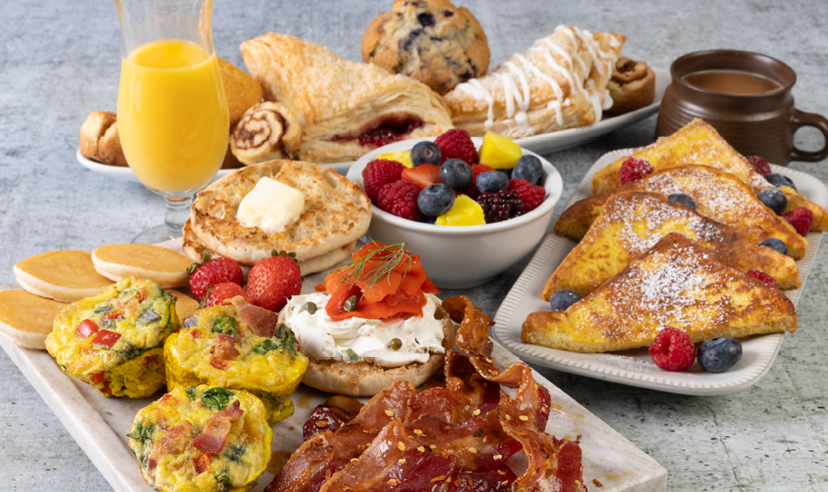
12 Recipes to Elevate Your At-Home Breakfast & Brunch
Picture this – it’s a cozy weekend morning at home. You get to sleep in and relax with the family. The only thing missing is a great dish to kick off the day. Well, you’ve come to the right place. Check out our 12 recipe ideas to elevate your at-home breakfast and brunch. See something that piques your interest? Give it a try!
Bacon, Tomato & Mushroom Strata
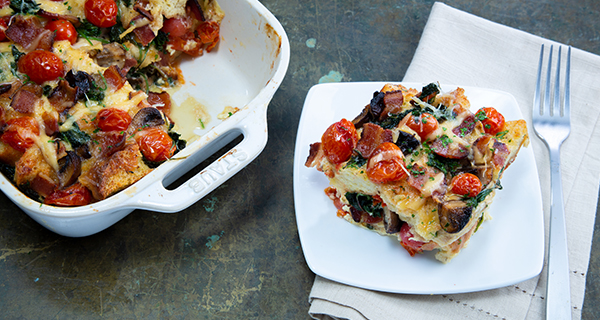
A strata is a savory breakfast casserole that layers bread, eggs, cheese, and various fillings. This Bacon, Tomato, and Mushroom Strata combines crispy bacon, sautéed mushrooms, and fresh tomatoes with Gouda and Parmesan cheeses, all baked to golden perfection.
Cottage Cheese Breakfast Bowl
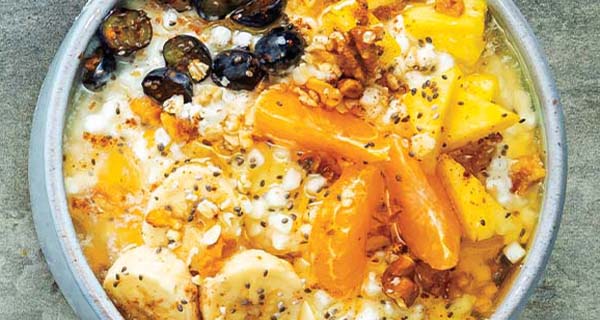
This Cottage Cheese Breakfast Bowl is a satisfying morning meal that combines creamy cottage cheese with a variety of toppings. It includes fresh fruits like blueberries and pineapples, nuts and seeds for added crunch, and a drizzle of honey or maple syrup for sweetness.
Blueberry-Stuffed French Toast
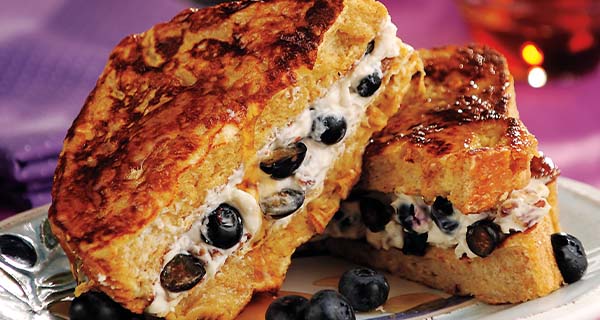
A delightful breakfast dish featuring layers of thick-sliced bread filled with a rich cream cheese and blueberry mixture. Perfect for brunch!
Egg Frittata Muffins

Egg Frittata Muffins are individual-sized baked egg dishes, like mini omelets, that are versatile and convenient for breakfast or brunch. They are made by whisking eggs with a variety of fillings such as vegetables, cheeses, and meats, then baking the mixture in a muffin tin until set.
Cinnamon-Walnut Crunch Coffee Cake
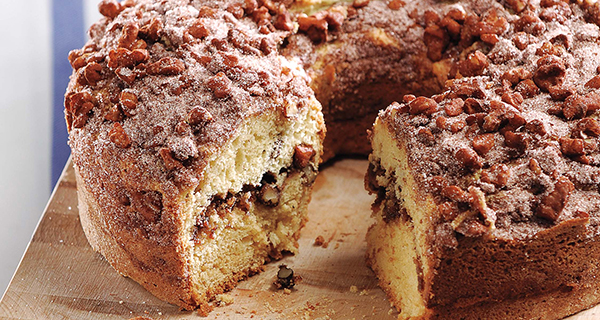
This Cinnamon-Walnut Crunch Coffee Cake is a moist and tender cake featuring a rich cinnamon-sugar swirl and a crunchy walnut topping. This delightful treat is perfect for breakfast or as an afternoon snack, pairing wonderfully with a cup of coffee.
Ham & Avocado Toast with Crispy Parmesan Eggs
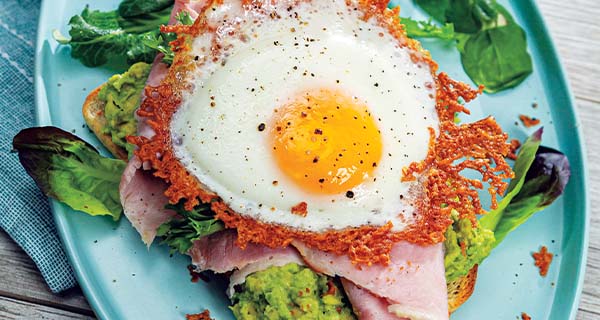
A savory breakfast dish that combines creamy avocado spread over toasted bread, topped with slices of ham and a crispy fried egg coated in Parmesan cheese. The Parmesan adds a flavorful crust to the egg, complementing the richness of the avocado and the saltiness of the ham.
Farmer's Market Hash with Poached Egg
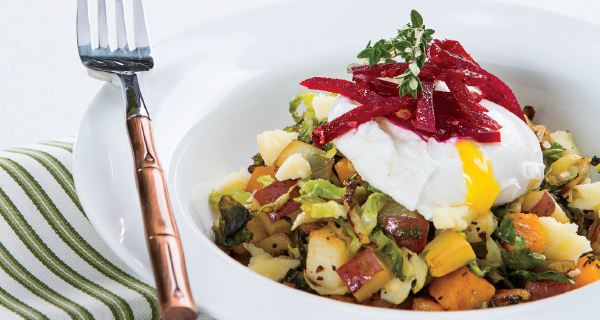
A hearty breakfast dish that combines a medley of fresh vegetables—such as butternut squash, Brussels sprouts, and potatoes—cooked until tender and golden. This flavorful hash is topped with perfectly poached eggs, allowing the rich yolk to mingle with the seasoned vegetables.
Heuvos Rancheros
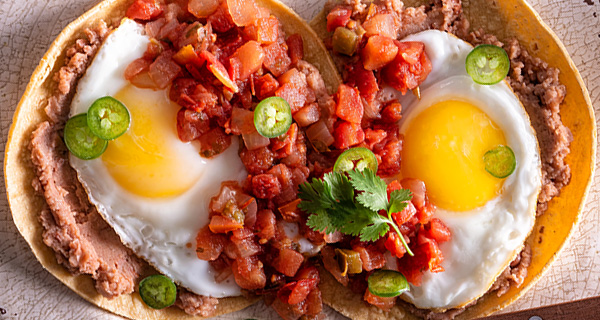
Huevos Rancheros is a traditional Mexican breakfast dish featuring fried eggs served on lightly fried corn tortillas, topped with a flavorful tomato-chili sauce. Often accompanied by refried beans, sliced jalapenos, and fresh cilantro, this hearty meal offers a delightful combination of textures and bold flavors, making it a popular choice for breakfast or brunch.
DIY Glazed Donuts

Bring the joy of glazed donuts to your at-home menu with this fun recipe. Breakfast and brunch might never be the same.
Roasted Veggie & Bacon Sheet-Pan Frittata

A versatile and hearty dish that combines roasted bell peppers, onions, kale, and cherry tomatoes with crispy bacon and a savory egg mixture. The combination of roasted vegetables and smoky bacon provides a flavorful and satisfying meal suitable for breakfast, brunch, or even dinner.
Smoked Salmon & Scrambled Egg Bagel Sandwich
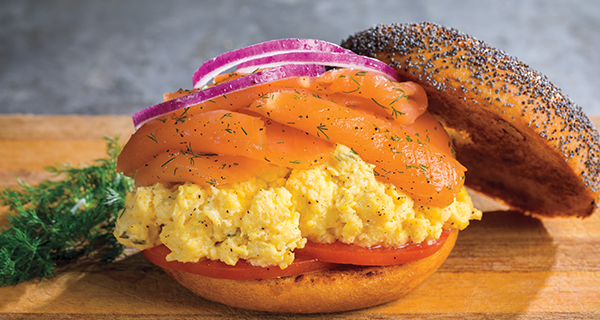
The Smoked Salmon Scrambled Egg Bagel Sandwich is a delightful breakfast option that combines creamy scrambled eggs with rich smoked salmon, all nestled between a toasted bagel. Elevate it with additions like chive and onion cream cheese, fresh tomato slices, and thinly sliced red onion, for a harmonious blend of flavors and textures.
Stuffed French Toast Rolls

Stuffed French Toast Rolls are a delightful twist on traditional French toast, featuring flattened bread slices filled with sweet or savory fillings, rolled up, and cooked until golden brown. These roll-ups make for a fun breakfast option that’s both easy to prepare and customize to your taste.
The Feast that Keeps on Giving: Delicious Leftover Recipes
Thanksgiving might just be the biggest food day of the year. It would be a shame if the food was limited to only one day. Luckily, we’re here to stretch the value of your Thanksgiving meal with a variety of delicious leftover recipes. Here’s some ideas to love your Thanksgiving leftovers until they are gone!
Turkey Pot Pie: Pot pie is a lovely comfort dish. Perhaps exactly what you need for the post-Thanksgiving blues before Christmas.
Roasted Buffalo Turkey: If you’re a fan of buffalo chicken, you’ll enjoy buffalo turkey just the same, maybe even more!
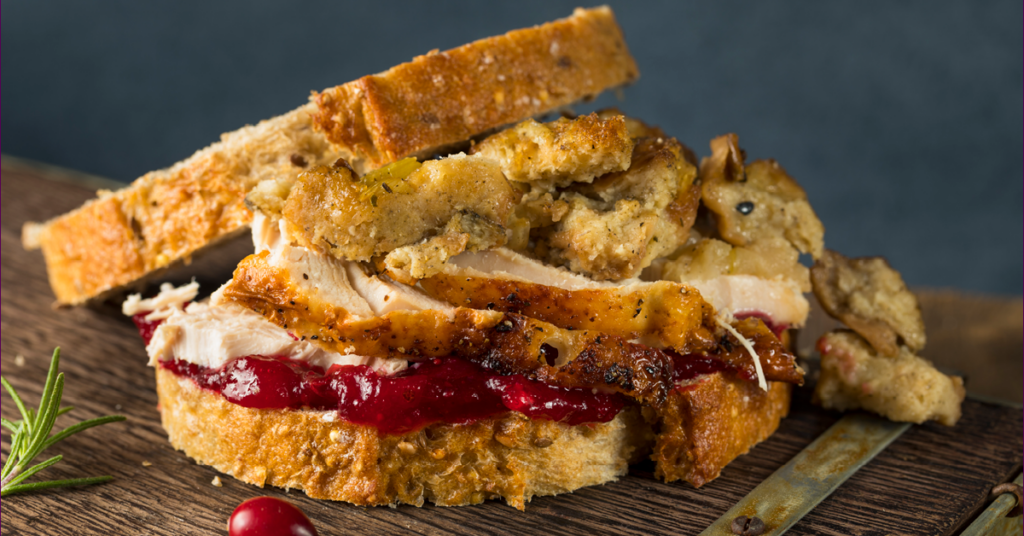
Open-Faced Turkey Melt: This Open-Faced Turkey Melt provides a yummy sandwich alternative for leftover turkey and cranberry sauce.
Cranberry Apple Stuffed Pork Chops: Stuffing like you’ve never used it before, this is an awesome choice for the leftovers that weren’t enjoyed on Thanksgiving.
Mashed Potato, Cheddar & Leek Casserole: Leftover mashed potatoes? Some cheddar cheese, bacon, and leeks will turn that into a nice casserole.
Leftover Turkey Pot Pie Roll Ups with Cranberry Mustard: These Turkey Pot Pie Roll-Ups are an excellent alternative to a whole pot pie, and the cranberry mustard is delicious.
Turkey, Cranberry, & Goat Cheese Quesadillas: Turn your turkey and cranberry into a quesadilla! Add a little goat cheese and this creative option works like a charm.
Loaded Leftover Soup with Stuffing Croutons: With leftovers, soup is always a winner. And this recipe works beautifully for post-Thanksgiving eats.

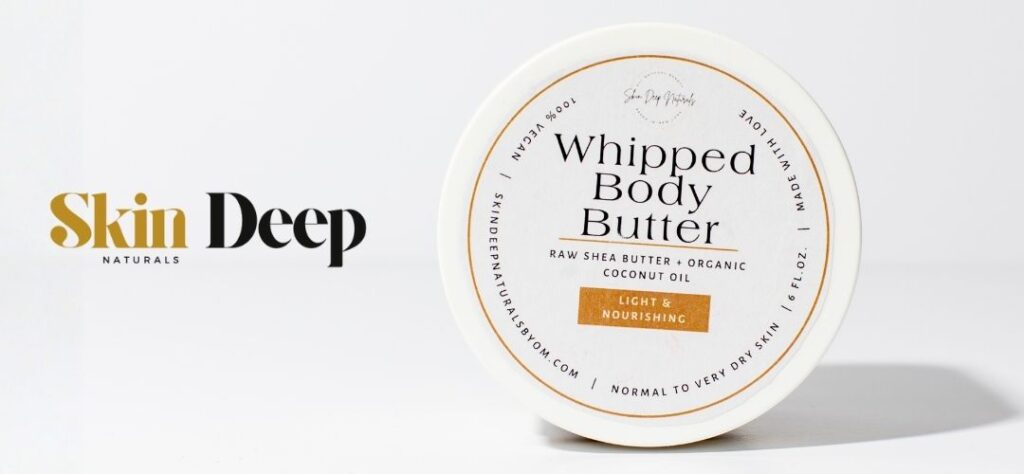
A Home.Grown. Partnership with Local Entrepreneur Octavia Maxwell
Market 32 is proud to announce the launch of Skin Deep Naturals, a locally crafted skincare and wellness line now available in 10 stores across the Capital Region. Rooted in clean ingredients, natural solutions, and community empowerment, Skin Deep Naturals reflects everything we value in our Home.Grown. partnerships—local passion, local talent, and products made with purpose.
Founded by Octavia Maxwell, a dynamic entrepreneur, speaker, and community advocate, Skin Deep Naturals blends a decade of research with a mission to make luxury self-care accessible for everyone. What began as a personal journey to better understand natural beauty alternatives has expanded into a trusted line of skincare and haircare products, experiential wellness workshops, and private-label collaborations that support other small businesses.
Octavia’s work goes far beyond the products she creates. She is deeply committed to empowering women, families, and young people through education, hands-on learning, and confidence-building experiences. Her partnerships with schools, youth programs, and community organizations—including the YMCA Black & Latino Achievers Program—reflect her belief that self-care is more than a routine: it’s a foundation for leadership, wellness, and personal growth.
Today, Market 32 is thrilled to help bring Octavia’s vision to even more customers—right here at home. We’re honored to support a local maker who is not only creating exceptional natural products, but who is also uplifting our community and inspiring the next generation of innovators.
Find Skin Deep Naturals at these Market 32 locations:
Albany – 709 Central Avenue, Albany, NY
Troy – 716 Hoosick Street, Troy, NY
Guilderland – Routes 20 & 155, Guilderland, NY
Rensselaer – 501 Columbia Turnpike, Rensselaer, NY
Schenectady – 1640 Eastern Pkwy, Schenectady, NY
Scotia/Glenville – 290 Saratoga Rd, Scotia, NY
Glenmont – 329 Glenmont Rd, Glenmont, NY
Latham (Market Bistro) – 873 New Loudon Road, Latham, NY
Slingerlands – 1395 New Scotland Rd, Slingerlands, NY
Clifton Park – 15 Park Avenue, Clifton Park, NY
Celebrating Local. Celebrating Community. Celebrating You.
We invite you to explore this exciting new Home.Grown. addition and discover the natural, confidence-building care that Skin Deep Naturals brings to the Market 32 family. From rejuvenating skincare to nourishing haircare and community-centered experiences, Octavia Maxwell’s brand is redefining what it means to feel good—inside and out.
Welcome to Market 32, Skin Deep Naturals. We’re proud to share your story.
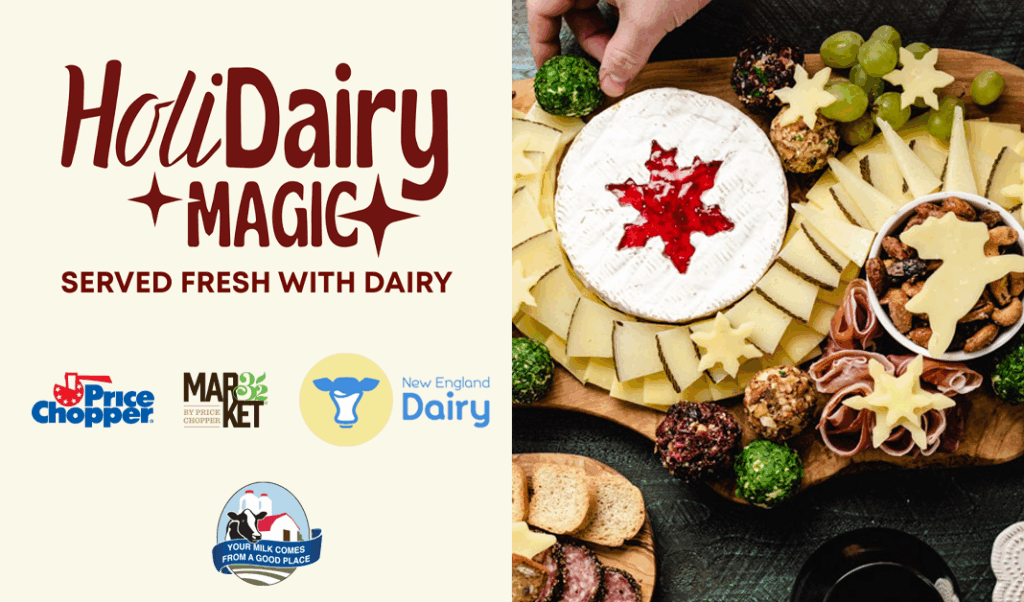
This season, bring Holi-Dairy Magic to your gatherings with a Holiday Dairy Board. It’s a festive twist on the classic charcuterie spread. Packed with color, flavor, and nutrition, a dairy-focused board is an easy way to impress guests while keeping your holiday entertaining, affordable, and fun! And the best part? Everything you need is waiting for you in the Price Chopper Dairy Aisle.
Start With Cheese
Anchor your board with a mix of cheeses like cheddar, brie, parmesan, or mozzarella. Cheese not only adds big flavor but also provides high-quality protein, calcium, and essential nutrients to help keep you energized through the busy holiday season. Cutting cheeses into different shapes like wedges, cubes, and slices adds visual interest.
Layer on Dairy-Inspired Extras
Enhance your board with creative dairy add-ons. Flavored butters like honey-cinnamon or herb-garlic are perfect for crackers or warm bread. Yogurt-based dips such as ranch yogurt dip or vanilla yogurt topped with pomegranate seeds add both freshness and nutrition, offering probiotics and additional protein. For a sweet touch, include chocolate-covered pretzels or a small bowl of whipped cream for dipping fruit.
Style With Seasonal Color
Give your board a festive holiday look by incorporating pops of red, green, and winter whites. Fresh herbs like rosemary and thyme add fragrance and greenery. Red grapes, strawberries, dried cranberries, green apples, pomegranate arils, and colorful crackers create a vibrant, holiday-ready presentation.
Keep It Budget-Friendly
Holiday entertainment doesn’t have to be expensive. Mix premium cheeses with affordable staples, use seasonal fruit, and choose store-brand dairy items to stay on budget without sacrificing quality. Dairy foods provide incredible value and are nutritious, versatile, and easy to include without stretching your grocery budget.
Ready to start creating? Shop here for all your Holiday Dairy Board essentials.
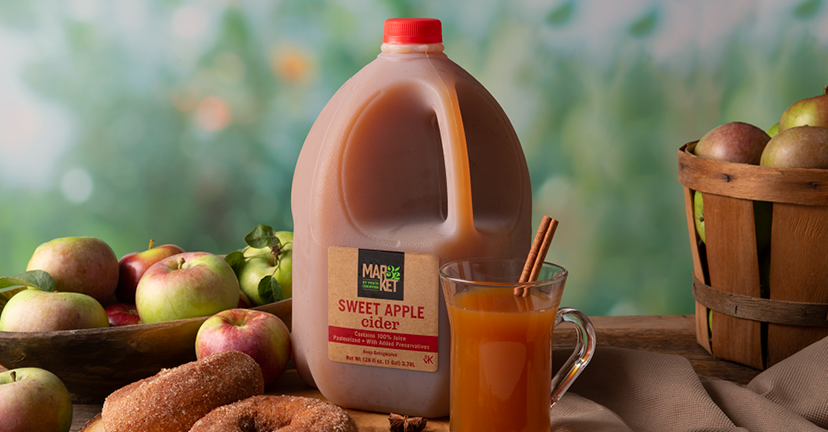
National Apple Cider Day
🍏 Happy National Apple Cider Day! 🍂 Today, we’re celebrating the deliciousness of apple cider in all its forms! Whether you love it hot, cold, or in your favorite recipes, there’s no denying that this fall favorite brings warmth and joy to our tables.
This mouthwatering dish features a succulent beef roast marinated in a delightful blend of apple cider, fresh sage, and aromatic spices, creating a perfect harmony of sweet and savory. As it slow-cooks, the roast becomes incredibly tender, allowing the rich flavors to infuse every bite. Serve it alongside roasted vegetables for a hearty meal that’s perfect for family gatherings or a cozy night in.
Get ready to elevate your comfort food game with our Slow Cooker Apple Cider Pulled Pork Grilled Cheese! This delicious recipe combines tender, slow-cooked pulled pork infused with the sweet and tangy flavors of apple cider, creating a deliciously unique filling. Nestled between two slices of perfectly toasted bread and melted cheese, this grilled cheese sandwich is a delightful twist on a classic favorite. Perfect for chilly days, it’s a cozy meal that’s sure to warm your heart and satisfy your cravings.
Embrace the flavors of fall with our refreshing Apple Cider Slushy! This frozen treat combines the sweet and tangy taste of apple cider with a frosty twist. Simply blend chilled apple cider with ice until smooth and enjoy the vibrant flavors that capture the essence of the season. Whether you’re hosting a backyard bonfire or just looking for a fun treat, this slushy is sure to be a hit with family and friends. Garnish with a slice of apple or a sprinkle of cinnamon for an extra touch of magic.

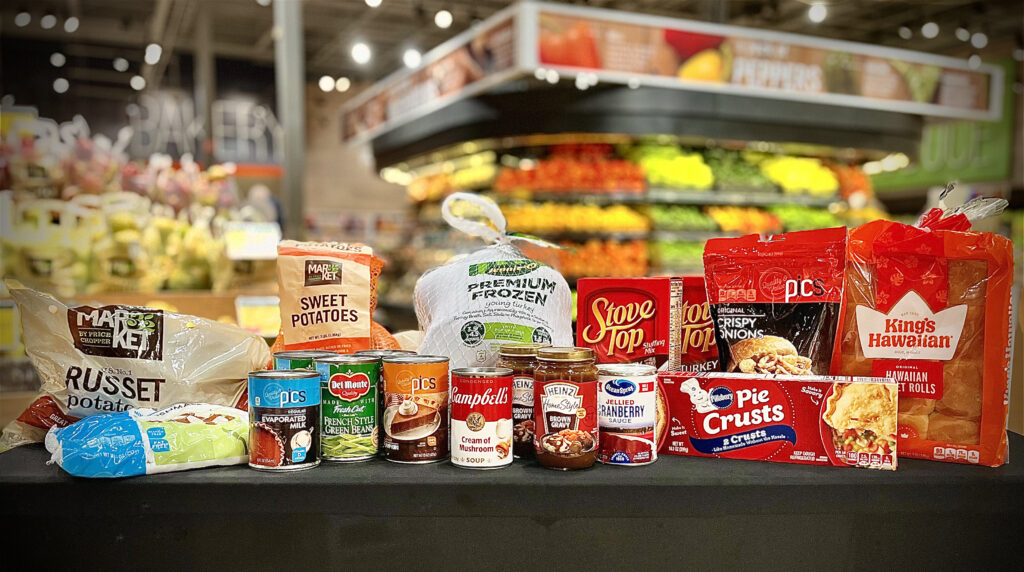
Market 32 and Price Chopper Add Value to Thanksgiving with New $40 Feast for 10
SCHENECTADY, N.Y., November 14, 2025 – Market 32 and Price Chopper are redefining what value means this holiday season by expanding its bountiful Thanksgiving assortment to include a feast that proves families don’t have to compromise on quality for savings across all 129 locations. Available starting November 16, the community mainstay and go-to grocer for generations will offer a complete Thanksgiving meal for 10 people for $40 to customers who use their AdvantEdge Rewards card — the signature centerpiece of Market 32 and Price Chopper’s abundant yet affordable holiday spread, helping families enjoy a memorable meal without straining their budgets.
Unlike other budget bundles announced weeks ago, Market 32 and Price Chopper’s $40 Feast for 10 features a carefully curated mix of holiday staples from popular national brands and PICS own-label favorites — offering customers an elevated combination of items with which to make a deliciously classic Thanksgiving meal.
The $40 Feast for 10 includes:
- (1) Jennie-O or Shady Brook Farms Grade A Frozen Turkey (~13 lbs.)
- (1) Market 32 Russet Potatoes (5 lb.)
- (1) Market 32 Sweet Potatoes (3 lb.)
- (2) PICS Mini-Marshmallows (10.5 oz.)
- (2) Stove Top Stuffing (6 oz.)
- (2) Heinz Homestyle Brown Gravy (12 oz.)
- (3) Del Monte Green Beans (14.5 oz.)
- (1) Campbell’s Cream of Mushroom Soup (10.5 oz.)
- (1) PICS Crispy Onions (4.5 oz.)
- (1) Ocean Spray Cranberry Sauce (14 oz.)
- (1) King’s Hawaiian Rolls (12 pack)
- (1) Pillsbury Ready Pie Crust (14.1 oz.)
- (1) PICS Evaporated Milk (12 fl. oz.)
- (1) PICS Solid Pumpkin (15 oz.)
Together, these items provide a complete meal for 10 people, all priced at approximately $39.72 (before taxes) with an AdvantEdge Rewards card. Each product can be purchased individually or together both in-store and online at all locations throughout NY, MA, CT, VT, NH, and PA, giving customers the freedom to build their feast exactly how they want it, with a serving of savings.
“The difference is in the details,” said Blaine Bringhurst, president of Market 32 and Price Chopper. “We’re honored to continue our tradition of helping families make the holidays special, with savings that are every bit as meaningful as the experience of shopping with us — where friendly, knowledgeable teammates, personalized service in our fresh departments, and the exceptional quality of the products we stand behind all come together to deliver a memorable meal.”
Customers may also order fully cooked Thanksgiving meals in advance by placing an order on the Holiday Dinners landing page from now through November 20 for pickup between November 25 – November 27, while supplies last.
Feast for Free: Doubling Down on Value
Market 32 and Price Chopper are excited to give customers a chance to “Feast for Free” with the AdvantEdge Rewards Holiday Doubler. From now through December 24, 2025, shoppers can earn double points on almost every purchase, turning everyday shopping into extra savings on everything that makes the season special.
Points can be redeemed on the cost of anything for their table — from the turkey, trimmings, and sides to desserts, beverages, and even floral centerpieces. To activate the Holiday Doubler, customers must register their AdvantEdge Rewards account here.
Customers can also earn five times the points on all retailer gift card purchases from now through December 6, 2025.
Paired with additional bonus points specials on selected items, it’s yet another way Market 32 and Price Chopper are helping families save — and celebrate — all season long.
The Feast that Keeps on Giving
It’s estimated that more than 320-million pounds of food will be wasted this Thanksgiving.[1] Market 32 and Price Chopper are helping customers stretch their dollar even further with access to a collection of recipes that transform holiday leftovers into fresh, delicious meals like a hearty pot pie, satisfying sandwich, savory soup, and more — keeping the flavor going at a time when providing value and combatting food insecurity are top priorities.
Customers can explore the holiday value inspirations created by culinary experts by visiting our Feast that Keeps on Giving blog.
ReFED. How much food will go to waste this Thanksgiving? About $550 million worth. Published November 3, 2025. Available at: https://refed.org/articles/how-much-food-will-go-to-waste-this-thanksgiving-about-550-million-worth/.