


Haleigh Eustis
E-Commerce Marketing Coordinator
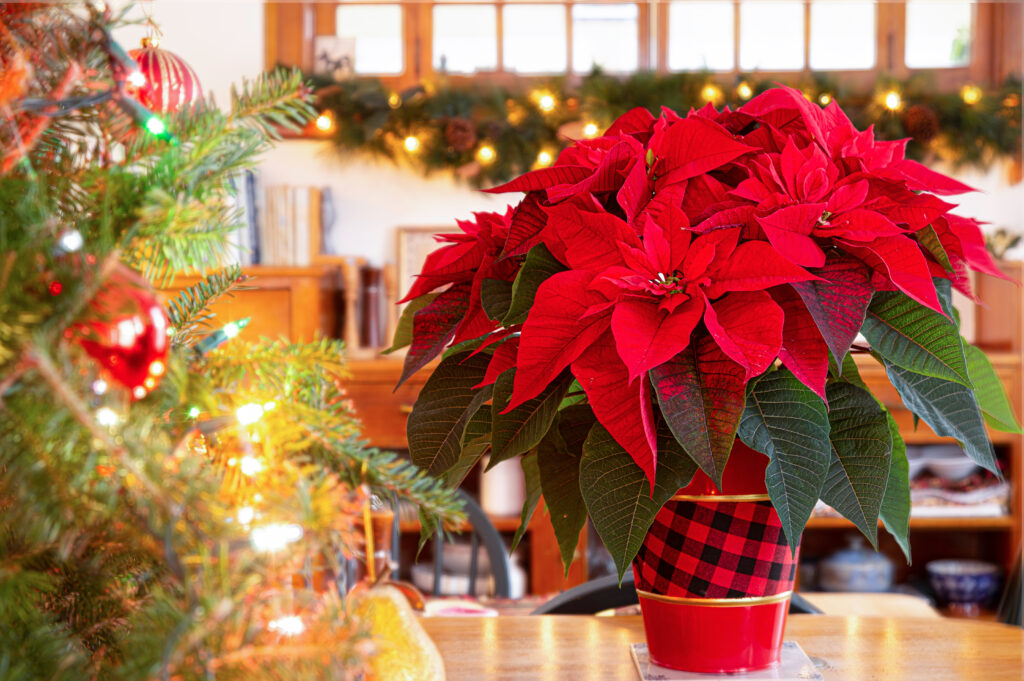
Happy December 12th! Did you know that today is National Poinsettia Day? These beautiful red flowers are a holiday staple, as their vibrant color and immense beauty bring life to any space you decide to place it! With the holiday season in full swing, shopping for endless amounts of friends, family, and even coworkers can tend to feel stressful and overwhelming. Poinsettia is a flower that stands for joy and celebration, which makes it the perfect gift for the loved ones in your life! Poinsettias are known for their staple red shades, but this Christmas flower comes in various colors including white, pink, burgundy, yellow, purple and more.
The poinsettia flower is native to the beautiful country of Mexico. These flowers have been cultivated for centuries and were used by the Aztecs for their natural red dye in clothing. As the years had passed, in 1827, botanist Joel Poinsett took a trip to Mexico where he had seen this beautiful flower. Upon his return to South Carolina, his home state, he brought a few Poinsettias to cultivate and very quickly this flower gained popularity within the states.
Though the Poinsettia is a largely popular holiday flower, you may be wondering how. The poinsettia flower stems from the Mexican legend of Pepita and her Christmas weeds. On Christmas Eve, a young girl named Pepita had no gift for her Christmas service. Encouraged by her cousin, she went to collect a bundle of weeds and placed them on a nativity set. Within seconds, the weeds were said to have bloomed into the beautiful Poinsettia flowers that we are familiar with today! Though these flowers are a seasonal plant in the states, they are the second most popular potted plant sold within a year.
Poinsettias are beautiful in all shapes, shades and sizes which is why Market 32 and Price Chopper have them readily available in our floral section during the holiday season. Shop in store for our beautifully arranged Poinsettias or use our online services, DoorDash and Instacart. Our online ordering allows customers to send personalized cardettes for any occasion which is sure to warm the hearts of whoever is receiving the potted plant!
Shop for the holiday season, stress free! Explore Price Chopper/Market 32 Floral Department for all your holiday gifts.
Haleigh Eustis
Floral Intern
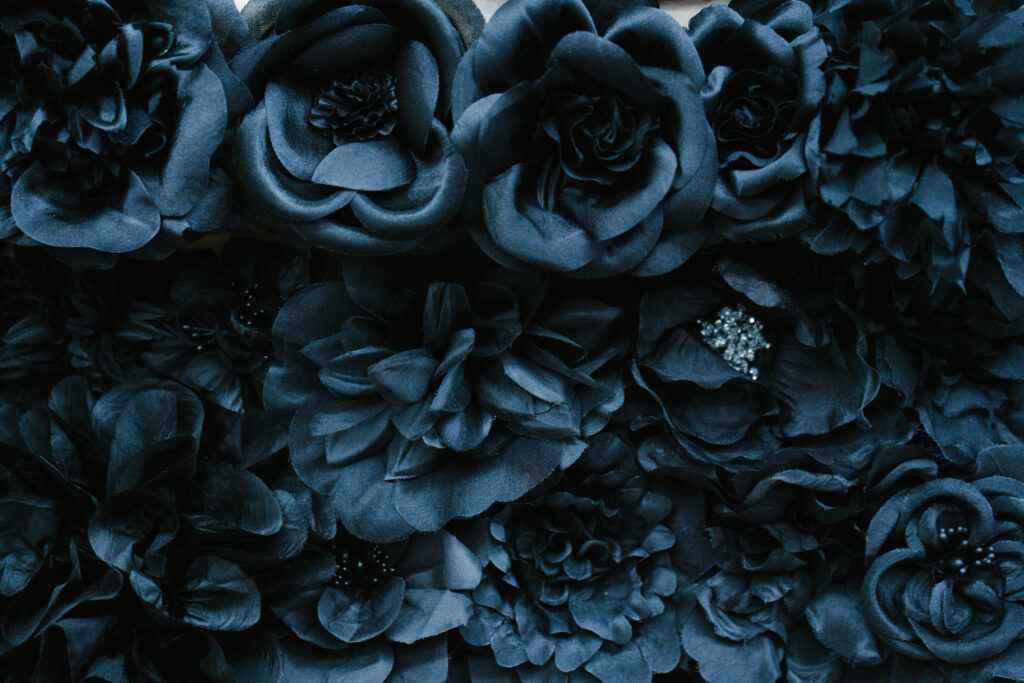
Happy Halloween! Considered one of the spookiest holidays of the year, it is understandable that one would want matching décor to go along with the theme. That being said, there is no such thing as a pure black flower to match the Halloween aesthetic to a spooky bouquet . . . until now! Lucky for you, there is a simple (and easy) way to achieve a pure black flower for the Halloween season.
This Halloween, we are changing it up and dying flowers. I know what you’re thinking; how can you dye flowers? Well, it’s much easier than you think!
What you need:
- White flowers (They don’t have to be just roses, they can range from daisies, lilies, roses, baby’s breath, tulips and more.)
- Water
- A knife
- Food dye (Both gel and drops are fine, just make sure you warm your water to melt the drops.)
- A cup
Let’s Get Started:
Step One: Take your flower of choice and clean the stem of all leaves. Other than the stem, we want no greenery on the actual flower itself.
Step Two: Once you have cleaned off your flower stem, make an “X” symbol at the bottom of the flower with a knife (be careful). This will encourage a better flow of water to the stem and petals itself.
Step Three: Now, this is where the craft could become messy! Once you have decided on a black food coloring, place 7-8 drops of dye into your water. I prefer room temp to slightly warm water, but it’s up to you!
Step Four: Once your water is dark in color, place your rose(s) in the water and let them soak for—at least—24 hours. After they have soaked your white flowers should be a dark shade of gray to black!
TIP: Make sure you leave your flowers in the water even after they’ve soaked.
There you have it! A super simple way to create a beautiful and spooky bouquet for the Halloween season. Don’t want black flowers? No problem, you can choose practically any color to dye your flowers with. Follow the same steps for an array of unique flowers that are sure to catch anyone’s eye!
HAPPY HALLOWEEN!🎃
Buy all your floral needs at Price Chopper/Market 32 Floral Department!
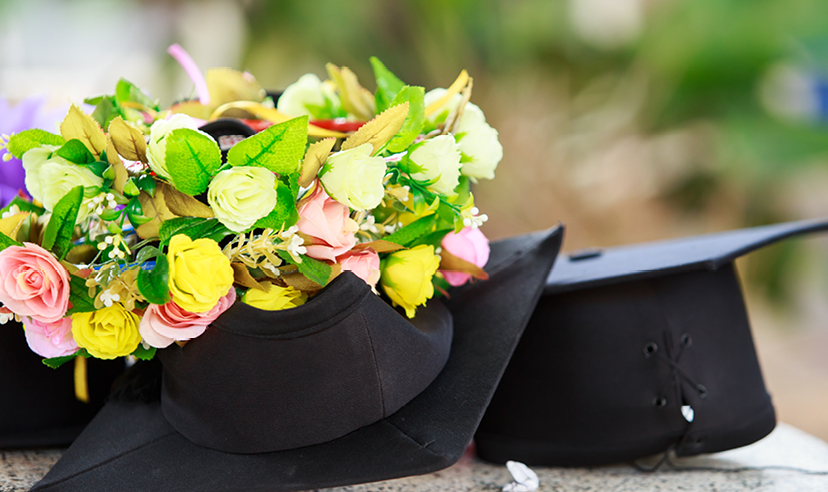
Celebrate Special Occasions with Floral
Haleigh Eustis
Digital Marketing Intern
It’s graduation season! As students step into this exhilarating phase of their lives, brimming with anticipation and excitement, the festivities and celebrations are in full swing. Amidst the whirlwind of planning, you may be asking one question: How do we decorate for this memorable occasion? Not to worry, because Price Chopper/Market 32 is at your service!
Elevate your graduation festivities with the timeless elegance of fresh flowers. Just like the graduates themselves, flowers symbolize growth and new beginnings. They infuse any setting with charm and grace, whether adorning a centerpiece or standing alone as a heartfelt gift.
Choose from our exquisite selection, each bouquet telling its own story. From the charm of ruby red roses to the vibrant and stunning color of a Crazy Daisy Bunch or the serene beauty of a Peace Lily, there’s a bloom to suit every graduate’s personality.
Short on time? No worries! Explore our wide array of flowers and bouquets conveniently available on Price Chopper Market 32 Floral DoorDash, ensuring effortless decoration for your celebration.
Let Price Chopper/Market 32 alleviate the stress of graduation season, ensuring every moment is filled with joy. Here’s to the graduating class of 2024, congratulations!
Haleigh Eustis
Intern, Digital Marketing
Happy Mardi Gras! This popular holiday is celebrated by many and is widely known for its extravagant and lively celebrations in New Orleans! This celebration is filled with food, parties, drinking and lively celebrations that take up the entire city. When one thinks of Mardi Gras, there are three colors that should come to mind: green, purple and gold (or yellow!) The colors were chosen by Rex, King of the Carnival and all represent different symbols. Purple stands for justice, while green stands for faith and gold stands for power. Though this celebration has little to do with flowers, that doesn’t mean we can’t add our own unique take on it! In this blog we’re going to make a DIY Mardi Gras bouquet that is sure to add a little color in your space!
Mardi Gras has been celebrated since the 18th century and has never ceased to bring celebration and enchantment every year. That said, we’re going to make a bouquet that mimics the same excitement that comes with the holiday and celebrations! What you’ll need:
- Medium height vase
- Party beads (specifically in purple, green and gold shades)
- Flowers
- Purple flowers that I recommend: lilac, purple daisies, lavender or hyacinth!
- Greenery of any kind but I have a strong preference for ivy, leather fern, silver dollar eucalyptus, baby blue and baby’s breath! (You can also use statice for some more purple flare.)
- Though there are no natural gold flowers, there are yellow flowers! Here are some I recommend! Sunflowers, marigolds, tulips, chrysanthemum, goldenrod and the primrose!
- (Optional) ribbon!
Let’s begin:
Step One: Start with your vase. You’re going to want to fill it with your Mardi Gras themed beads. There doesn’t have to be any order to this, do what you like!
Step two: Once the vase is filled with beads start to create your bouquet! If you’re not confident in your bouquet making skills, we have a blog that will help you, click here! Don’t forget, because there’s no water in your vase, your flowers are more prone to die faster! If you want to prolong their life, nestle a small glass into your vase and place your bouquet in the cup with water. Then you work around your cup and use the beads to hide it! Make this bouquet as extravagant as you want!
(Optional): You can always add feathers and Mardi Gras masks to the bouquet as well!
Step Three: now that you have your finished bouquet, you can wrap a beautiful ribbon around the vase and voila! You’ve got a beautiful and easy to make Mardi Gras bouquet!
Buy all your floral needs at Price Chopper/Markert 32 Floral Department!
Haleigh Eustis
Intern, Digital Marketing
Happy New Year! Did you know that January 1st isn’t the only day that is referred to as “The New Year?” Around the world, there are various New Years that are celebrated on different days. That being said, what is a better gift for the new year than flowers! The New Year symbolizes new beginnings and is commonly associated with a flower or plant. Celebrate the New Year while learning the flowers that are associated with different New Year’s celebrations globally!
Nowruz, The Persian New Year (March 21st): Celebrated in the spring, Nowruz is a 13-day celebration that symbolizes the end of winter. Because this holiday symbolizes rebirth and renewal, the Hyacinth flower is normally associated with Nowruz. This flower refers to renewal as well, which is perfect for the New Year celebration!
Russian Old New Year (January 14th): Celebrated across the world (but mainly in Russia), the Old New Year was first documented on the Julian Calendar. The Russian Old New Year is a holiday filled with winter festivals that embody Russian culture. Food, activities and family are all a large component of the New Year. Though it’s not a flower, the fir tree is the plant associated with the holiday. It’s a symbol of life, rebirth and value which makes it the perfect plant for the Russian Old New Year!
Diwali, Hindu New Year (November 12th): This Hindu New Year is a celebration of lights as it is filled with lanterns, fireworks, prayer and sweets. The rangoli flower is a symbol for Diwali. Though it’s not a physical flower that can be planted, mum flowers are used when creating this beautiful floral symbol. The mum represents death and rebirth at the same time which is a wonderful flower for the New Year as one is saying goodbye to the past and hello to a new beginning!
Chinese New Year (February 10th): Chinese New Year is a celebration that involves offerings to ancestors, fireworks, good food and beautiful decorations. A flower commonly associated with Chinese New Year is the orchid. It’s a beautifully classic flower that symbolizes fertility and wealth. These flowers are usually sold during Chinese New Year as they are used to decorate.
Rosh Hashanah, Jewish New Years (September 15th): Celebrated in two nights, Rosh Hashanah is the Jewish New Year which is observed after someone has blown the shofar. Considered a high Holy Day, Rosh Hashanah is celebrated with prayer, symbolic foods such as apples and honey and family. White lilies are usually associated with this New Year’s celebration as they represent peace and purity.
Though this list is small compared to the various New Year’s celebrations across the world, it’s a fun insight into the correlation that flowers have with holidays! While flowers are beautiful, they are much more than a decoration. Their symbolism runs deeper than many people would imagine! Shop all your floral needs at Price Chopper/Market 32 Floral Department!
Haleigh Eustis
Floral Intern
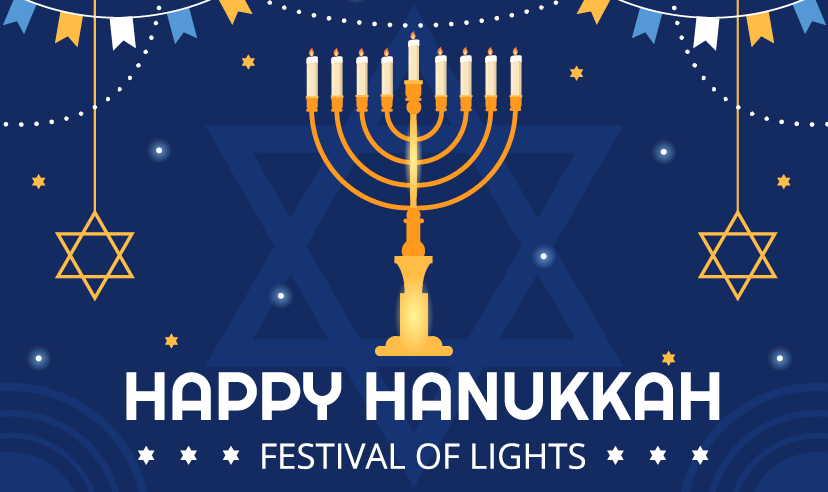
Chanukah is a holiday that lasts for eight days in which people celebrate with traditions, foods, games, and family. Even though flowers aren’t technically a staple to this holiday, they certainly could be! If you’re planning on having a family gathering after lighting the menorah, but you want decorations that are fitting for the time of year, I’ve got you covered. Let’s make a Chanukah themed bouquet! .
What you will need:
- One small vase (this will be your inner layer)
- One medium sized vase (This will be your outer layer. Make sure your outer layer is taller than your inner layer and that there is wiggle room when you place the small vase into the medium vase.)
- One bunch of baby’s breath
- One bunch of white roses
- One bunch of blue crazy daisies
- Greenery (optional)
- Chocolate coins or “gelts”
- Blue ribbon (optional)
How to make this bouquet:
Take your inner layer (which is a small vase) and assemble your bouquet. If you’ve never made an arrangement before, don’t fear, I can help!
- Every arrangement has specific flowers that you can utilize to create the most attractive bundle of flowers. The arrangement is going to focus on your focal flower(s) which is—typically—the most beautiful, or eye-catching flower. In this case, your focal flower will be the rose. Normally, we use between one to three focal flowers and build from there.
- After we have our focal flowers, we start utilizing our focal fillers (which in this case will be the blue daisies!)
- Once you’ve created an arrangement of focal and focal fillers, we can start adding regular fillers. For this arrangement I’ve chosen baby’s breath and greenery. Filler flowers are used to fill in odd or awkward gaps. It’s easy to get taken away by fillers, so use them sparingly!
- And voila! You’ve created a beautiful arrangement, and it wasn’t even hard, was it? Let’s continue!
- Once you’ve created your arrangement, place your inner layer into your outer layer. After you’ve assembled shell for your flowers, this is where the fun comes in!
- Take your chocolate coins and place them in the gap between the inner and outer layer (this is the importance of having wiggle room)! When you place the coins in the space, they will stand upright. Repeat this until all the space is filled and you’re going to end up with an eye-catching arrangement that is beautiful on its own or . . . you can adorn the arrangement with a ribbon!
- And there you have it, a beautiful and easy Chanukah arrangement that is sure to impress with its beauty and uniqueness!
Shop all of your Chanukah and Holiday needs at Price Chopper/Market 32!
Haleigh Eustis
Floral Intern
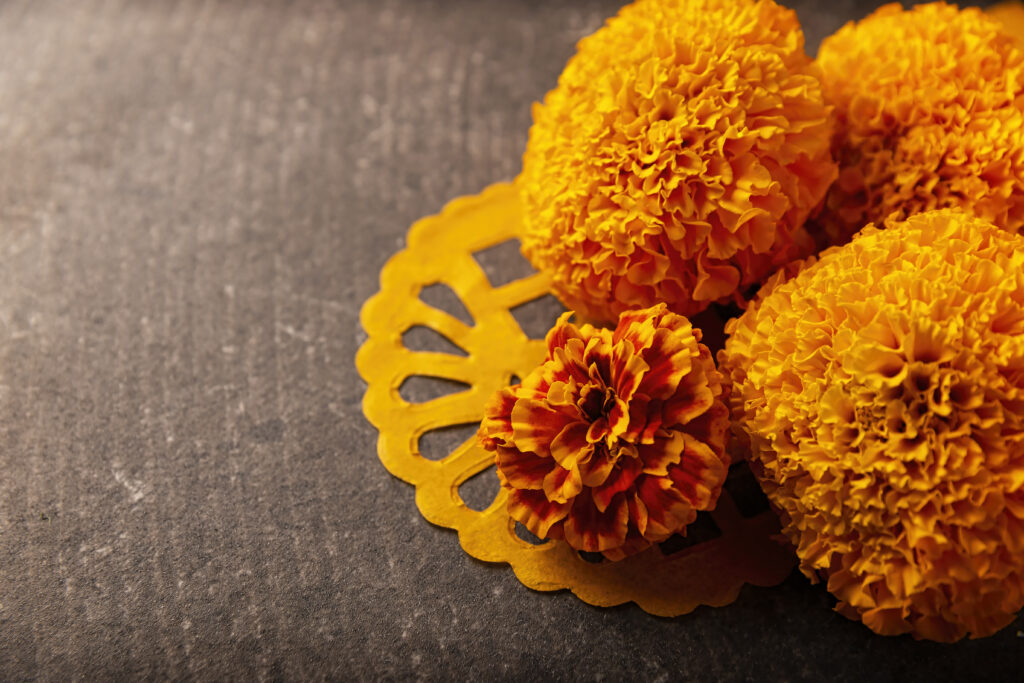
Day of the Dead or “Día de los Muertos” is an event that is commonly celebrated throughout the central and southern regions of Mexico. It is a celebration of deceased loved ones as their souls are welcomed back to Earth for twenty-four hours. This tradition is thousands of years old, dating back to the pre-Aztecs. Day of the Dead is celebrated with food, rituals and flowers. That’s right, flowers are used during Day of the Dead as a guide for souls looking to find their families. This is because of their vibrant and beautiful colors and decadent scent that flowers are a key component to this celebration. More specifically, the marigold or “flor de cempasúchil” is a popular flower for this celebration as its notorious musky smell is strong enough to lead souls to their families. Though marigolds are popularly used for Day of the Dead, there are plenty of other flowers that are used to decorate during the celebration for a variety of reasons!
Marigold: Marigolds are known for their musky smell and vibrant colors that flourish in the fall time. They’re an easy choice as they are beautiful and fairly inexpensive to cultivate. Besides their beauty, many of the flowers used during Day of the Dead have symbolism that makes them popular choices for commemorating deceased family members. Historically, marigolds are known to ward off evil spirits and symbolize positive energy and are referred to as the “Flower of the Dead.” Marigolds usually range from oranges to yellows as they are often compared to the sun (or light) to guide during Day of the Dead!
Chrysanthemums: Mum are a widely utilized flower during Day of the Dead as well. They represent friendship, trust, and optimism. More specifically, white mums are commonly used for this holiday. Their pure white petals and earthy scent is enjoyable on its own, but commonly white mums are used to decorate during the celebration because they represent purity and trust.
Baby’s Breath: Baby’s Breath is a classic accent flower, especially during Day of the Dead. These flowers are small and simple, but that doesn’t take away from their beauty. They’re a classic staple to bouquets and arrangements as they add a pop of color, and accent other flowers, such as marigolds! Their pure white petals in contrast to a marigold’s vibrant yellow and orange petals create a wonderful spectacle to the eye! These flowers are perfect for Day of the Dead as they represent everlasting love.
Cockscomb: Lastly, Cockscomb is a popular flower used during Day of the Dead as they are a vibrant red and used primarily as a religious symbol, as it’s referred to as the “Blood of Christ.” These add a beautiful pop of color to floral arrangements and withstand the hot heat for eight weeks!
Though flowers may be beautiful, their importance runs deeper than just an eye-catching piece of décor. Shop Price Chopper/Market 32 for your floral needs!

Haleigh Eustis
Floral Intern
Flowers are as beautiful to the eye as they are to the soul! Did you know that flowers and plants affect your mental health in numerous positive ways? If you didn’t, that’s okay, that’s why I’m here to explain. There are various ways that flowers aid your mental health, which is in part why we love them so much here at Price Chopper/Market 32. According to Texas A&M University, surrounding yourself with plants, foliage and nature has many benefits that range from stress reduction, increased creativity and even reduction of depression. Though flowers can aid mental health, there are a wide variety of flowers, and it may seem overwhelming to understand certain flowers and their abilities. Here is a breakdown of flowers’ specific roles in impacting mental health:
LAVENDER: This flower is popular for its infamous stress reducing properties! Primarily, we utilize lavender in essential oil and candles. According to the NIH, smelling the floral scent of lavender can reduce stress as the scent relaxes the brain thanks to the Linalool within the plant. Linalool is an aromatic alcohol found in plants that is used in many beauty products. It is a natural therapeutic and can most likely be found in many essential oils. Lavender is suggested for all types of stress, but especially insomnia and post childbirth stress. Smelling this scent before you go to bed, or during a restless night of childcare, has been proven to aid stress reduction and happiness levels over the course of four or five weeks. Click here for all-things lavender!
SUNFLOWER: A fan favorite in August, the sunflower is known to increase a positive outlook as well. Much like mums, these are the perfect flower for happiness due to their bright colors and health properties. Their oils can help reduce stress and, henceforth, put you in a much better mood. Thanks to NIH we understand that along with its stress reducing benefits, sunflower oil consists of an abundance of essential amino acids, vitamin B and minerals. Click here for all-things sunflower seeds!
ROSES: Are you looking to reduce stress, but you don’t like the scent of lavender? Don’t worry, roses serve the same purpose. According to the NIH, inhalation of rose essential oils can be used to reduce stress and act as a natural antidepressant as the flower has a strong floral scent that releases endorphins in our brain that makes us feel relaxed. Along with its stress reducing properties, roses also are used as a natural muscle relaxer as you can use the oil topically. Both lavender and rose can aid in overall stress levels and positive moods. Click here for roses!
While distinct flowers offer particular health benefits, Rutgers University has substantiated that the mere presence of any flowers can promptly enhance positive emotions. Although this insight provides only a glimpse into the world of flowers and their connection to mental health, it’s a wonderful insight into flowers’ benefits and all they provide to us.
Shop all your floral needs at Price Chopper/Market 32 Floral Department!
Haleigh Eustis
Floral Intern
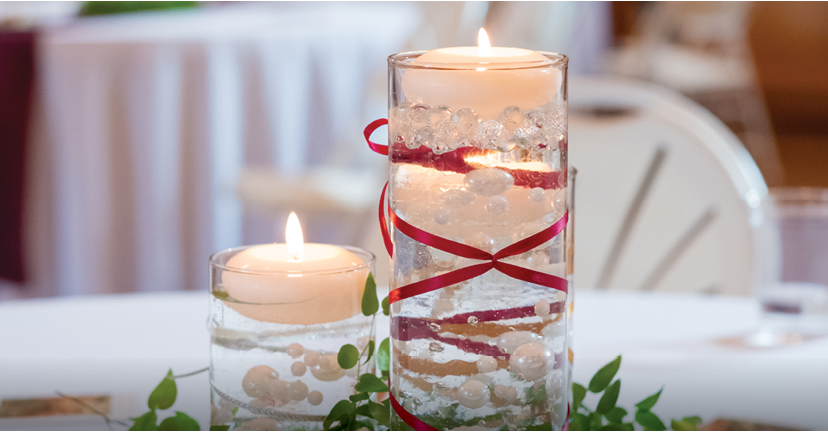
Happy August! Even though summer is slowly starting to wrap up, weddings are still going strong this month. Planning a wedding can be stressful, especially not knowing how to decorate in a “trendy” way. There’s such a push to have unique wedding decor, but inspiration to decorate and collect out of the box ideas can be difficult! What if I told you that creating wedding décor that is out of the ordinary is far easier than you may think?
Floating candles are a novel way to have add an elegant flare to your wedding; they are eye-catching but reserved. Though floating candles are beautiful, they can tend to feel boring depending on the theme and selection of decor you may have. That being said, there is a very simple way to fix this issue!
Let’s Make Floral Floating Candles!
What You Need:
- Flowers! Make sure the flowers you use won’t immediately brown when submerged into water (avoid African violets!)
- Flowers I recommend: Roses, Water Lilies, Orchids and Daises.
- Glass vase (The size is completely up to you, but make sure it is as tall as your flower and there’s extra room on the top for the candle.)
- Flower frog (Check out the link below for the Flower frog. These are used to keep bouquets upright in the vase!)
- Accent gems or rocks (See link below!)
- Floating candles (See link below!)
- Hot glue gun
Let’s Begin!
Step One: Take your flower frog and flowers. I recommend using a maximum of four flowers (all differing in height) for this or else the vase may be too crowded. Using the stems of the flower, place them in the flower frog until you find a look that you like! If you need help using a floral frog, click here for a great video to help you out.
Step Two: Once you have created your bouquet, place a dollop of hot glue on the bottom of your flower frog and place it into the bottom of the vase. Let this cool completely before you continue the rest of your DIY.
Step Three: Once your bouquet is in the vase, take your rocks or accent gems and very carefully place them on the bottom of the vase. You’ll want to completely cover up your flower frog when this is over!
Step Four: Once your flower frog has been covered you will want to take water (room temp or cold water is preferred) and submerge the entire flower. Make sure your vase is tall enough to submerge the entire flower while leaving room for your floating candle!
Step Five: Once you’ve filled your vase with water, take your candle and place it on top of the water. Make sure you have a few back up candles. If they get wet, they won’t light up again! Now, you can light your candle and admire your beautiful floral floating candle!
With unique decoration ideas wedding season doesn’t have to be a hassle! Buy all your floral needs at Price Chopper/ Market 32 Floral Department!
Haleigh Eustis
Floral Intern
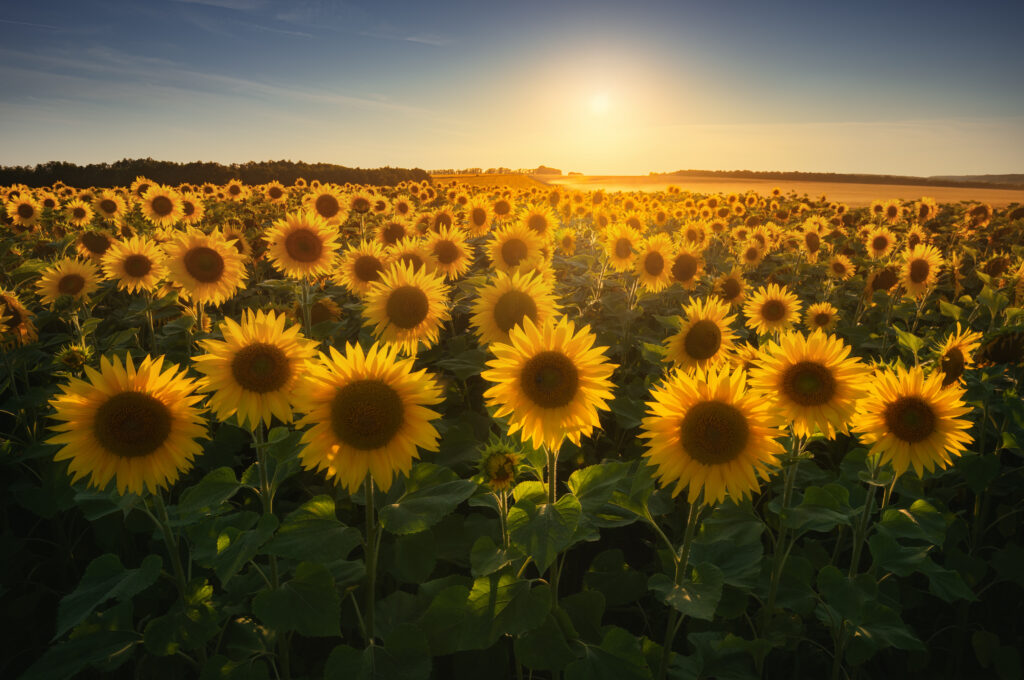
Happy August! As the excitement of summer starts to dwindle down, kids prepare to go back to school, and the air slowly starts to feel crisp and cool. You may be thinking this is the time when flowers are beginning to wither away and prepare for the colder season. Well, think again! Flowers can grow successfully until mid-October and for specific months such as August, flowers are just beginning to flourish! One of summer’s most beloved flowers is the sunflower, which, coincidentally, is the official flower of August! This beautiful and vibrant flower has a rich history that has made it a staple flower in gardens over the decades.
This flower originated over four thousand years ago when indigenous peoples started to cultivate this crop for its health benefits and cooking uses. Though this flower was once previously used for its practicality, once it was brought to Europe many people ignored its health and culinary benefits and used the sunflower for its decorative nature.
As the sunflower migrated throughout Europe and into Asia, many other places in the world started to adapt to this flower. The most notable country is Russia. Russians learned how to extract the sunflower’s benefits while utilizing its beauty in decorations. Because of Russia’s popularized multi-uses for sunflowers, foods like sunflower seeds and cosmetics such as sunflower oil are popular to this day!
That being said, growing these beautiful flowers doesn’t have to be intimidating. Here are a few tips and tricks to grow sunflowers:
- As you’d guess, sunflowers flourish in complete sunlight. Bright areas outside are preferred, rather than any indirect sunlight. The barrier of a window indoors could affect the growing habits of a sunflower so make sure to avoid indoor growth.
- For sunflowers to flourish they need to be planted in well-drained soil. For those who are unfamiliar with what exactly “well-drained” soil is, don’t worry, I can help!
- “Well-drained soil” is almost exactly what it sounds like. For soil to drain well, it needs to be in an elevated container, whether that’s a pot, or a raised gardening bed. To go the extra mile, add compost to your soil to encourage draining.
- Water your flower regularly but wait to re-water after the first few inches of your flower’s soil is dry! Too much watering of your plant will lead to root rot, which no one wants!
- Lastly, these flowers can survive in various temperatures. On average, sunflowers thrive in mid-seventies, but can survive in hotter or colder temperatures as long as they’re planted in a well-drained soil and have a decent fertilizer.
There you have it! Follow these tips to growing a sunflower and you’re sure to grow and thriving and beautiful flower that’s equally has stunning as it is useful. Happy gardening!
Buy all your floral needs at Price Chopper/Market 32 Floral Department!