


Create Jerk Chicken Sliders with King's Hawaiian
Now Available in the Deli/Bakery. Whether you’re cooking for a block party crowd or a special meal with close friends and family, new KING’S HAWAIIAN® Sweet Slider Buns are pre-sliced and slightly larger than our traditional dinner rolls, making them the perfect fit to bring together the flavors of your favorite recipes, from pulled pork and mini-burgers to BBQ chicken.
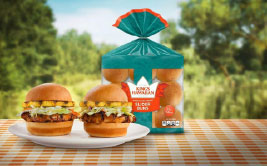
Try this recipe for irresistible Jerk Chicken Sliders made with KING’S HAWAIIAN® Sweet Slider Buns:
Prep Time: 15 minutes | Cook Time: 15 minutes
Serves: 4
Ingredients:
- 4 (2 ounce) Chicken cutlets
- 4 Pineapple rings
- 4 ounces Jerk chicken seasoning
- 4 ounces Jerk chicken sauce
- 8 ounces Coleslaw
Preparation:
- Step 1: Rub raw chicken with Seasoning or Rub
- Step 2: Grill chicken while basting with Jerk Chicken Sauce until done
- Step 3: Grill Pineapple Rings
- Step 4: Make or Purchase Coleslaw
- Step 5: To assemble the sliders, place slider buns on plate with both sides open faced
- Step 6: Place Jerk Chicken on the Heel Bun, then top Jerk Chicken with Coleslaw
- Step 7: Place Grilled Pineapple slice on top of Coleslaw
- Step 8: Place Crown Bun on top of Pineapple

Silly Egg Head Planters by Jodie Fitz
Whether you’re an avid gardener or a novice, these eggshell planters are a great way to craft and recycle while celebrating Earth Day and starting your garden prep. You can plant vegetables, fruits or herbs, and if you don’t like to garden, you can plant flowers or grass and still have fun!
Supplies Needed:
Eggs
Egg Carton
Vegetable or herb seeds
Colorful permanent markers
Seed starting potting mix
Plastic Spoon
Easy Instructions:
To prepare in advance, when baking or cooking with eggs in the days before the activity, crack them at the top so that you keep three-quarters of the eggshell intact.
- Place the empty eggshells in an egg tray and let dry overnight. The tray will provide stability for your eggs once they are planted.
- Gently create silly faces on the eggs using permanent, colorful markers.
- Using a small plastic spoon, fill the eggs with potting soil.
- Add 1 to 3 seeds (depending on what you are planting) into the dirt and cover the seeds with a little more soil.
- Water the plants.
More on making Silly Eggshell Planters:
All Planted: Keep your silly egg heads in a sunny window and water as needed. Germination time depends on the plant. You can learn more on your seed packet(s).
Find the Supplies: You can find almost everything you need for this activity when shopping at Price Chopper/Market 32.
- Markers: school supply aisle.
- Plastic spoons: paper supply aisle.
- Eggs: dairy aisle.
- Seeds: floral department.
- Potting soil: seasonal aisle or floral dept.
Watering Suggestion: PICS brand paper coated cups are great for watering. You can squeeze the cup to create a spout and control the amount of water. They can also be found in the paper supply aisle.
Transplanting: Eventually, the seedlings will outgrow the eggshells. You can transfer them to a larger planter or your garden, depending on the weather. Gently break the shell and plant it with the seedlings; it helps to feed the soil and your plant.
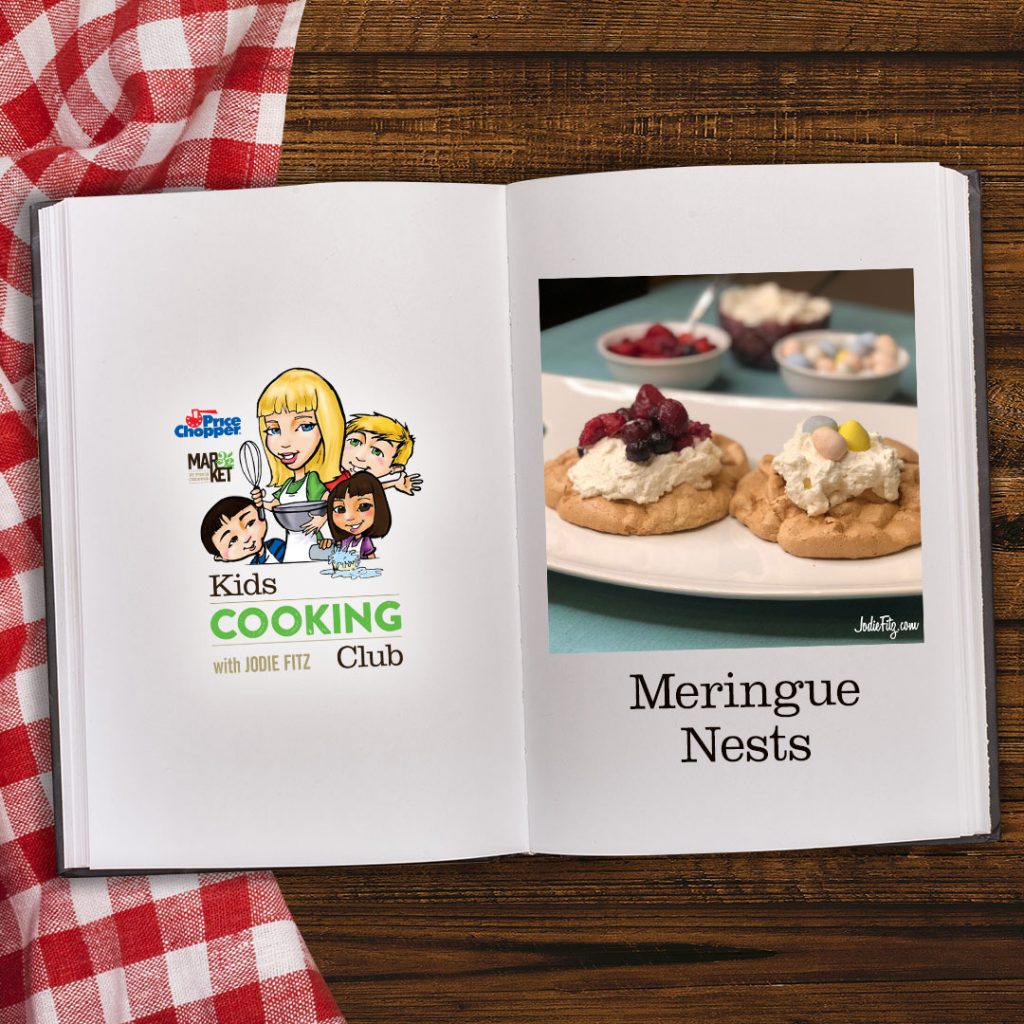
Meringue Nests
by Jodie Fitz
5 egg whites
2 teaspoons PICS vanilla extract
1 cup PICS light brown sugar
8 oz. PICS whipping cream
1/4 cup PICS confectioner’s sugar
1 teaspoon PICS vanilla extract
Pre-heat the oven to 325 degrees. Spread the brown sugar on a non-stick baking sheet. Place it in the oven for approximately eight minutes, remove it and let it fully cool.
Place the dried brown sugar into a mini chopper or food processor to bring it to a dried, granulated state.
Beat the egg whites with an electric mixer until they form stiff peeks. Add in the vanilla extract and sprinkle in approximately an 1/8 cup of the granulated brown sugar at a time and continue to mix with the electric mixer until it has all been added and mixed thoroughly.
On a piece of parchment paper, make approximately four – 4” circles with a permanent marker. Flip the paper so that the ink is face down on a nonstick baking sheet; you will be able to see the lines through the paper. Using a spoon to scoop the meringue onto the paper on the inside of the ring. Bake the meringues at 325 degrees for 30 – 35 minutes.
Turn off the oven, but open it a crack and let the meringues cool in the opened oven for an additional 35 – 40 minutes.
Just before serving, add the whipping cream, confectioner’s sugar and vanilla extract together in a mixing bowl. Whip until it is stiff.
Fill each nest with cream and top it off with Cadbury mini chocolate filled eggs with the crisp colored shells or PICS frozen mixed berries that have been thawed.
Egg White Time Tip: Yes, you can crack the eggs and separate the yolk from the whites. However, then you have all of the yolks that you either toss or find another way to use. Or, you can simplify and buy the PICS egg whites located near the regular eggs at your Price Chopper and Market 32 Supermarkets.
Drawing the Circles: I trace a small bowl, but you can use a ruler or protractor to create the circles as well. Just make sure you turn the ink side down before adding the meringue. You can make smaller circles for smaller bites if desired.
Storing Extras: If you have additional nests and cream, store them separately.
Cooking with Kids: Every recipe is filled with life skills that help to encourage children’s confidence in the kitchen. Here are a few to focus on when making this recipe;
- Separating eggs
- Whipping eggs
- Electric mixer safety
- Scooping
- Baking
- Oven safety
- Mini chopper or food processor safety
- Measuring ingredients
- Following directions

Mission Style Burritos by Jodie Fitz
1 Rotisserie cooked chicken
1 – 15 oz. can of refried beans, traditional or black bean
½ cup PICS sour cream
2 tablespoons taco sauce
Fresh salsa
2 pounds PICS frozen corn
1 green bell pepper
1 lime
Fresh cilantro
Avocado
PICS shredded Mexican cheese blend
Tortilla wraps, large
PICS butter

Remove the chicken from the bones and cut the chicken into small pieces.
Remove the refried beans from the can and place them in a bowl.
Stir the sour cream and taco sauce together. Keep it refrigerated until you are ready to build your burritos.
Prep the salsa by either opening a container or making it (see below).
Cook the corn and drain it.
Wash the green bell pepper, remove the seeds and dice it.
Chop a ½ cup of fresh cilantro.
Stir the corn, bell pepper and chopped cilantro together. Cut the lime in half and squeeze the fresh juice onto the corn mixture and stir it together.
Remove the skin and seed from the avocado and cut it into slices.
Steam the tortilla wraps by placing one on a plate, placing a damp paper towel over the top and put it in the microwave for 20-30 seconds.
Add the ingredients to the center of your tortilla; refried beans, fresh salsa, the corn mixture, the chicken, the cheese and fresh avocado.
Fold the tortilla burrito style by folding in the sides and rolling it up.
Melt a little butter in a skillet style pan; just enough to coat it. Toast the burritos on either side like you would a grilled cheese.
Rotisserie Chicken: You can find this in the prepared food area at your Price Chopper and Market 32 Supermarkets.
Salsa: You can find fresh salsa in the produce aisle at your Price Chopper and Market 32 Supermarkets. Or, you can make your own.
Simply place 1 pint of grape tomatoes with ½ cup of finely diced sweet onion into a mini food chopper or food processor and chop the ingredients. Add in 1 green bell pepper that’s been rinsed, seeded and diced along with 1 clove of peeled garlic and chop them together with the tomatoes and onions. Add in a ½ cup of fresh cilantro and 1 tablespoon of PICS balsamic vinegar. Chop again and serve.
Extra Corn: Simply serve it on the side or add it to the top of a salad if you have extra.
Spanish Rice: Spanish rice is a great side dish and can be added into the tortilla as part of your burrito or served on the side.
The Plastic Knife: If you have younger children, they can help to cut many of the ingredients in the recipes to help strengthen this motor skill. For example, cut the bell pepper into strips and let them cut it into small pieces. Or, remove the avocado from the skin, let the children cut it into strips.
Cooking with Kids: Every recipe is filled with life skills that help to encourage children’s confidence in the kitchen. Here are a few to focus on when making this recipe;
- Measuring ingredients
- Stirring
- Cutting skills
- Knife Skills
- Dicing
- Avocado prep
- Burrito folding
- Stove top safety
- Following directions
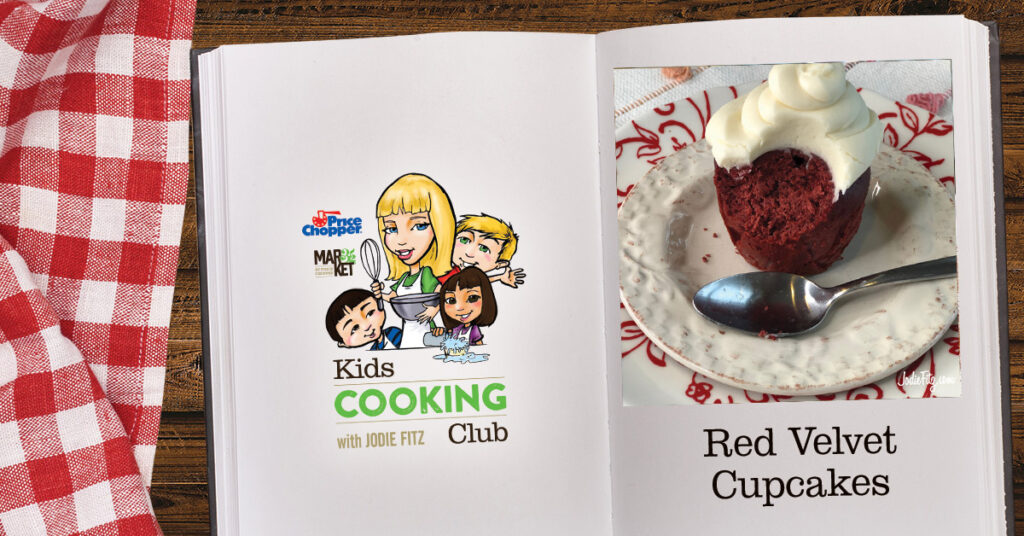
Healthy Red Velvet Cupcakes by Jodie Fitz
3 PICS eggs, large
1-cup buttermilk
¾ cup PICS brown sugar
¾ cup PICS granulated sugar
2 teaspoons PICS vanilla extract
4 oz. PICS cinnamon applesauce
½ cup PICS pureed beets (see below)
1 ½ cups PICS all-purpose flour
½ cup PICS cocoa powder, unsweetened
1 teaspoon PICS baking soda
1 teaspoon PICS baking powder
1 teaspoon PICS salt
1-tablespoon red food dye
Combine the eggs, buttermilk, brown sugar, granulated sugar, vanilla extract, applesauce and pureed beets together in a bowl. Whip the ingredients together using an electric mixer.
Once they are mixed well, add in the dry ingredients; the flour, cocoa powder, baking soda, baking powder and salt.
Mix in the red food dye.
Preheat the oven to 350 degrees.
Line a cupcake/muffin tin with cupcake liners. Fill the cupcake liners with the batter. Bake the cupcakes for 25 minutes.
Pureed Beets: Simply purchase sliced or diced PICS beets. Drain the liquid. Place the beets in a food processor, mini chopper or blender and puree them until the look like a purple applesauce.
Original Red Velvet Cupcakes: When this recipe originated, the cupcakes turned a natural burgundy through a chemical reaction that took place with certain ingredients. Over time our ingredients have changed and cocoa powder is now alkalized so the chemical reaction no longer naturally occurs.
Red Food Dye: If you have an allergy to red food dye, you can eliminate the red food dye all together. The color will lean towards a darker burgundy. A typical red velvet recipe requires ½ cup of red food dye. This recipe allows us to greatly reduce the amount of red food dye used.
Top it off! Simply serve with a traditional Cream Cheese Frosting by combining a ½ cup (1 stick) of PICS butter at room temperature with 8 oz. PICS cream cheese at room temperature, 3 cups of PICS confectioner’s sugar and 2 teaspoons of PICS vanilla extract.
Pipe it on top of the cupcakes using decorating utensils or simply fill a quart sized snap and seal freezer bag and clip a corner to pipe on the frosting.
Cooking with Kids! Every recipe has lessons, small and big, that encourage life and cooking skills. Here are a few to focus on:
Measuring ingredients
Level ingredient measurements
Pouring
Pureeing
Food processor safety
Scooping
Baking
Oven safety
Following directions

Chocolate Covered Strawberry Smoothie by Jodie Fitz
3 cups PICS fresh frozen strawberries
1 ½ cups PICS low fat milk
1 tablespoon PICS unsweetened cocoa powder
1 teaspoon PICS vanilla extract
2 tablespoons PICS honey
Add the fresh frozen strawberries, milk, cocoa powder, vanilla extract and honey into the blender. Blend well; until everything is thick and creamy like a milkshake.
NOTE: Make sure the 1-tablespoon of cocoa powder is a level measurement.
Dairy Allergies? Swap the low fat milk with your favorite dairy free milk alternative; rice milk, almond milk, cashew milk, coconut milk, oat milk, etc.
Fun Facts:
• A strawberry can have up to 200 seeds on it!
• Strawberries are a source of vitamin C.
• Cocoa powder has been dated back before the Mayans; an ancient civilization.
Cooking with Kids! Every recipe has lessons, small and big, that encourage life and cooking skills. Here are a few to focus on:
• Measuring ingredients
• Level ingredient measurement
• Blending
• Blender safety
• Pouring
• Following directions

Round up your change at checkout during February and March and help support MDA!
When you give, you help kids and adults living with muscular dystrophy to get the services and
support they need to live longer
and grow stronger.
• MDA is leading the fight to free individuals from the harm of muscular dystrophy, ALS, and
related muscle-debilitating diseases that take away physical strength, independence, and
life.
• MDA helps to uncover breakthroughs that will accelerate treatments and cures, provides
patients with early diagnosis, highly specialized care, and access to clinical trials.
• During February and March, all stores will participate in our annual MDA fundraising program.
• By collecting donations at our registers, we’re helping kids and adults in our community live
longer and grow stronger.
• 100% of the proceeds stay local.
• Thank you for your support!
mda.org
NOTE: Comments on this blog are not monitored and will not be replied to. To contact our Customer Service team, please click here.
By Savannah Wallace, DisneyBaby.com
Soren has extremely sensitive skin, and we’re always combating some type of flare up – anything from eczema to diaper rashes. After Soren’s surgery in August, he got a horrible diaper rash that took some time to clear up, and ever since then, it sometimes flares up here and there.
Thankfully, we’ve found a couple of extremely helpful methods to help prevent icky rashes before they get out of control.
1. Cream – Using a diaper rash cream as a preventative has been so helpful for us. We have a few different creams on hand. One is more natural and not too strong; another has a little more kick; and the third one is an anti-fungal for the yeast-based diaper rashes. If I notice any redness, I’ll start with the natural cream, and that usually makes it go away quickly. If it sticks around, I’ll apply something a little stronger. More often than not, I apply a little bit of the natural cream during our nighttime routine.
2. Baby Powder – Baby powder not only smells pleasant, but it’s great for keeping the area dry. If baby is sitting in a wet diaper for too long, it can perpetuate a diaper rash. Powder creates a great protective dry layer for baby. I usually apply powder a few times each week.
3. Nighttime Diaper – This was a game changer for us. We are huge fans of Huggies OverNites diapers. Not only do they help baby sleep better throughout the night, but they also help keep the diaper area dry. During Soren’s nasty bout with diaper rash, I noticed regular diapers made it worse, and slowly every morning, the area looked more and more irritated. As soon as we switched to overnight diapers, it started clearing up and we could focus on letting the creams really do their job.
4. Change Baby Often – We noticed that if a rash looked like it was trying to flare up, we would be more intentional about changing his diaper frequently throughout the day in order to help keep the area dry.
Best wishes on helping prevent icky rashes on your little one!
These quick tips will save you time, sanity, and maybe even your wardrobe.
- Always pack at least two more diapers than you need. Because just when you get cocky about having had an extra one on hand, your baby is sure to have her poopiest day yet.
- Restock! Whenever you get home from an outing, restock your diaper bag. It’s one of those little things that’ll make you feel super organized and smart.
- Order diapers and wipes online. Let’s see, you could drive to the store for diapers between feedings, wait in line, get stuck in traffic, and haul the heavy bags home. Or you could click one pre-set button. Be the smart mom: Click.
- BYO trash bag. “I always pack a plastic grocery bag to avoid the uncomfortable situation of having to throw a smelly diaper in someone’s kitchen garbage,” says Allison Brown, a mom of one in Ridgewood, New Jersey. Her friends are grateful—and yours will be too!
- Duck and cover! “As newborns, both of my boys had the tendency to pee as soon as the cold air hits their privates,” says Brenna Paransky, a mom of two in Raleigh, North Carolina. “I learned quickly the open-diaper-and-cover routine.” Use a wipe or an extra diaper to keep the surprise spray in check.
- Open up the new diaper before taking off the old one. “Sometimes babies are super-squirmy,” says Karen Lesh, a mom of two in Cheshire, Connecticut. “The faster you can get the new diaper on, the better!”
- Keep a package of one-size-up diapers on hand Growth spurts are real, and they happen seemingly overnight.
- And when you do find yourself with leftover too-small diapers… “For goodness’ sake don’t throw them away,” says Francesca Donner, a mom of one in New York City. “Find a neighbor, a community center, or a homeless shelter to donate them to and you’ll make someone else happy—and feel good, too.”
- Want to help out? Check out Huggies’ No Baby Unhugged Program, which has donated over 225 million diapers to babies in need.