
8 Ways to Love A Bag of Oranges (or Citrus)
Ellie Wilson
MS, RDN Manager, Lifestyle and Wellness
The cheery view of a bowl of fruit on your counter in the winter is also a good way to remind yourself (and your family) to eat more every day! Americans have plenty of room to enjoy more fruit as part of their healthy habits – here are some fresh ideas for enjoying a bag of oranges (and other bagged fresh citrus options) that will color your plate with great!
- Sweet and Simple – Peel a fresh navel orange and indulge in the fresh, juicy goodness! You can also slice them into wedges and share, a good idea for smaller children. Surprise them with the aromatic, juicy Cara Cara orange, with its spectacular rosy color! There may be a few seeds, so check before sharing!
- Slice any citrus fruit into rounds, and place on parchment paper on a sheet pan. Freeze, and then bag for use in water or as fun garnish for beverages, desserts, seafood – your call!
- If you are juicing an orange, or any other citrus, roll it first to max extracting juice from the pulp – the little juice vesicles in the fruit segments. That will ensure you get as much juice as possible. Then, toss the spent halves into a bag in the freezer, to use for zest and a few other ways we will share – keep reading! Check out the kitchen section in stores for great citrus press to make it easy!
- Segment an orange, mandarin, minneola tangelo, grapefruit or pomelo, and add to any fresh salad. Oranges, mandarins and tangelos pair beautifully with peppery arugula (rocket) greens and vibrant radicchio. Fresh baby spinach is mild and pairs with all citrus. Grapefruit and pomelos like sweet, buttery lettuces, with a sweet dressing, like a light raspberry vinaigrette. Check out your favorite fresh salad kit – add mandarin segments to chipotle cheddar, orange segments to honey pecan, and grapefruit to enhance poppyseed. A squeeze of fresh lemon on a bagged Caesar salad brings some added zing to that savory staple!
- Sweet salvage – Those leftover peels and halves are good for some, such as dried for potpourri (easy to drop into a small crockpot with a cinnamon stick!), or zested into sugar or salt and used for seasoning. For those who prep early – there is just enough acid in the spent citrus halves/peels to minimize browning in cut apple or potato – just drop one of the frozen halves in the water before you cook/serve them.
- Citrus serves up flavor, color and energy in spritzers, smoothies and spirits. Cocktail and mocktail drinks with lime, lemon and orange are plentiful, with quite a few on the recipes link at Pricechopper.com. Don’t forget the grapefruit – brighten up your day when you slice them up and garnish grapefruit drinks, sparkling waters, and grown-up only shandies and hard seltzers.
- Sassy salsas – Chopped orange, grapefruit, or mandarin, with some chopped onion, garlic and herbs (rosemary, parsley, cilantro, basil all work) and zest from the fruit make a super salsa topper for chicken, turkey, pork or seafood.
- Clean up time – If you are exploring cleaning with white vinegar, consider dropping a few solid peel slices into the vinegar first – they should infuse for about a week. The peel will release its acid and aroma into the vinegar, adding a little cleaning energy and fresh scent to the spray. A 50/50 mix of infused vinegar and water in a spray bottle will arm you with a fresh way to clean up!

Snowman Breakfast Pizza by Jodie Fitz
PICS cauliflower pizza crust (two pack)
2 cups fresh baby leaf spinach
8 PICS eggs, large
1/4-cup PICS low fat milk
8 oz. PICS sharp cheddar cheese, shredded
Fresh veggies
PICS nonstick canola cooking spray
PICS canola oil
Sea salt
Black pepper

Preheat the oven to 375 degrees.
Coat a baking sheet with a nonstick cooking spray. Lay the two pizza crusts onto the baking sheet overlapping them slightly to create your snowman shape.
Baste the crusts with a very light layer of canola oil.
Chop the spinach into small pieces and evenly distribute that on top of the pizza crusts.
In a microwave safe bowl coated with nonstick cooking spray, whisk the eggs, milk, sea salt and pepper. Microwave the mixture for 2 minutes, remove and stir. Repeat until the eggs are cooked, using two-minute intervals, 4 to 6 minutes total.
Spread the scrambled eggs onto the pizza crusts.
Top it off with the shredded cheese.
Add fresh veggies to create a snowman by adding two eyes, a nose, a mouth and buttons.
Bake for 15 – 20 minutes.
More About Making this Recipe!
Pizza Dough? You can use traditional or whole-wheat pizza dough, if preferred. Simply separate the dough into 1/3 and 2/3 pieces, then roll out the larger piece into an oval (the body) and the smaller piece into a circle (the head) and place them onto a baking sheet coated with nonstick cooking spray. Follow the rest of the directions listed above, and bake for 20 minutes.
Bake the pizza at 375 degrees for 20 minutes and enjoy!
Where’s the Dough? 2-pack PICS cauliflower pizza crusts are found in the pizza section of the freezer aisle at Price Chopper/Market 32. Traditional dough is located in the dairy aisle.
PICS? PICS is the preferred brand of Price Chopper/Market 32 Supermarkets.
Cooking with Kids! Every recipe has great lessons to focus on that encourage life skills in the realm of cooking.
- Rolling dough
- Fractions
- Chopping
- Knife safety
- Shredding
- Grater safety
- Layering
- Basting
- Baking
- Oven safety
- Following directions

The Melted Snowman Smoothie by Jodie Fitz
3 cups ice
1½ cups low-fat milk
6 oz. PICS low fat vanilla yogurt
1 banana
3 tablespoons PICS honey
1 ½ teaspoons PICS vanilla extract
Add all ingredients to a blender, blend well and serve.
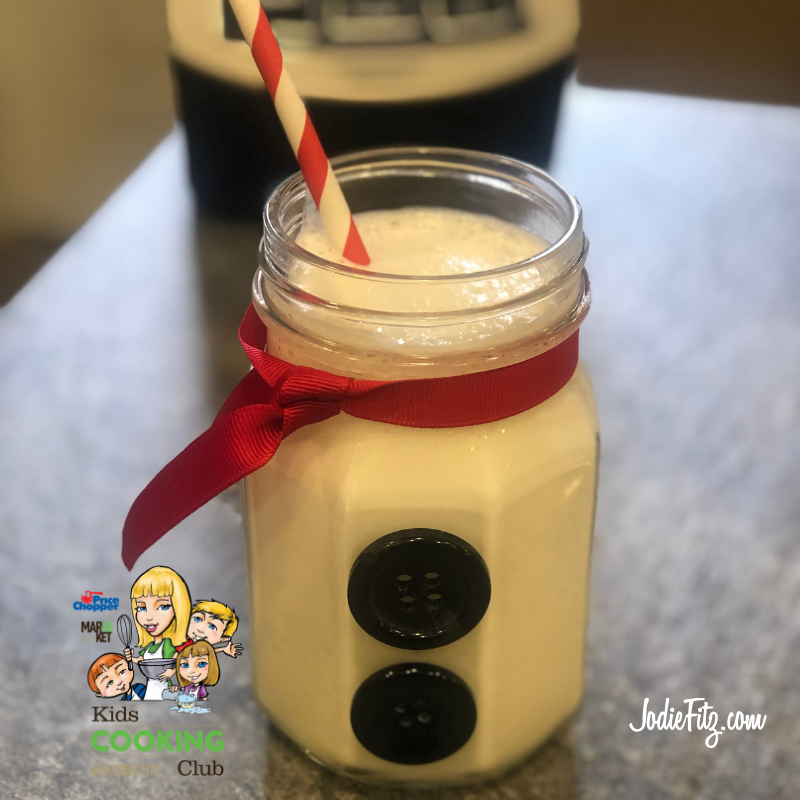
Create a Snowman Mason Jar! This craft is simple and fun. Here are the supplies you will need:
Mason jar
Ribbon
2 buttons
Double stick tape
Scissors
Decorative Paper Straws (optional)
Measure, cut and tie ribbon around the jar rim and adhere two buttons to the front of the jar with double stick tape. Serve your Melted Snowman with a colorful paper straw.
Dairy allergies? Substitute your favorite dairy free yogurt and milk alternatives. Coconut based products help keep this recipe thick and creamy.
Cooking with Kids! Every recipe has lessons, small and big, that encourage life and cooking skills. Here are a few to focus on:
- Measuring ingredients
- Peeling a banana
- Blending
- Blender safety
- Pouring
- Following directions

Kodiak Cakes - Energize a Protein and Whole Grain Habit!
Ellie Wilson
MS RDN Manager, Health and Wellness
New Year’s resolutions to embrace healthier habits inspire shoppers to look for new products and ideas. So many are working and managing school from home these days, I love finding solutions that connect the dots including easy-to-make, kid-friendly, travel-friendly, versatile and nutritious. The Kodiak Cakes products are delicious solutions with unique benefits to explore.
Power Cakes
The signature flapjack and waffle mixes, in Buttermilk and Honey or Dark Chocolate flavors, are a great starting place. Just add water, and these mixes will kick the day off with over 5 grams of protein per serving, (up to 14 gms in the Dark Chocolate mix!), 100% whole grains, and a good source of fiber to stay full and focused on the morning to-do list. Make extra and freeze them – they make a great lunch, snack or “breakfast-for-dinner” treat. These mixes can also be used for muffins, even batter for chicken nuggets or veggies (did someone say air fryer?). Bonus – both mixes earn the Know Your Colors nutrition guide tags for Protein Smart and Whole Grain!
Frozen Waffles and Flapjacks
The same whole grain goodness and even more convenience when you add these to the basket! Flavors adults and children love, and something older children/teens can make themselves, so super for beyond breakfast snack attacks! All three flavors – Buttermilk Vanilla, Dark Chocolate, and Blueberry Chia make the grade for Know Your Colors Whole Grain and Protein Smart.
Baking Mixes
You know you have a hit when your 17-year-old decides to make the protein-packed cornbread into muffins he can take to school! With 10 gms of protein per prepared serving, as well as 3 gms fiber and less than 10 grams of sugar, this item hits the mark and aligns with several of the healthier eating recommendations reinforced last week with the release of the new Dietary Guidelines for Americans – increase whole grain intake, increase fiber intake, and limit added sugars. Check out the whole line – the brownie and blueberry mixes are also made with whole grains, check the labels for more nutrition information and some great recipe variations on the side of the box.
Oatmeal Cups
Another hit with all age groups – these power 100% whole grain breakfast cups are easy and delicious, with flavors like Maple Brown Sugar – just add water (or milk, for a little extra nutrient boost) and cook in the microwave while coffee is brewing, they are also great for tweens and teens starting to cook, (placed strategically at the front of the pantry to inspire better after-school snacking on a cold day), and are a smart item to keep handy in a desk drawer at work for a power lunch. Bonus – they earn the Know Your Colors Protein Smart guide!
Granola Bars, Protein Balls and More
Kodiak Cakes is a company on a mission to bring whole grains, protein and flavor together in ways that really work for today’s health-seeking shoppers and families – check out their products throughout the store, for more solutions that will energize your whole grain and protein habits!

Cooking Up Well-Being in the New Year
Ellie Wilson
MS, RDN
Can the challenging times of the last year help us approach the benefits of food and medicine differently in the new year? The answer is a resounding YES! The New Year is time for a fresh start when it comes to health, so let’s look at some ways we can move towards that goal from wherever you are starting from.
The Recipe
The Price Chopper/Market 32 website can help you find resources, food items and information – the ‘ingredients” you need to create a more healthful lifestyle. Cuddled up on the couch on a cold January day? One of those couch sessions is a great time to take a digital tour and activate wellness efforts with personalized food shopping and medication management.
On the website, the toolbar at the top offers shortcuts to functions that can help you shop quickly and confidently. The first link is to the Shops Online dashboard, where you can create shopping lists, order online and make choices using the Know Your Colors nutrition guides. These color-coded guides include lifestyle choices such as Gluten Free, Organic, and more. You can learn all about the Know Your Colors program on the Pharmacy Health and Wellness page. The criteria that define the nutrition guides are all based on federal and recognized non-profit Health Association standards that support general nutrition lifestyle goals. The color-coded guides are visible on shelf tags that make in-store shopping quick and easy.
More resources at Price Chopper/Market 32 include the cutting-edge programs, easy-to-use pharmacy app, blood pressure kiosk and more you can find at the Price Chopper/Market 32 Pharmacy. Our Pharmacy teams work hard to ensure patients have the medication they need to stay well. The pharmacy app has many features, including a list for re-ordering, and reminder alerts to ensure meds are not missed. You can also sign up for text notifications to stay connected with pharmacy alerts. Food and medicine together can be a dynamic duo when managing chronic health issues – making it easier to do both is part of our commitment to you.
Make a Great Plate
The updated Dietary Guidelines for Americans were released last week. No surprise, fruits and vegetables lead the recommendations. Including good sources for protein, nutritious dairy, and reducing sugars are all part of the guidance. The Know Your Colors nutrition guides, also based on those guidelines, can help you activate those recommendations as you make food choices throughout the store. Start off with easy changes, such as doubling up favorite veggie servings, enjoying milk with meals, and choosing Low Sodium versions of the foods you usually buy. Each of the Know Your Colors guides can help you explore products that may support your personal health goals throughout the store.
Get Active
There are so many benefits from all kinds of movement. Check out this Think Lifestyle, Not Resolution blog from professional trainer Antoni Favata for some ideas that will help you frame how to think about reaching for your wellness targets in the New Year.
Happy, Healthy New Year from all of us at Price Chopper/Market 32!

Think Lifestyle, Not Resolution
Antoni Favata
NASM-CPT, CES, CF-L1, FMS, SGX-OS
You hear about it year after year. Creating resolutions to begin a new year with a new you on Jan. 1. For a lot of people these resolutions focus around health and fitness.
However, most people with good intentions who set these realistic goals tend to lose steam and momentum come February.
So, what can we do to ensure our success with these not so lofty goals?
Here are a few tips to keep you on track and on target so you hit your mark and maintain your achievements for years to come.
- Think Lifestyle, Not Resolution
We often think of these resolutions in terms of extremes. Instead, we should think of these choices as a way of life and incorporate small changes every day. Change your mindset from “all or nothing” to “one day at a time.”
- Smaller, Manageable Habits
Small habits are not only more attainable, but easier to manage and maintain. Start with easier changes and build on them as they become regular practice. Smaller habits help you stay more motivated, too! Development and success of these smaller habits creates a growing sense of achievement as you get closer to a larger goal.
- Variety
It’s true, most of us struggle with having a short attention span. And for a lot of people that short attention span affects our fitness routine, which can derail progress. Even the word routine can be daunting for some. Fortunately, these days the Fitness Industry is not short on options. Keep exercise and movement fun by mixing up your routine. Subscribe to something new and exciting. Variety will help keep you on track by providing a new challenge to help keep your mind and body stimulated.
Instead of New Year’s resolutions set intentions instead, focusing on manageable lifestyle changes that will set you on a path to success.
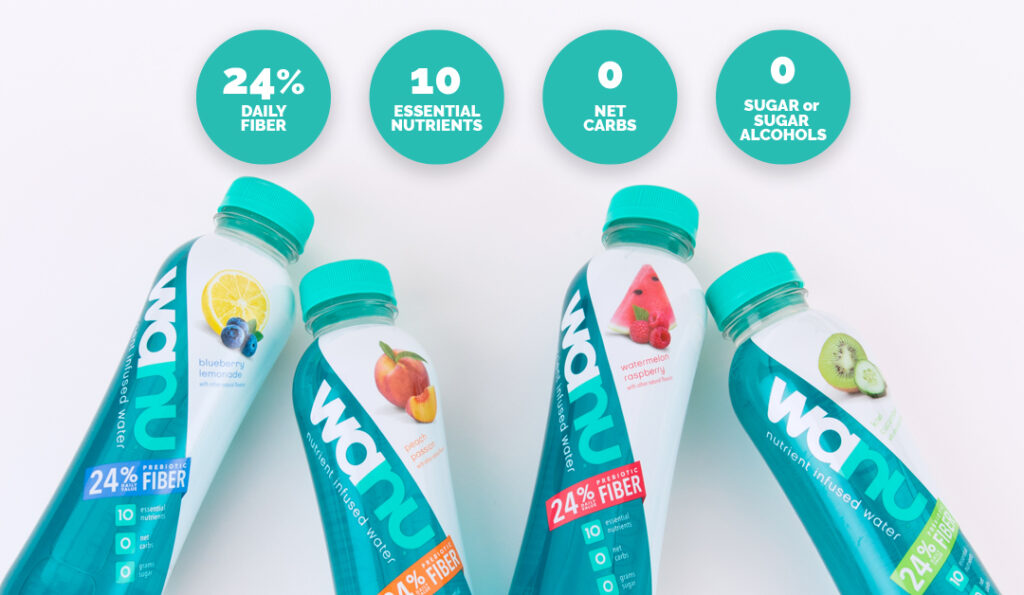
New Items: wanu water
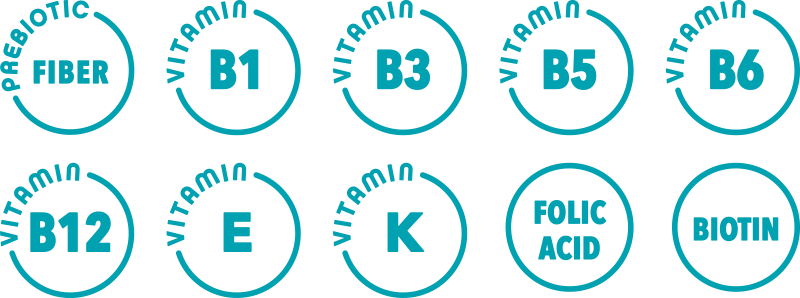
“95% of American adults are deficient in fiber, so we created wanu water as an easy + delicious way to get 24% of your daily fiber intake in every bottle. With 7g of plant based prebiotic fiber + 9 other essential nutrients, wanu supports a healthy immune system + digestive system, as well as naturally boosts your energy + metabolism while you hydrate!” – Todd O’Gara, Founder
wanu water is now available at your local Price Chopper in (4) refreshing flavors: Blueberry Lemonade, Peach Passion, Watermelon Raspberry, and Kiwi Cucumber.
Natural fruit flavors, paired with the perfect balance of a monk fruit/stevia blend, form wanu’s unique + delicious recipe. With no sugar, artificial sweeteners, or sugar alcohols, wanu makes it easy to stay healthy + hydrated when you want more than just plain water.
With 100% B12, you can enjoy wanu before a workout or as an afternoon pick-me-up for a natural energy boost. It’s also the perfect non-dairy alternative for smoothies, healthier mixer for cocktails, and base for homemade popsicles!
wanu Immune Boosting Citrus Smoothie
Ingredients:
- 1 cup frozen mango chunks
- juice of 1 lemon
- ½ tsp ground turmeric
- ¼ tsp ground cayenne pepper
- ¾ cup fresh squeezed orange juice
- 2 tsp fresh grated ginger
- 1 small red beet, chopped
- 1 cup frozen raspberries
- 1 orange, peeled
- ½ cup Watermelon Raspberry wanu
- Chia seeds for topping (optional)
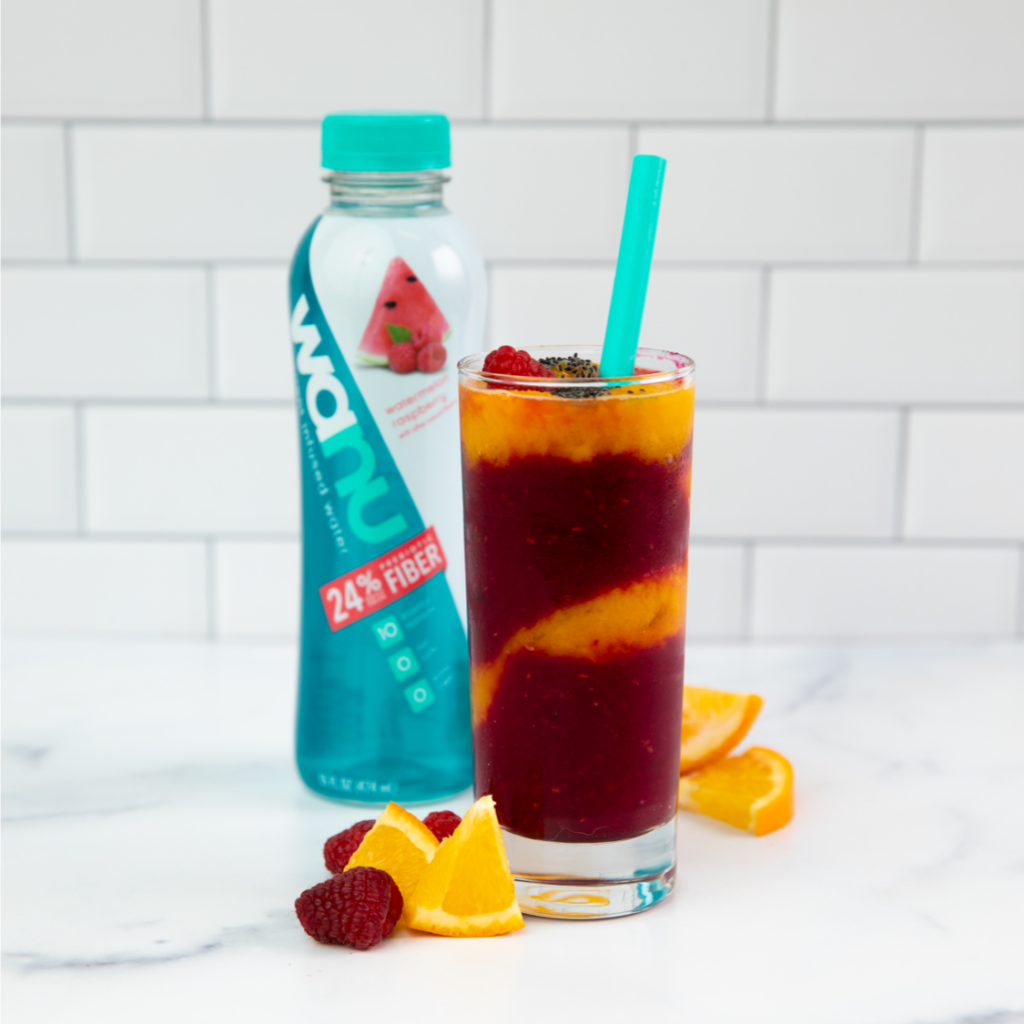
Directions:
- In a blender, combine the mango, lemon juice, turmeric, cayenne, ginger, and orange juice. Blend until completely smooth. Pour into a tall glass.
- Rinse the blender out. Combine the beets, raspberries, orange, and wanu water. Blend until smooth and creamy, adding more wanu water if needed to reach your desired consistency. Pour over the mango mixture and stir gently to swirl. Top with chia seeds, if desired.
Find wanu in the enhanced water/functional beverage aisle!

Celebrate with Cheese Pairings!
For many, cheese is a staple when it comes to celebrating, especially during the holidays. Luckily, our in-store delis provide a plethora of tasty cheeses, perfect for pairing with a relaxing drink. We’ve created a list of some of our favorites, each with their ideal beverage pairings. Try these options below and find your new favorite combination!
Vermont Creamery Honey Goat Log: Vermont Creamery Clover Blossom Honey Goat Cheese takes Vermont’s classic, mild fresh goat cheese and blends it with sweet clover honey. The honey pairs perfectly with the tart creaminess of fresh goat cheese. Try it with Barbera wine, Founders All Day IPA or a Belgian Tripel Beer like Ommegang’s Three Philosophers.
Fleur de Franco Brie: A beautiful wheel of French double cream Brie, Fleur de Franco is pleasantly mild and approachable, yet fully flavored with a buttery interior and soft, fluffy rind. Pair it with a sparkling wine, Chardonnay, or a German pilsner like Saranac Adirondack Lager.
Grafton 2 Year Old Cheddar: Fits the classic profile of a New England Cheddar: buttery notes with a bold, sharp tang and a long, nutty finish. The aroma is lactic and bright, with flavors of sweet cream, freshly mown hay, and tangy, cultured milk. Completed by a moderate acidity. Pair it with balanced, full-bodied wines such as Merlot or White Burgundy, or brews such as Smuttynose Old Brown Dog Brown Ale, Brooklyn Brewing Bel-Air Sour Beer, or even Angry Orchard Hard Cider.
Market 32 American Grana by BelGioioso: Made from freshly gathered local raw milk, this premium American Grana Parmesan cheese is allowed to mature a minimum of 18 months on wooden shelves in special caves. During this process, each wheel is hand-turned to ensure proper aging and development of its deep, nutty flavor and granular texture. Try it with bold Cabernet Sauvignon or a bock beer like Shiner Bock.
BelGioioso Creamy Gorgonzola: Handcrafted and aged 90 days in special caves, master cheesemakers hand-rub each wheel with salt and pierce small holes into the rind of the cheese, allowing air to penetrate and facilitate the growth of beneficial mold. This care and craft creates an exceptionally earthy flavor and creamy texture. Cut right through the thin rind and spread on a baguette. Great when paired with a Harpoon Rec League or other light IPA’s.
Any of these ideas pique your interest? Visit us online or at your local store to find all of these pairing items!

KCC Hot Cocoa Cones by Jodie Fitz
Supplies Needed:
Price Chopper or Market 32 Paper Grocery Bag (or craft paper)
Double sided tape
Regular tape
Holiday wrapping paper
Cellophane
Ribbon
PICS Instant Hot Chocolate Packets
PICS Mini Marshmallows
PICS Snap and seal sandwich size bag
Tools Needed:
Scissors
Pencil
Bowl

Directions:
- Create a template on the paper bag or craft paper by flipping a bowl upside down and tracing it with a pencil. The bowl should be a medium sized bowl, approximately 8 “ in diameter. It does not have to be exact.
- Using scissors, cut out the paper circle. Note: You need a paper bag circle for every cone you create; it provides the stability to the cone.
- Lay the paper bag circle on top of wrapping paper, trace a circle and cut it out. Attach the two circles together with double sided tape.
- Draw a pencil circle in the center of each circle.
- Cut out a pie shaped triangular piece like in the video. It will look almost like a Pac-Man character.
- Roll the circle by overlapping the cut pieces until it forms a cone shape. Keep it in position by placing a double-sided piece of tape where the overlap pieces come together.
- Roll the hot chocolate packet and insert it into the cone.
- Fill the snap and seal bag about a third of the way full with mini marshmallows. Release the air before sealing it. Roll the empty end and tuck it into the cone. Tape it into place.
- Cut a square piece of clear cellophane. Place the pointed end of the cone in the center, bring the cellophane up around the cone and tie the top off with a ribbon.
Optional: Add a personal note and share with friends!
Where to Find Everything?
Paper Bags: Reuse a brown paper grocery bag. Or, you can purchase a roll of brown craft paper.
Double sided tape, regular tape, pencils & scissors: You can find these in the school supply aisle.
Holiday wrapping paper, cellophane and ribbon: You can find these items in the seasonal aisle, and also the greeting card section at Price Chopper/Market 32.
Hot Cocoa Packets: This is typically located in the coffee and tea aisle.
Mini Marshmallows: Typically found in the baking aisle.
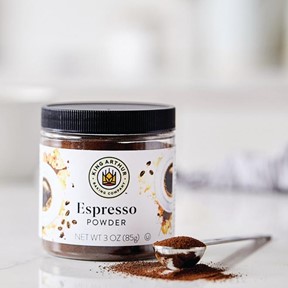
New Items: King Arthur Spices
Espresso Powder: A baker’s secret ingredient for rich chocolate flavor
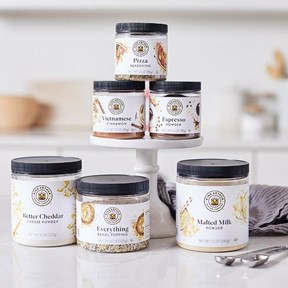
Now available in the Spice aisle, you can find King Arthur Baking Company’s most coveted test kitchen ingredients for better baked good: Espresso Powder, Vietnamese Cinnamon, Cheese Powder, Everything Bagel Topping, Pizza Seasoning, and Malted Milk Powder.
Imagine a secret ingredient that could make chocolate taste more like chocolate. Too good to be true, you’re thinking, but such a miracle exists: espresso powder.
A pinch of espresso powder greatly enhances and intensifies the chocolate flavor in brownies, cakes, and more — without transitioning your treat to mocha-flavored. Think of it as a supporting actor that helps the star ingredient shine, much like a pinch of salt takes the flavor of cookies from flat to robust, without adding any savory flavor.
Espresso powder is not the same as instant coffee. Espresso powder is made from darkly roasted coffee beans that have been ground, brewed, dried, and then ground to a very fine powder. It’s much more concentrated than instant coffee, which means you only need a teaspoon or so in your chocolate recipe to do the trick.
Don’t let the name fool you; in small amounts, espresso powder doesn’t add any coffee flavor to your baked goods. It merely makes chocolate tastes more intense and rich.
Try baking your favorite brownie recipe, any one you like, without espresso powder and with it. You’ll notice a subtle difference. The batch made with espresso powder will have a more complex, deep chocolate flavor. This is a particularly useful baker’s trick for enhancing less fancy chocolate: If you don’t want to spring for expensive cocoa powder or chocolate, adding espresso powder can help “dress up” the chocolate flavor.
Here are some favorite recipes: