


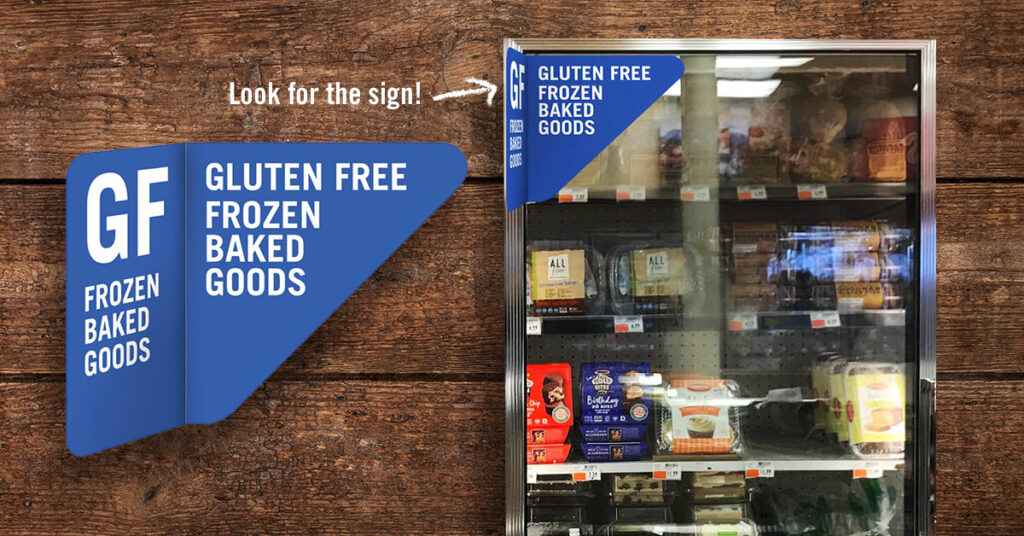
New Gluten Free Bakery Items
We’re excited to introduce our NEW line of gluten free bakery items! Now available in a specially marked case in select stores. Staying gluten free can be challenging, and we look forward to providing more options to our customers. Check out some of our new items!
Goodman Gluten Free Products: Launched in 2015 by Founder & CEO Bob Goodman, the Goodman Gluten Free Products mission is to “bring breakthrough taste to gluten free baked goods.” Goodman products are scratch-baked in dedicated gluten-dairy-peanut-soy free bakeries. We’re proud to now carry Goodman items such as, hamburger buns, hot dog rolls, bagels, breads, and cookies.
The Maine Pie Co.: Over the years, Jill Miller made a name for herself with her local favorite bakeries in both Nyack, New York and then Kennebunkport, Maine. She saw much success in her full-service bakeries, but after continuously hearing customers ask about gluten free options, Miller decided to do something about it. She created a moist and flaky gluten free pie crust, now used in Maine Pie Co’s products. We’re proud to offer Maine Pie Co. products such as, blueberry pie, apple pie, and even packs of pie shells.
Gluten-Free Natural Foods Cakes & Muffins: GFN Food Products LLC, are the makers of Gluten-Free Naturals line of baking mixes. These mixes are made in a dedicated gluten free area of their facility, using 100% gluten free ingredients. We’re proud to provide GFN items such as, lemon pound cake, blueberry muffins, chocolate cupcakes, and carrot cake cupcakes.
We’re excited to offer these new items from Goodman, The Maine Pie Co., and GFN in our stores. Be on the lookout for their items and more new gluten free bakery items from our friends at ALLfree Bakery, Inspired Gluten Free, Gillian’s, and Better Bites Bakery.
See the list below for participating locations
Torrington | CT |
Putnam | CT |
Newington | CT |
Middletown, CT | CT |
Pittsfield | MA |
Lenox | MA |
Marlborough | MA |
New Webster | MA |
Mountain St | MA |
Gardner | MA |
West Lebanon | NH |
Wilton | NY |
Cobleskill | NY |
Endicott | NY |
Newburgh | NY |
Amsterdam | NY |
Bethlehem | NY |
Clifton Shopper’s World | NY |
Loudon | NY |
Rome | NY |
Commercial Dr | NY |
Johnstown | NY |
Niskayuna | NY |
Catskill | NY |
Fulton | NY |
North Oswego | NY |
Eastern Parkway | NY |
Genessee St | NY |
Ogdensburg | NY |
Glenville | NY |
North Utica | NY |
Altamont Ave | NY |
Massena | NY |
East Greenbush | NY |
Westgate | NY |
Hudson Valley Plaza | NY |
Brunswick | NY |
Glen St | NY |
Route 50 | NY |
Plattsburgh | NY |
Erie Blvd | NY |
Western Lights | NY |
Cicero | NY |
Vails Gate | NY |
Edwardsville | PA |
Westfall | PA |
Barre | VT |
Bennington | VT |
Morrisville | VT |
Shelburne Rd | VT |
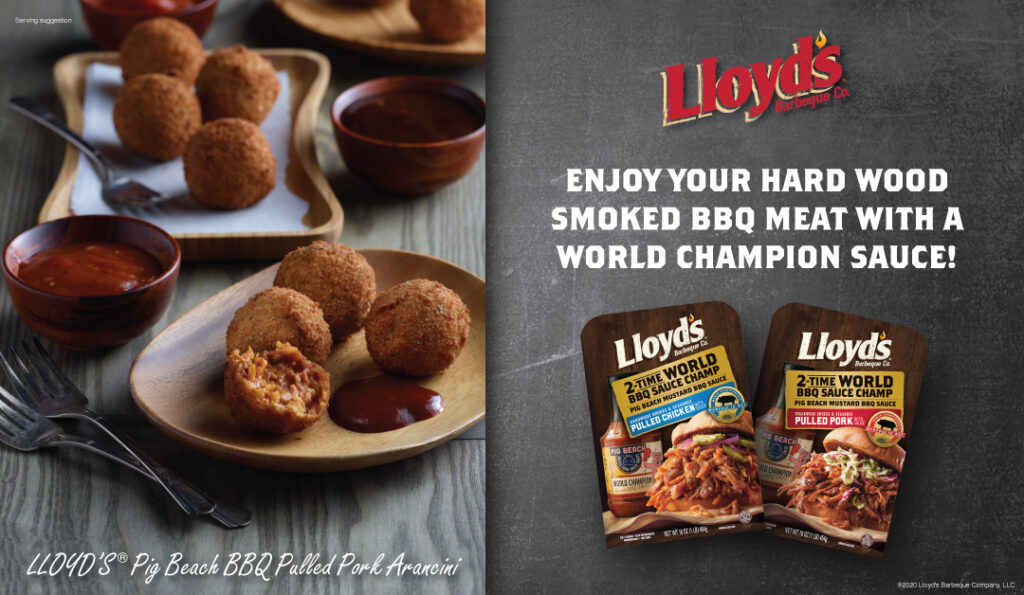
Enjoy your hardwood-smoked BBQ meat with a WORLD CHAMPION SAUCE!
A match made in BBQ heaven
What do you get when you combine a best-selling heat-and-serve barbeque partners with a two-time world champion barbeque sauce? Nothing less than pure deliciousness! The maker of the Lloyd’s® Barbeque brand recently announced its newest products – pecanwood-smoked pulled pork and hardwood-smoked chicken – made with Brooklyn-based Pig Beach’s mustard barbeque sauce.
“Barbeque is all about bringing families and friends together,” said Eric Jacobson, Lloyd’s® Barbeque brand manager. “Our new hardwood-smoked pulled meats made with Pig Beach mustard barbeque sauce are perfect for any backyard barbeque or hectic weeknight meal, bringing delicious and smoky competition-style authenticity to your plate.”
In 2014 and 2016, the Pig Beach mustard barbeque sauce was crowned the winner of the Memphis in May World Championship Barbecue Cooking Contest. Recognized by USA Today as the “most prestigious barbecue contest,” the four-day competition draws nearly 250 teams from all over the world.
More to the point, Pig Beach’s mustard barbeque sauce pairs beautifully with Lloyd’s® lightly seasoned hardwood-smoked pulled meats. Pig Beach’s founders are as enthusiastic as the team from Lloyd’s.
“The Lloyd’s® brand offers a meat that is moist, tender, flavorful and perfectly smoked, and is arguably better than a lot of barbeque that I’ve eaten at restaurants,” said partner Matt Abdoo.
“We are really excited and passionate about what’s in that package going out to consumers,” fellow partner Shane McBride added.
As an added bonus, the team at Lloyd’s Barbeque and Abdoo offered a melt-in-your-mouth Lloyd’s® Pig Beach BBQ pulled pork arancini. What premiered on the Pig Beach Instagram account is now yours to make at home. Check out the recipes here.
You can find Lloyd’s® Pig Beach products at select retailers across the United States.
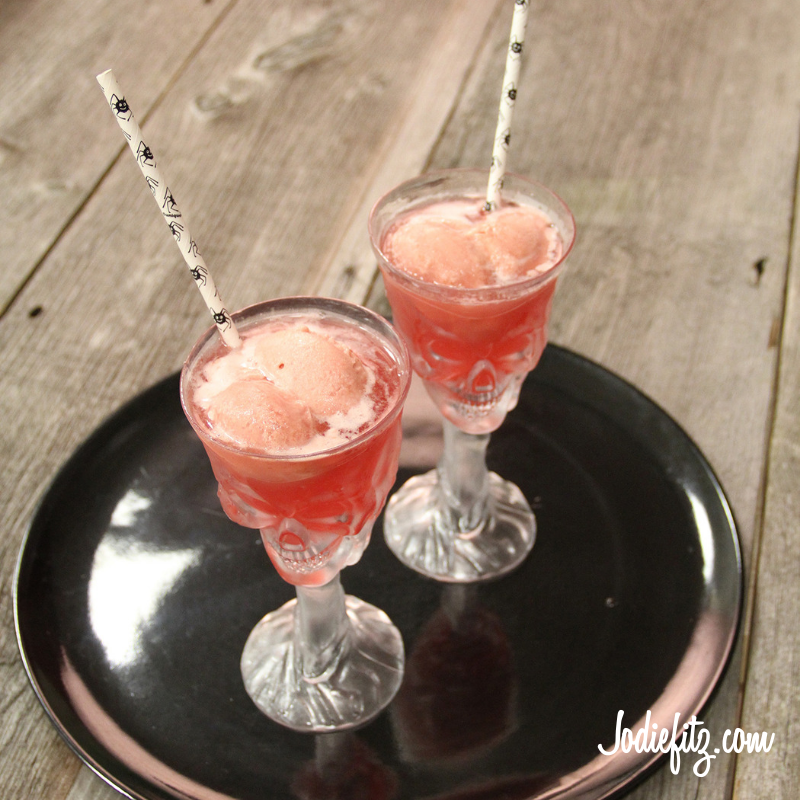
Beetle Juice
Beetle Juice, Beetle Juice, Beetle Juice! After you sip on this yummy blend you will definitely be calling out beetle juice three times.
It’s a fruity drink with just the right amount of fizz that’s fun and festive, but incorporates fresh, healthy ingredients .
Beetle Juice by Jodie Fitz
4 cups ice
2 lemons, fresh
2 cups water
½ cup PICS honey
½ cup PICS fresh frozen mixed berry medley
1 teaspoon PICS vanilla extract
1 teaspoon raspberry extract
Triple berry seltzer
PICS Raspberry sherbet (optional)
Cut the lemons in half. Squeeze the lemon juice from the lemons.
Note: If you have a citrus juicer simply squeeze the juice right into a blender pitcher. If you have to squeeze by hand, squeeze the juice into a glass or bowl first so that you can remove any seeds with a spoon before adding the juice to the blender.
Add the ice, lemon juice, water, honey, frozen mixed berry medley and extracts into the blender. Blend the ingredients together well.
Depending on the size of the glass, add 1 to 2 tablespoons of the triple berry seltzer to add fizz to the mix. Fill the rest of the glass with the blended fruit mixture.
The kids! Remember there are always valuable lessons to learn in every recipe. Here are a few with Beetle Juice…
- Blending
- Blender safety
- Measuring ingredients
- Following Directions
- Extracting juice from lemons
- Exploring healthier alternatives
The Brains! If you want to add a little dessert style fun add sherbet brains to the mix. If you want to keep it healthier, freeze some of the beetle juice without the seltzer in ice molds of either brains or bugs and add them to your finished drink before serving.
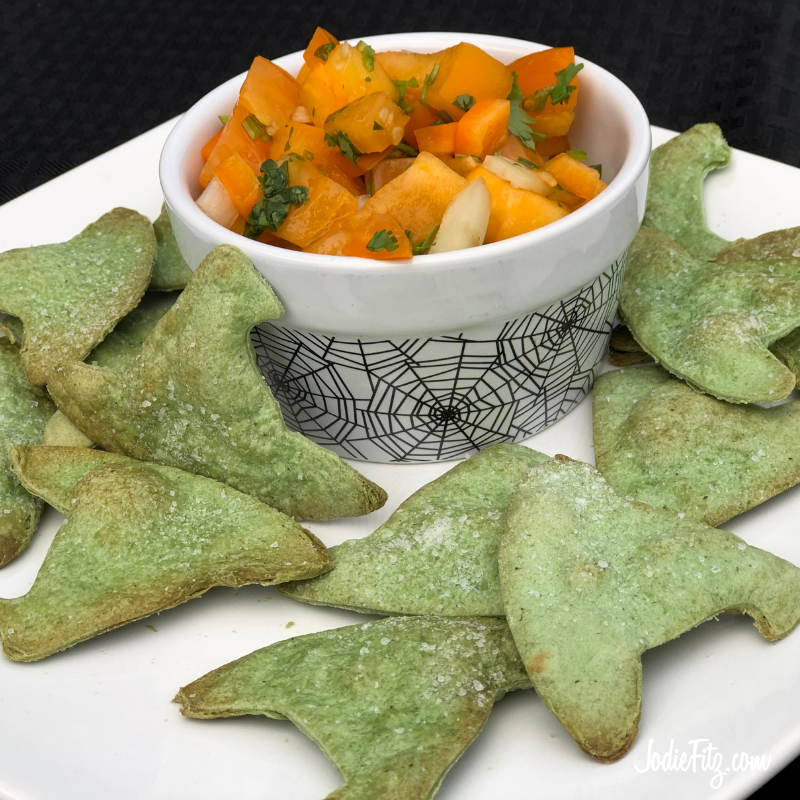
Basic Witch Hat with Homemade Chips
Looking for a healthy Halloween nosh? Look no further. Check out these festive homemade witch hat chips served with an orange Pico de Gallo salsa. The entire combination is total yum!
Basic Witch Hat Homemade Chips by Jodie Fitz
1 package of cedar spinach wraps
1 witch hat cookie cutter
2 tablespoons PICS canola oil
PICS Sea salt
Nonstick cooking spray
Place the spinach wraps, one at a time, on a cutting board. Use a cookie cutter to cut out witch hat shapes. Each cedar wrap should yield approximately 8 hats depending on the size of your cookie cutter.
Preheat the oven to 375 degrees.
Coat a nonstick baking sheet with the nonstick cooking spray.
Baste each hat lightly with the canola oil and then sprinkle them with sea salt.
Bake them for 5-7 minutes until the edges start to toast. Let them cook completely to finishing the crisping process.
Lessons and life skills to focus on when making this recipe with the kiddos:
- Basting
- Baking
- Oven safety
- Following directions
Homemade Pico de Gallo Salsa by Jodie Fitz
2 orange heirloom tomatoes, small
1 orange bell pepper
½ cup sweet onion, finely diced
1 small clove of garlic, minced
4 tablespoons fresh chopped cilantro
1 tablespoon PICS balsamic vinegar
Wash the tomatoes. Remove the top and bottom of the tomatoes. Slice the tomato and dice the tomato into small pieces.
Wash the bell pepper. Remove the top, seeds and insides of the peppers. Slice and dice the pepper.
Stir the diced tomatoes, the diced bell pepper, diced sweet onion, chopped cilantro and balsamic vinegar together.
Serve with your homemade witch chips.
Lessons and life skills to focus on when making this recipe with the kiddos:
- Dicing
- Knife safety
- Mincing
- Chopping
- Stirring
- Following directions
- Measuring ingredients
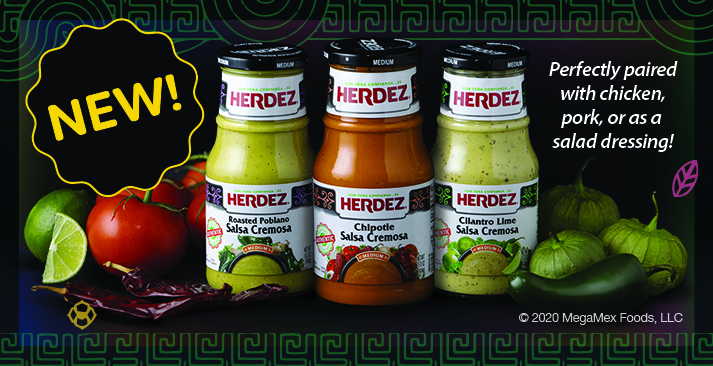
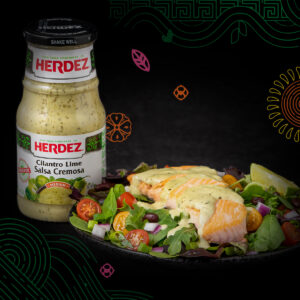
Herdez Salsa Cremosa
Pour on the flavor with endless possibilities. Inspired by generation of Mexican, this craveable combination of tangy tomatillos and lime with garlic and jalapeno will transform your fish tacos, grilled chicken or garden salad. A perfect addition to your daily dish. Check out our Salmon Salad featuring Cilantro Lime Salsa Cremosa! This hearty salad is sure to make a delicious lunch win!
HERDEZ® Roasted Poblano Salsa Cremosa
Excite your grilled chicken, pep up your shredded pork and make Taco Night a new adventure with the perfectly balanced flavors of roasted poblano peppers, garlic and cilantro. Try it over grilled chicken and pasta and as a dressing for your favorite cobb salad.
HERDEZ® Chipotle Salsa Cremosa
Inspired by Mexican cuisine from the ages, this creamy chipotle salsa will flavor your favorite dishes in a whole new way. Pour over chicken or pork, top your favorite taco or create something new your family will love.

Downy Defy New Items
DOWNY DEFY:
Tired of your clothes stretching, fading and fuzzing?
Clothes are exposed to a lot of damage in the washing machine. Instead of avoiding laundry or having anxiety every time you wash, give your clothes the protection they can’t live without.
Downy DEFY Damage Total-Wash Conditioning Beads protect your fabrics: from the first wash, you’ll notice the damage protection as an elevated feel of your fabrics. With consistent use, you’ll see that Downy DEFY protects the shape, color, and appearance of your favorite garments. Not to mention that even in-wear, your clothes will become more resilient and comfortable! Delight in how soft your favorite clothes feel and how good they smell with the airy and awesome scent of Fresh.
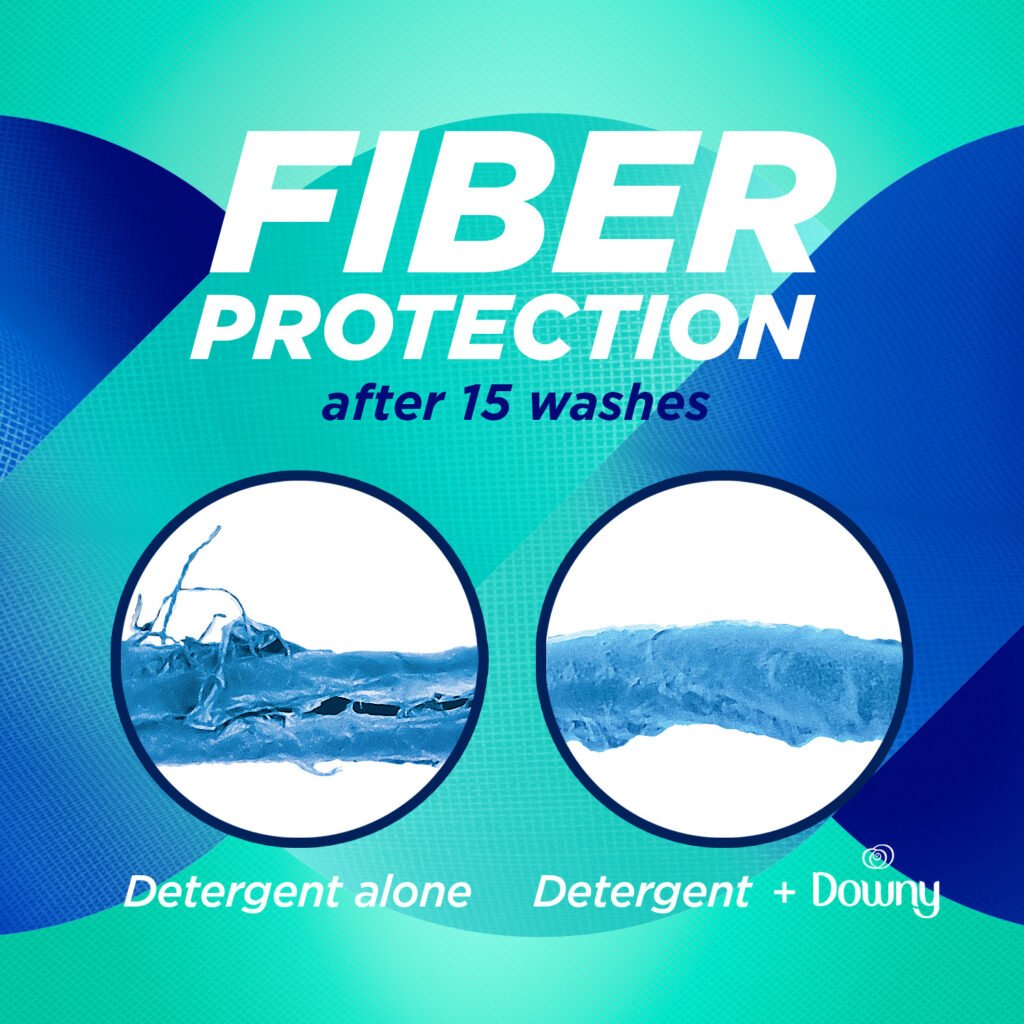
Compatible with all washers, including HE washing machines: just toss a scoop of laundry beads from the convenient tub into your washer. The best part? Downy DEFY works with your favorite detergents and can be paired with scent beads and fabric softener for an extra boost.
Are you ready to protect your fabrics against stretching, fading and fuzzing? Keep your clothes looking newer longer. Visit the laundry aisle to add the protection of Downy DEFY to every wash.

KCC Sun's Up Smoothie
by Jodie Fitz
3 cups ice
2 cups PICS 100% orange juice
1-cup PICS low fat milk
½ cup 100% pure carrot juice
1 banana
6 oz. PICS low fat vanilla yogurt
1 teaspoon PICS vanilla extract
1 tablespoon PICS honey
Add the ice, orange juice, milk, carrot juice, banana, yogurt, vanilla extract and honey into a blender. Blend the ingredients until the ice is fully crushed.
Serve and enjoy! After all, who doesn’t want to start their day with a cup of sunshine?
More on the Sun’s Up Smoothie Ingredients:
Dairy Allergies:
- The Milk: If you have a dairy allergy, replace the milk with your favorite dairy alternative. Depending on your allergy concerns, I suggest you consider rice milk or coconut milk for this recipe. The rice milk is very gentle in flavor. It allows the other flavors to ‘shine’ in this smoothie recipe. It does make the mixture a little icier. If you use coconut milk it adds a bit of a tropical flavor to this mix and is creamier. However, always use alternatives based on your dietary needs.
- The Yogurt: Replace the yogurt with one of your favorite vanilla dairy free yogurt alternatives based on your dietary needs. There are many great options on the market.
Leftovers? No worries turn them into freeze pops! Pour the leftovers into the 7 oz. PICS paper coated cups and place them in the freezer for one hour. Then add a wooden craft stick to the center and let them freeze overnight.
Carrot Juice: 100% carrot juice can be found in the produce aisle at Price Chopper/
Market 32 Supermarkets. There is also a delicious blend of 100% carrot juice with turmeric and ginger added.
Lessons for Children when making this smoothie recipe;
- Measuring ingredients
- Pouring
- Blending
- Blender Safety
KCC Crustless Sandwich Pockets
by Jodie Fitz
OPTION 1:
2 slices of honey wheat bread
2 tablespoons PICS Peanut butter
1 tablespoon PICS Honey
1 Banana
PICS Cinnamon
Cut the bread slices with a large circle cookie cutter to create circular shapes.
Stir the peanut butter and honey together. Spread it on one side of each of the circles.
Cut half of the banana into thin slices. Add several slices onto one side of the peanut butter and sprinkle a light coat of cinnamon on top of the banana pieces.
Add the other piece of bread to create a sandwich.
Using a fork, press around the edges of the circle so that it forms a sandwich pocket.
OPTION 2:
2 tablespoons PICS vegetable cream cheese
1 tablespoon of ranch dressing
Cucumber, sliced thin
Cut the bread slices with a large circle cookie cutter to create circular shapes.
Stir the cream cheese and ranch dressing together. Spread it on one side of each of the circles.
Add the cucumber slices to one side.
Add the other piece of bread to create a sandwich.
Using a fork, press around the edges of the circle so that it forms a sandwich pocket.
More thoughts:
PICS Vegetable Cream Cheese can be located near the bagels at your local Price Chopper/Market 32 Stores.
Ranch Dressing: Use your favorite. My personal favorite is the avocado ranch dressing located in the produce aisle at Price Chopper/Market 32 Supermarkets.
Lessons for Children when making this recipe;
- Measuring ingredients
- Stirring
- Spreading
- Slicing
- Knife safety
- Following directions
NY Apple Recipe Roundup - 10 Ways to Love a Bag of Apples
Ellie Wilson
MS RDN
Apples From New York™ are in season, and in the store! One of our favorite Home.grown crops, New York Apples are a quick snack, or a culinary chameleon – so versatile and easy to enjoy! Making your way through a bag or tote of New York apples is a smart way to add flavor, fiber, crunch and nutrition benefits to every meal and snack. Check out this fun recipe roundup that will make you look forward to that apple-a-day in some new ways!
New York apple agriculture is very important – New York is second in the USA for apple production. The farm families that grow apples are multi-generational stewards that carefully nurture the land and trees, to ensure you get delicious, nutritious fruit for your family meals. September is #FamilyMealsMonth, no better time to explore new ways to eat well as a family, and add some new meal and snack ideas if you are navigating new school routines and need some inspiration.
Home schooling? Use the website resources and crunch on apples as you learn about farming, local foods, cooking, history, agriculture, science, and nutrition – children of all ages will love these lessons!
Store smart – keep apples crunchy and fresh by storing in the refrigerator or a cool, dry space. Wash apples before using for recipes or snacks by rubbing skins briskly under cool running water.
Apple-palooza!
- Simple snack – grab that apple for a mid-morning crunch or afternoon munch.
- Slice and serve – apple slices are a super snack, and easy with an apple slicer. Pack them fresh with a squeeze of lemon to keep them from browning, dip into PICS Peanut Butter or dust with cinnamon for a fresh twist.
- Breakfast boost – grated fresh apples are a quick and easy addition to overnight oats recipes, PICS yogurt parfait (vanilla/apple/walnuts/yum!) – love them on my PICS Shredded Wheat cereal with milk!
- Salad savvy – Chopped apples are a great addition to salads, including many of the fresh salad kits in the store. Try any one of your favorite apple varieties with Fresh Express Poppyseed, Sweet Kale or Honey Pecan salads. Some PICS Cheddar Cubes or pulled Market 32 Rotisserie Chicken make the meal in just a minute!
- Sandwich smart – PICS Flour tortillas/pita or your favorite Market 32 Bakery bread are a great base for a ham or turkey/apple/cheddar quesadilla or panini. Pulled pork with grated apple or a side of apple coleslaw with pecans are fresh takes on old favorites. Or, try your new favorite Chicken Apple Kale Slaw Wrap.
- Snack attack – No-bake apple “donuts” will win the day and sneak some nutrition into afternoon snacks. Peel and core two apples, then slice into rings. Spread peanut or almond butter (you can call it icing, we won’t tell!) on one side of the ring, and top with crushed cinnamon cereal, nuts, pretzels or even sprinkles.
- Sweet and savory – New York apples will help you make quick dinner magic with some fresh takes on sheet pan and skillet meals. Each meal below serves 4.
- Apple Panko Skillet Chicken – (4) Market 32 Apple Panko Chicken Cutlets, made fresh in the Meat Department, sautéed in PICS Olive Oil until done (160F) – pair them up with a quick New York apple and onion sauté and a warm fresh Bakery cornbread muffin.
- Apple Sheet Pan Dinner – Chop (2) New York apples, (2 small) yellow onions, and (2 medium white or yellow) potatoes in a one- inch dice. Add 1 bag (fresh or frozen) Brussels sprouts and place on an oiled sheet pan with (about 1 Lb.) Market 32 Chicken Tenders or Skinless Thighs, OR Market 32 Sweet Chicken or Italian Sausage, OR cubed pork tenderloin. Roast at 400F for about 30 minutes, or until meat is done (160 F) and vegetables are tender and caramelized. If using sausage, be sure to turn them once during cooking.
Apple Cider Chicken and Cabbage – Place aluminum foil in a sheet or roasting pan, oil lightly with PICS Olive Oil or vegetable oil spray. Lay about 1 Lb. of Market 32 Skinless Chicken Breasts in the center. Surround with (3-4) peeled, chopped New York apples. Roast for 25 minutes at 350F, then baste with ½ cup of New York Apple Cider mixed with 1 tsp PICS Dijon Mustard. Roast for an additional 10 minutes, until chicken is 145F and apples are tender. Serve with warm Market 32 Bakery rolls and sautéed fresh cabbage.
Fun in the Kitchen
The Price Chopper Kids Cooking Club has some amazing apple recipes, like this one for Apple Pie Ice Cream Apple Pie Ice Cream. Cooking and baking can be part of home -schooling lessons – measuring ingredients promotes math skills, and reviewing recipes supports reading and science skills.
Learn more about the many varieties of home.grown. Market 32 New York apples you can find in our stores. Tips, hacks and amazing recipes can all be found here. Enjoy!
Peanut Butter and Jelly Smoothie Bowl
by Jodie Fitz
1 – 1 ½ cups PICS frozen fresh strawberries
1 cup PICS Greek vanilla yogurt
¼ cup PICS honey
1 teaspoon PICS vanilla extract
Place the frozen strawberries, Greek yogurt, honey and vanilla extract into a blender or food processor. Blend until the ingredients form into a soft serve ice cream consistency.
Scrape the mixture into a bowl and top it with the following;
- 2 tablespoons PICS peanut butter
- Granola cereal
- Organic coconut flakes
- Chia seeds
- Flax seed, ground
- Fresh strawberries
Enjoy!
More thoughts on the Peanut Butter and Jelly Smoothie Bowl:
Dairy Allergies? Replace the Greek vanilla yogurt with your favorite dairy free yogurt alternative. There are several great options depending on your needs in the dairy aisle at your Price Chopper/Market 32 Supermarkets.
Peanut Allergies? Substitute the peanut butter for WOWButter®. It’s a peanut/tree nut free alternative located in the allergy friendly aisle at Price Chopper/Market 32 stores.
Lessons for Children when making this smoothie recipe;
- Measuring ingredients
- Blending
- Blender/Food Processor Safety
- Following directions
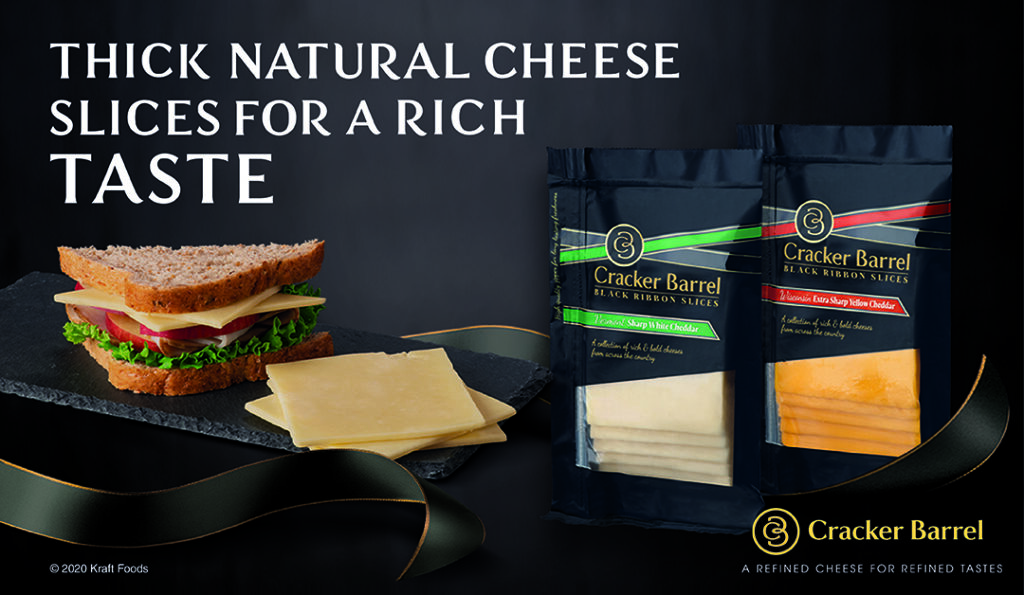
Checking Out - Cracker Barrel Sliced Cheeses
Ellie Wilson
MS, RDN Senior Nutrionist
Cheese please! Cracker Barrel cheeses have been pleasing Americans for generations. The brand was launched in 1954 by Kraft, a heritage brand itself in cheese, as a premium product named for the tradition of socializing around the cracker barrel, an icon of small general stores. Friends and neighbors would gather around the cracker barrel, and spend time connecting, sharing and creating stronger communities.
The sliced cheeses of the Cracker Barrel line, found in the dairy aisle, bring favorite flavors to the table, with Extra Sharp Wisconsin Yellow Cheddar, Heartland Swiss, Wisconsin Mozzarella, Vermont Sharp White Cheddar tapping into dairy traditions from around the U.S. Consistently rich in flavor, the award-winning cheeses are made with proprietary heritage starter cultures that have been part of the Cracker Barrel tradition for over 50 years. The signature black packaging is easy to open and zips closed to maintain freshness. These packages are also very portable, great for day trips and picnics, when you want to grab and go.
Cheese and dairy are getting fresh research on benefits – the matrix of nutrients in dairy includes being a good source of calcium and protein, and using sliced cheeses helps those working on managing calories and serving sizes. Sliced cheeses are a convenient and quick way to top dishes with flavor as they finish cooking, add a creamy layer of flavor in a casserole or sandwich, or power up a quick snack of cheese and (of course) crackers!
With shoppers looking for ways to eat something interesting, and reduce food waste, exploring ways to update leftovers with cheese is a win-win. Leftover grilled chicken? Add some pasta sauce and a slice of Wisconsin Mozzarella for a quick new meal. Leftover veggies? Top with a slice of Extra Sharp Wisconsin Cheddar for a quick flavor boost. Powering up produce? Pair sliced apples and Vermont White Cheddar for a sweet and savory snack! Enjoy!